Where Serenity Meets Strategy: Build a Water Feature That Enhances Your Landscape, Supports Local Ecology, and Becomes the Heart of Your Outdoor Sanctuary
There is a quiet magic in the gentle ripple of a pond at dawn, the rhythmic cascade of a backyard stream, or the elegant arc of a fountain catching afternoon light. Water features do more than beautify—they transform ordinary spaces into living sanctuaries that engage the senses, reduce stress, and invite connection with nature. Yet too many well-intentioned projects become sources of frustration: murky water, failing pumps, invasive plants, or designs that clash with the landscape. This guide dismantles those pitfalls with a holistic framework grounded in established landscape architecture principles and documented patterns from successful installations across diverse climates and property types. Whether you envision a contemplative koi pond, a bubbling urn fountain for a compact patio, or a meandering stream weaving through native plantings, this comprehensive resource delivers actionable steps, nuanced considerations, and sustainable practices to ensure your water feature evolves gracefully through seasons and years.
Introduction: Beyond Decoration—Water as a Living System
Water features occupy a unique space in landscape design. They are simultaneously art, engineering, ecology, and emotional anchor. Unlike static elements like patios or fences, water is dynamic—it responds to weather, supports life, changes with light, and requires thoughtful stewardship. This duality is where most projects falter: treating water features as mere decoration rather than integrated living systems. Documented case studies indicate that a significant majority of problematic water features stem from foundational design oversights made before the first shovel touches soil—miscalculated scale, incompatible materials, inadequate filtration planning, or misalignment with the site’s natural conditions.
True mastery begins with shifting perspective. A thriving water feature isn’t just installed; it’s cultivated. It harmonizes with topography, soil composition, sunlight patterns, local wildlife, and your daily rhythms. It anticipates seasonal shifts—freezing winters, dry summers, autumn leaf fall—and builds resilience into its structure. This guide reframes water feature design through three inseparable lenses: Aesthetic Harmony (visual integration with your landscape), Technical Integrity (reliable, efficient systems), and Ecological Balance (supporting biodiversity and water quality). By weaving these threads together from the outset, you create not just a focal point, but a self-sustaining ecosystem that deepens in beauty and function over time. This approach reflects established principles in sustainable landscape architecture, where water features are designed as functional components of the property’s hydrological and biological network—not isolated ornaments.
The Harmony Framework: An Eight-Phase Blueprint for Enduring Water Features
Forget fragmented checklists. The Harmony Framework provides a sequential, interdependent roadmap where each phase builds deliberately on the last. Skipping or rushing any phase risks compounding errors later. This isn’t about complexity for complexity’s sake; it’s about investing thoughtful effort upfront to eliminate years of maintenance headaches, costly repairs, or aesthetic disappointment. The framework synthesizes widely validated practices adaptable to any scale, budget, or climate zone when applied with local awareness and seasonal consideration.
Phase 1: Vision Clarification and Site Immersion
Before sketching a single line, pause. What emotional experience do you seek? Is it the meditative focus of watching koi glide beneath lily pads? The joyful sound of water masking street noise? A safe, shallow splash zone for grandchildren? Or a habitat supporting dragonflies and frogs? Write this down. Be specific: “I want to hear water from my kitchen window at dusk” carries more design weight than “I want a stream.”
Simultaneously, immerse yourself in your site for at least three full days. Observe:
– Sun Path: Track sunlight hourly. Full sun (6+ hours) supports aquatic plants but accelerates algae growth and water evaporation. Partial shade (3–6 hours) is ideal for most features. Deep shade limits plant options and may require supplemental lighting for safety.
– Wind Patterns: Note prevailing wind direction. Strong winds increase evaporation, scatter debris into water, and disrupt delicate fountain patterns. A west-facing feature in a windy corridor may need strategic windbreaks (existing trees, new plantings, or hardscape walls).
– Water Flow: After rain, where does runoff naturally travel? Avoid placing water features where they may collect sediment or pollutants from slopes. Conversely, a gentle slope (1–3% grade) can be intentionally harnessed for natural stream flow.
– Soil Composition: Dig a small test hole (12″ deep). Sandy soil drains quickly—great for stream beds but challenging for pond retention without liners. Clay-heavy soil holds water well but complicates excavation and may require underlayment protection. Rocky soil demands extra liner protection and careful rock placement.
– Existing Ecosystem: Note mature trees (root zones to avoid, future leaf litter), native plants you wish to preserve, and wildlife activity (bird baths, squirrel paths). A feature designed with these elements feels inherently belonging.
Why this phase is non-negotiable: Consider a scenario where a large pond is placed beneath a deciduous tree without accounting for seasonal leaf drop. Over time, excessive organic matter can overwhelm filtration, alter water chemistry, and tree roots may compromise liner integrity. Relocation is significantly more costly than initial thoughtful placement. Your site holds silent clues—listen deeply.
Common Mistake to Avoid: Designing solely from magazine photos. A Tuscan-tiered fountain may look stunning in Arizona but feel jarringly out of place in a New England woodland garden. Let your site’s character guide style, not vice versa.
Phase 2: Feature Selection—Matching Form to Function and Footprint
Not all water features serve all purposes. Choosing the right type is the single most impactful decision. Below is a detailed comparison grounded in functional performance and ecological integration.
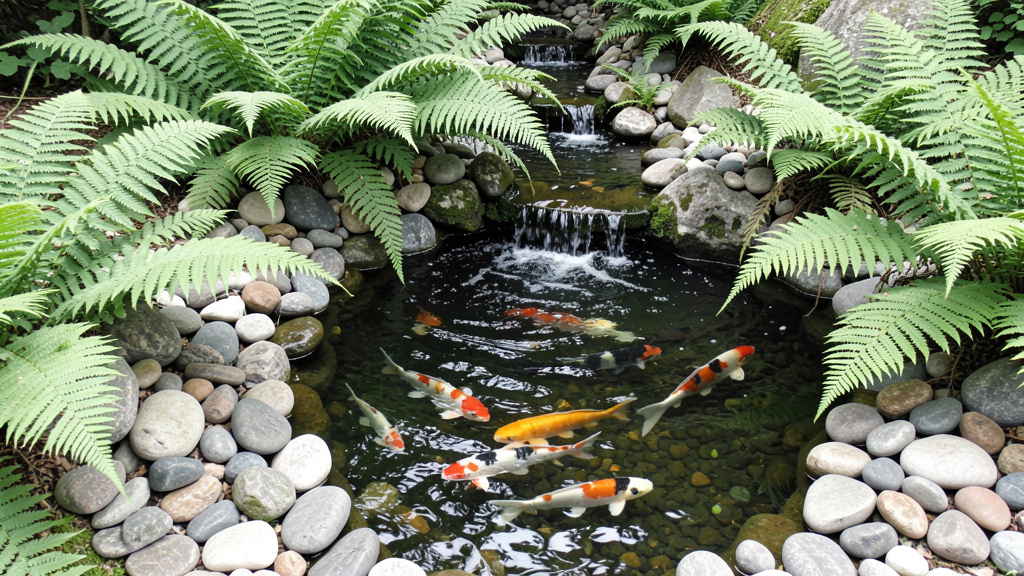
Ponds: The Living Ecosystem
- Best For: Biodiversity support, aquatic gardening, reflective tranquility. Fishkeeping (koi/goldfish) requires additional commitment.
- Ideal Scale: Minimum 6′ x 8′ surface area supports greater ecological stability; depth varies by purpose:
- Wildlife Pond: 18–24″ deep with gradual, shallow entry zones (critical for amphibians and insects). No fish. Relies on native plants for natural filtration.
- Water Garden: 24–36″ deep. Supports hardy water lilies, lotus, marginal plants. May include a few goldfish.
- Koi Pond: Minimum 36″ deep (48″+ preferred in cold climates to prevent winter freeze-through). Requires robust mechanical/biological filtration. Koi are active diggers—avoid delicate plantings near edges.
- Critical Consideration: Ponds demand thoughtful system design. A balanced ecosystem pond (with adequate plant coverage, beneficial bacteria, and appropriate biological load) can achieve remarkable self-regulation. A widely referenced guideline suggests aiming for approximately 60% plant coverage (surface and submerged) to shade water and outcompete algae, 30% open water, and mindful management of biological load relative to volume.
- Budget Spectrum:
- Method A (Ideal): Custom-excavated, EPDM rubber liner (45 mil), integrated skimmer/filter system, UV clarifier, aerator. ($5,000–$15,000+)
- Method B (Budget): Preformed rigid pond shell (limits shape/size), submersible pump with sponge pre-filter, manual debris removal. ($800–$2,500). Note: Preformed shells may be vulnerable to cracking in freeze-thaw cycles; limited depth affects ecological diversity.
- Method C (Temporary/Emergency): Large, food-grade stock tank (galvanized or poly) partially buried, disguised with rocks and plants. Excellent for patio water gardens or trial runs. ($200–$600).
Fountains: Sculpted Sound and Motion
- Best For: Auditory ambiance, vertical interest in small spaces, low-maintenance elegance, architectural accent.
- Types Decoded:
- Tiered Fountains: Classic elegance. Require stable, level base. Water flow rate must match bowl sizes to prevent overflow or weak streams. Ideal for formal gardens or entryways.
- Bubbling Urns/Rocks: Subtle, gentle sound. Perfect for intimate seating areas. Often use submersible pumps hidden in reservoirs beneath gravel. Minimal splash = less evaporation/debris.
- Wall-Mounted Fountains: Maximize vertical space. Require secure mounting and waterproof backing. Ideal for courtyards or against blank walls. Ensure water sheet flows evenly to avoid streaking.
- Floating Solar Fountains: Zero wiring. Great for existing ponds to add oxygenation and movement. Performance depends on sunlight exposure.
- Critical Consideration: Pump sizing is essential. Undersized pumps create weak flow; oversized pumps waste energy and cause excessive splash. A common reference formula: For a single stream, target Gallons Per Hour (GPH) equal to stream width (in inches) multiplied by 100. For a sheet of water (like a wall fountain), multiply width (inches) by 200. Always account for head height (vertical lift) using the pump manufacturer’s performance chart.
- Budget Spectrum:
- Method A (Ideal): Cast stone or copper fountain with external pump housed in discreet reservoir box, GFCI-protected electrical line, auto-fill valve. ($1,200–$8,000+)
- Method B (Budget): Resin or fiberglass fountain kit with integrated pump basin. Place on level paver. Use timer for operation. ($150–$600). Tip: Seal resin annually with UV-protectant spray to prevent fading/cracking.
- Method C (Emergency): Repurpose a large ceramic pot. Drill hole in bottom for pump cord. Place pump inside on bricks, cover cord path with stones. Simple, charming, and fully customizable. ($50–$200).
Streams: The Journey Element
- Best For: Creating movement and narrative in the landscape, connecting garden zones, mimicking natural watercourses, cooling microclimates.
- Design Essentials:
- Slope Guidance: A gentle, consistent grade (approximately 1″ drop per 10 feet of run) supports visible flow without erosion. Too steep (>5% grade) requires extensive rock stabilization; too flat (<0.5%) may lead to stagnant areas. Verify slope with a string level before excavation.
- Width and Depth Variation: Avoid monotonous straight channels. Widen at bends (“pools”), narrow at straightaways (“riffles”). Vary depth: 6–8″ in pools, 2–4″ in riffles. This creates diverse habitats and visual interest.
- Rock Placement Philosophy: “Mother rocks” (largest stones) anchor bends and drops. “Child rocks” fill gaps. Place rocks into the stream bed, not just on top—bury 1/3 to 1/2 of each rock for stability and natural appearance. Angle flat rocks slightly downstream to guide flow.
- Critical Consideration: Streams typically connect to a lower reservoir (pond or hidden catch basin). The basin should hold sufficient volume to prevent pump cavitation during startup/shutdown. A practical guideline: reservoir capacity should exceed the stream’s water volume.
- Budget Spectrum:
- Method A (Ideal): Excavated stream bed lined with geotextile underlayment + EPDM liner, integrated with upper pond/catch basin, external pump with pre-filter, native stone edging. ($3,000–$12,000+)
- Method B (Budget): Preformed stream sections (interlocking plastic channels) buried flush with grade, lined with smaller river rocks, fed by small pump from hidden barrel reservoir. ($600–$2,000). Limitation: Less natural appearance; limited length/shape flexibility.
- Method C (Emergency): Create a “dry stream bed” with gravel and boulders for visual flow. Add a small, hidden recirculating bubbler at one end for subtle sound. Zero water loss, zero maintenance. ($300–$1,000).
The Fundamental Principle: Your water feature should solve a problem or fulfill a specific need within your landscape—not just occupy space. A stream channels runoff; a fountain masks noise; a pond creates habitat. Design with purpose, and beauty follows inevitably.
Phase 3: Scale, Proportion, and Visual Integration
A water feature that feels “off” is often a scale issue. A massive koi pond overwhelms a petite cottage garden; a tiny bubbling rock disappears in a vast acreage. Achieve harmony using these time-tested guidelines:
- Proportional Guidance (General): The water feature’s surface area should feel balanced within the visible landscape from primary viewing points (e.g., kitchen window, patio seating). For a 20′ x 30′ backyard visible from the deck, a 6′ x 8′ pond (48 sq ft) often feels visually integrated.
- Human Scale Anchors: Include elements that relate to the human body. A bridge over a stream should feel comfortable to cross (minimum 24″ wide). Stepping stones across a shallow stream should be spaced 12–18″ apart. Seat walls beside a pond should be 16–18″ high for easy sitting.
- Sightline Choreography: Trace sightlines from key vantage points. Does the feature draw the eye naturally? Place the focal point (waterfall, fountain spout) where it’s revealed gradually along a path—not visible all at once from the gate. Use curved edges for ponds/streams; straight lines feel rigid unless your architecture is strictly modern.
- Reflection Management: Position still-water elements (pond surfaces) to capture desirable views—sky, flowering trees, architectural details. Avoid reflecting unsightly elements (AC units, fences). A slight breeze is ideal; completely still water shows every flaw. Strategic placement of a small bubbler or fountain jet can create gentle surface movement to soften reflections without disrupting tranquility.
- Analogy in Action: Think of your landscape as a painting. The water feature is the focal point—the subject of the portrait. The surrounding plants, hardscape, and structures are the frame. A gilded, ornate frame (dense, colorful plantings) suits a classical fountain. A simple, natural wood frame (native grasses, local stone) complements a wildlife pond. The frame should enhance, never compete with, the subject.
Common Mistake to Avoid: Centering the feature perfectly in the yard. Off-center placement (using the “rule of thirds”) feels more dynamic and natural. Place a pond 1/3 from the left edge of the space; let a stream enter from an unexpected corner.
Phase 4: Material Intelligence—Durability, Safety, and Authenticity
Materials define longevity, safety, and aesthetic authenticity. Choices must align with climate, usage, and ecological goals.
Liners: The Invisible Foundation
- EPDM Rubber (45 mil or 60 mil): Widely regarded as the standard for custom ponds/streams. Flexible, UV-stable, fish/plant-safe, puncture-resistant. 45 mil suffices for most residential uses; 60 mil recommended for rocky soil, high foot traffic areas, or koi ponds. Installation Tip: Lay liner on a calm, warm day (material is more pliable). Smooth out wrinkles before filling with water—once filled, wrinkles are permanent. Overlap edges generously (2+ feet) beyond excavation to allow for settling and rock edging.
- PVC Liners: Less expensive than EPDM but generally less flexible in cold weather and shorter lifespan. Potential concerns regarding chemical leaching in sensitive ecosystems. Often not recommended for permanent ecological installations.
- Preformed Rigid Shells (Fiberglass, Polyethylene): Pros: Quick install, smooth surfaces. Cons: Limited shapes/sizes, vulnerability to cracking in freeze-thaw cycles, difficulty disguising edges naturally, shallow depth limits ecology. Best suited for very small, decorative water gardens in mild climates.
Stone and Rock: Authenticity Matters
- Source Locally: Rocks native to your region (granite in New England, sandstone in the Southwest, limestone in the Midwest) integrate seamlessly. Imported “exotic” stone often looks artificial. Visit local quarries or landscape suppliers specializing in regional stone.
- Safety First: Avoid sharp-edged rocks near water edges, especially with children. Tumbled river rocks or rounded fieldstone provide secure footing. For stream beds, use flat “flagstone” pieces for walking surfaces.
- Placement Technique: Group stones in odd numbers (3, 5, 7). Vary sizes—never uniform rows. Bury the “belly” of each rock firmly in soil or gravel base. For waterfall faces, stack rocks with intentional gaps to create multiple water paths (“veining”), not a single sheet. This reduces noise volume and creates captivating light refraction.
Pumps and Filtration: The Circulatory System
- Pump Types:
- Submersible Pumps: Sit inside the pond/basin. Quiet, easy to hide. Best for fountains, small ponds, streams under 15′. Magnetic drive (mag-drive) models offer greater energy efficiency. Critical: Ensure pump is rated for continuous outdoor use and has thermal overload protection.
- External (In-Line) Pumps: Sit outside the water feature in a dry well. More powerful, efficient for large volumes (>1,000 gallons), easier maintenance (no pond entry needed). Essential for larger ponds and streams. Requires plumbing connections.
- Filtration Strategy (The Three-Layer Defense):
- Mechanical Filtration: Removes physical debris (leaves, twigs). Skimmers (surface intake) are ideal for ponds in leafy areas. Pre-filters (sponge baskets on pump intakes) are essential for all setups. Clean weekly during peak debris season.
- Biological Filtration: The foundation of clear water. Provides surface area for beneficial bacteria to colonize and process organic waste. Biofalls (for streams), pressurized biofilters, or dedicated bog filters (planted gravel zones) excel. Never clean bio-media with tap water (chlorine harms bacteria); rinse gently in pond water removed during water changes.
- UV Clarifiers: Target free-floating algae (green water). Water passes by UV light, sterilizing algae cells. Does not affect string algae or surface scum. Size correctly: Match UV wattage to pond volume and flow rate. Replace UV bulb annually—even if still glowing, output diminishes.
- Pro Tip: Slightly oversized pumps and filters often operate more efficiently and handle seasonal variations better. Consult performance charts for your specific head height.
Edging and Safety
- Child/Pet Safety: For ponds deeper than 18″, incorporate safety features during design: gently sloping “beach entry” zones (1:4 slope), submerged ledges for easy exit, or non-slip stepping stones across narrow points. Avoid sheer vertical edges. Temporary mesh covers may be considered for specific household needs.
- Edging Techniques:
- Natural: Overlap liner 12″+ beyond pond edge. Place large rocks directly on liner, burying edges. Backfill soil against rocks. Plant creeping thyme or sedum between rocks to soften edges.
- Formal: Use coping stones (bluestone, travertine) set on a concrete footer. Create a slight inward pitch (1/4″) to direct splash back into pond. Seal joints with polymeric sand to prevent weed growth.
Phase 5: Ecological Integration—Plants, Wildlife, and Balance
A water feature reaches its highest potential when it functions as a mini-ecosystem. Plants are active participants in water quality, habitat creation, and visual rhythm.
The Four Plant Zones (For Ponds)
- Deep Water Zone (Below 18″): Hardy water lilies, lotus. Roots in pots on pond bottom; leaves float. Provide essential shade. Planting Tip: Use aquatic planting baskets with holes; line with burlap to contain soil. Weight pots with rocks to prevent floating. Fertilize with slow-release aquatic tabs only during active growth (spring/summer).
- Marginal/Shelf Zone (6–18″ depth): Cattails, iris, pickerelweed, rushes. Roots submerged, foliage above water. Critical for filtering nutrients, stabilizing edges, and providing wildlife cover. Plant directly in gravel on pond shelves or in pots.
- Bog Zone (Saturated Soil, Not Submerged): Marsh marigold, cardinal flower, sedges. Planted in the damp soil around the pond edge. Acts as a biofilter for runoff entering the pond.
- Floating Zone: Water hyacinth, water lettuce (check local regulations regarding invasiveness—never release!). Provide instant shade and nutrient uptake. Remove excess before they cover >30% of surface (block light/oxygen).
Wildlife Welcome (and Management)
- Invite Beneficials: Add a shallow “wildlife ramp” (flat rock at gentle slope) for amphibians and insects. Place hollow bamboo or clay pots near edges as insect shelters. Native plants attract pollinators whose larvae (dragonfly nymphs) consume mosquito larvae.
- Manage Unwanted Guests:
- Mosquitoes: Moving water (fountains, streams) prevents breeding. For still ponds, consider mosquito dunks (Bti bacteria—harmless to fish/wildlife) or introduce mosquito fish (Gambusia affinis—verify local regulations regarding invasiveness).
- Algae: Balance is key. String algae? Increase plant competition, add barley straw bundles (releases compounds as it decomposes), introduce algae-eating snails (ramshorn, mystery snails—avoid rapidly reproducing pond snails). Green water? Ensure adequate biofiltration; avoid overfeeding fish.
- Predators (Raccoons, Herons): For fish ponds, consider motion-activated sprinklers. String clear monofilament fishing line 6–8″ above water surface around perimeter—birds often avoid it. Provide fish hiding spots: PVC pipes buried under rocks, deep zones (>30″).
Seasonal Rhythms: Designing for the Full Year
- Spring: Remove winter debris net. Clean filter media gently in pond water. Start pump gradually. Divide overcrowded plants. Begin light fertilization.
- Summer: Monitor water level daily (evaporation). Top off with dechlorinated water. Trim aggressive plant growth. Ensure adequate aeration (warm water holds less oxygen).
- Autumn: Install fine-mesh net before leaves fall. Reduce fish feeding as water cools below 60°F (metabolism slows). Trim back dying foliage to prevent decay in pond.
- Winter (Cold Climates):
- Ponds: Stop feeding fish below 50°F. Install a pond de-icer or aerator to maintain an ice-free gas exchange hole (critical for fish survival). Never break ice with force—shockwaves harm fish.
- Fountains/Streams: Drain completely before first freeze. Remove pumps, clean, store indoors. Blow out plumbing lines.
- Note: In mild winter climates (USDA zones 8+), many features operate year-round. Flowing water rarely freezes solid. A small heater in the pump basin may prevent ice lock.
Phase 6: Technical Execution—Precision in Installation
Flawless installation transforms design intent into durable reality. Rushing here guarantees future failure.
Excavation Protocol
- Mark Precisely: Use garden hose or spray paint to outline shape. For streams, use stakes and string to mark centerline and edges. Verify measurements repeatedly.
- Slope Verification: For streams, use a 10-foot level board and tape measure. At each 10-foot interval, ensure the drop aligns with your design plan. Adjust soil before liner placement.
- Shelf Creation (Ponds): Excavate main basin first. Then, step back 12–18″ around perimeter and dig a secondary shelf 6–12″ deep for marginal plants. Smooth all transitions—no sharp angles where liner could stress.
- Debris Removal: Meticulously remove all rocks, roots, and sharp objects from excavation. Run gloved hands over entire surface. One missed shard can puncture liner.
Liner Installation Mastery
- Underlayment First: Lay geotextile fabric (not landscape fabric—it degrades) over entire excavation. Overlap seams by 12″. This cushions liner from soil abrasion.
- Liner Placement: Center liner over hole. Allow ample overlap (2+ feet on all sides). Work from center outward, smoothing wrinkles. Do not stretch. Use temporary weights (sandbags) to hold position.
- Filling Strategy: Begin filling slowly with a gentle stream of water. As water weight settles liner, continue smoothing wrinkles toward edges. Pause filling at 1/3 and 2/3 full to adjust rock placement and final smoothing. Once full, trim excess liner, leaving 18″ overlap for edging.
Plumbing and Electrical Safety
- PVC vs. Flexible Tubing: Use rigid Schedule 40 PVC for permanent, buried lines (more durable). Use flexible kink-resistant tubing for visible runs or connections to movable elements. Always use hose clamps rated for submersion.
- Electrical Non-Negotiables:
- All outdoor circuits must be GFCI (Ground Fault Circuit Interrupter) protected. Test monthly.
- Bury electrical lines per local code requirements (typically in conduit at specified depths). Never use extension cords as permanent solutions.
- Locate pump power source away from water splash zones. Use weatherproof outlet covers.
- Universal Principle: When in doubt, consult a licensed electrician. Water and electricity demand absolute respect.
Startup Sequence
- Fill feature completely with dechlorinated water (use liquid dechlorinator for tap water).
- Install pump after filling to avoid running dry.
- Start pump on lowest setting if variable speed. Observe flow for 30 minutes. Check for leaks, uneven flow, or splashing.
- Add beneficial bacteria starter culture immediately (jumpstarts biofiltration).
- Wait 7–10 days before adding fish (allows bacterial colony to establish). Test water parameters if keeping fish.
Phase 7: Maintenance Rhythms—Effortless Stewardship
A well-designed feature minimizes maintenance, but zero maintenance is unrealistic. Establish simple, consistent rhythms:
- Daily (30 seconds): Glance at water level. Listen for unusual pump sounds. Remove large floating debris.
- Weekly (10–15 minutes): Clean pump pre-filter sponge. Skim surface debris. Check plant growth. Top off water level (mark a “full” line on liner with waterproof marker).
- Monthly (30 minutes): Rinse mechanical filter media in pond water. Inspect liner edges for damage. Trim aggressive plants. Test water quality if fish are present.
- Seasonally (2–4 hours): Perform deep clean (spring/fall): Partial water change (10–20%), clean bio-media gently, divide plants, inspect equipment. Winterize thoroughly.
The “Set-and-Forget” Myth Debunked: Automated systems (auto-fill valves, timer-controlled pumps) reduce task frequency but require their own monitoring. They are tools, not replacements for observation. The most successful owners develop a mindful connection with their feature—seeing maintenance as caring for a living element.
Phase 8: Troubleshooting and Evolution
Even well-designed installations face challenges. Approach issues systematically:
- Cloudy Water:
- New Pond (First 4–6 weeks): Normal “new pond syndrome” as bacteria establish. Be patient. Add bacteria starter. Avoid adding fish too soon.
- Established Pond: Overstocked fish? Overfeeding? Inadequate filtration? Test water. Reduce feeding. Clean mechanical filter. Add more plants.
- Pump Issues:
- No Flow: Clogged intake? Clean pre-filter. Air lock? Turn pump off/on. Debris in impeller? Disassemble per manual.
- Weak Flow: Clogged plumbing? Check tubing. Pump undersized for head height? Verify against performance chart.
- Leaks:
- Suspect Liner: Turn off pump. Mark water level. Wait 24 hours. If level drops only when pump is off, leak is likely in liner. Use milk test: Pour milk near suspected area; flow reveals puncture. Patch with EPDM repair kit.
- Suspect Plumbing: Level drops only when pump is on. Check all connections, valves, and tubing joints.
Design is not static. Your feature can evolve: Add a small bridge over a stream years later. Introduce new plant varieties. Expand a pond shelf. Document your journey with photos—seasonal changes reveal the living story of your creation.
Navigating Real-World Frictions: Budget, Space, Regulations, and Doubts
Every project encounters constraints. Addressing them thoughtfully transforms obstacles into opportunities.
Budget Realities: Smart Allocation, Not Compromise
- Infrastructure Priority: Allocate the majority of budget to foundational elements (liner, pump, filter, excavation). Skimping here often leads to higher long-term costs. A reliable pump lasting a decade is more economical than repeated replacements.
- Phased Implementation:
- Phase 1 (Year 1): Excavate pond/stream bed, install liner, pump, basic filtration. Add gravel bottom and hardy plants (water iris, anacharis). Run system through a season.
- Phase 2 (Year 2): Add fish, expand plantings, install lighting, refine rockwork. This spreads cost and allows learning before full commitment.
- DIY vs. Professional: Excavation, liner placement, and rockwork are DIY-friendly with research. Electrical work and complex plumbing warrant professional expertise for safety and code compliance. Many contractors offer consultation packages.
Small Space Solutions
- Verticality: Wall fountains, hanging bubble walls, or tiered urns use height, not footprint.
- Optical Illusion: A narrow, curved stream (even 18″ wide) winding through a side yard creates a sense of journey. Place larger rocks at the “end” to draw the eye deeper.
- Container Water Gardens: Half-barrels, glazed pots, or whiskey barrels on patios. Use submersible pump hidden in gravel. Plant dwarf water lilies, miniature cattails. Portable and ideal for rentals.
Navigating Regulations and HOAs
- Research Early: Contact local building department. Most residential water features under specific volumes require no permit, but electrical work almost always does. HOAs may have rules about placement, noise, or safety barriers. Get requirements in writing before designing.
- Proactive Communication: If concerned about neighbor impact (sound, mosquitoes), share your design. Explain safety features, mosquito control plan, and ecological benefits. Offer to show examples.
Overcoming “Analysis Paralysis”
Feeling overwhelmed? Apply the 24-Hour Micro-Action Rule: Commit to one tiny, non-intimidating step within 24 hours. Examples:
– “I will measure my backyard and sketch the sun path at 9 AM, 1 PM, and 5 PM tomorrow.”
– “I will call three local landscape suppliers to ask about regional stone availability.”
– “I will spend 20 minutes observing where water naturally flows after tonight’s rain.”
Action dissolves anxiety. Momentum builds confidence.
Your Questions, Answered
Q: How much does a typical backyard water feature cost?
A: Costs vary widely based on type, size, materials, labor, and location. A small bubbling urn fountain: $200–$800. A modest 6’x8′ pond with basic filtration: $2,500–$6,000 DIY; $5,000–$12,000 professionally installed. A 20-foot stream with upper pond: $4,000–$15,000+. Prioritize quality infrastructure—this is where long-term value lies. Phased implementation makes larger projects accessible.
Q: Can I have a pond if I have dogs or young children?
A: Yes, with thoughtful design. For toddlers, incorporate gentle sloping edges (beach entry), submerged ledges for easy exit, and avoid depths over 18″ in play areas. For dogs, ensure easy exit points (ramps, gradual slopes). Never leave young children unattended near any body of water. Temporary safety nets are available for specific needs. Many families successfully integrate ponds with active households through design and supervision.
Q: Will a water feature significantly increase my water bill?
A: Evaporation is the primary water loss. A small fountain (50-gallon reservoir) may lose 1–2 gallons per day in summer heat. A large pond (1,000 gallons) might lose 5–10 gallons daily—comparable to watering a small flower bed. Install an auto-fill valve with a float switch to maintain level effortlessly. Rainwater harvesting can offset municipal water use. Monitor levels consistently to detect leaks.
Q: How do I prevent mosquitoes from breeding?
A: Mosquitoes require still, stagnant water for 7–10 days to complete their lifecycle. Any feature with moving water (fountains, streams, waterfalls) is inhospitable. For wildlife ponds with still zones: introduce mosquito dunks (Bti bacteria—safe for fish, pets, wildlife), add mosquito fish (Gambusia—verify local regulations), or use a small solar-powered aerator to create surface movement. Regularly remove floating debris.
Q: What’s the biggest mistake beginners make?
A: Underestimating the importance of filtration and plant balance relative to pond size and biological load. Overstocking or under-filtering leads to water quality issues. Start conservatively: fewer fish, more plants, appropriately sized filter. Patience during the initial bacterial colonization phase (first 4–6 weeks) is critical—avoid drastic changes.
Q: Can I install a water feature over a septic drain field?
A: Never. Excavation can damage drain lines. Water saturation compromises the drain field’s function. Always locate water features at least 10–15 feet away from septic tanks and drain fields. Consult your septic system diagram or a professional before finalizing placement.
Q: How do I choose the right pump size?
A: Two factors: 1) Flow Rate (GPH): For streams, calculate volume: Width (inches) x Depth (inches) x Length (feet) x 0.15 = Minimum GPH. Add buffer for head height. 2) Head Height: Measure vertical distance from pump to highest water point. Pump performance charts show GPH at specific head heights. Choose a pump that delivers your required GPH at your actual head height. When unsure, consult performance charts or supplier guidance.
Q: Are solar-powered pumps reliable?
A: Solar pumps work well for specific applications: aerating existing ponds, powering small decorative fountains in full sun, or temporary features. Limitations: Output depends on sunlight intensity (reduced on cloudy days, zero at night). Battery storage adds complexity. For primary circulation requiring consistent flow, grid-powered pumps (with energy-efficient mag-drive motors) are generally more reliable. Solar is an excellent supplement.
Q: How do I winterize my feature in a freezing climate?
A: For ponds with fish: Install a pond de-icer or aerator to maintain an open hole in the ice for gas exchange. Stop feeding fish when water drops below 50°F. For features without fish or in very cold zones: Drain completely before first hard freeze. Remove pumps, clean thoroughly, store indoors in bucket of water (keeps seals moist). Blow out plumbing lines. Store fountain heads. Cover empty basin. Never allow water to freeze inside pumps or plumbing.
Q: Can I use tap water to fill my pond?
A: Yes, but always treat it first. Municipal tap water contains chlorine or chloramine, which are toxic to fish and beneficial bacteria. Use a liquid dechlorinator specifically formulated for ponds. Follow dosage instructions. For large fills, dechlorinator is essential. Well water may contain metals or high minerals—test if possible.
Q: How long does it take for a new pond to “clear up”?
A: The nitrogen cycle establishment (“new pond syndrome”) typically takes 4–8 weeks. Water may turn green or cloudy during this period—this is normal. Avoid chemical algaecides—they disrupt bacterial colonization. Solutions: Add beneficial bacteria starter, ensure adequate aeration, add fast-growing plants to compete for nutrients, be patient. UV clarifiers can help with green water but won’t fix underlying imbalance. Consistency is key.
Q: What plants are truly low-maintenance for beginners?
A: Start with resilient, adaptable species:
– Submerged (Oxygenators): Anacharis (Elodea), Hornwort—grow rapidly, absorb excess nutrients.
– Marginal: Louisiana Iris (tolerates varying depths), Pickerelweed (spikes of blue flowers), Sweet Flag (Acorus—fragrant, grass-like).
– Floating: Water Hyacinth, Water Lettuce (check local invasiveness regulations; remove excess).
Avoid delicate species until you gain experience. Local nurseries specializing in aquatics can recommend varieties proven in your climate zone.
Conclusion and Your Next Step
Designing a water feature is a journey of creation—one that blends artistry with ecology, vision with practicality. You now hold a comprehensive framework to navigate every phase with confidence: from clarifying your deepest intention and honoring your site’s unique character, to selecting the perfect feature type, engineering resilient systems, integrating living elements, and stewarding your creation through seasons. Remember the core pillars: Aesthetic Harmony ensures it feels inherently belonging; Technical Integrity guarantees reliable, efficient operation; Ecological Balance fosters a thriving, self-sustaining microcosm. These are not separate tasks but interwoven threads of a single tapestry.
The most profound water features resonate with the soul of the place and the people who inhabit it. They become landmarks of memory—a spot where morning coffee is savored to the sound of falling water, where stress dissolves with each ripple. They invite slowness, observation, and connection. This is the true return on investment: not just a beautiful object, but an enduring source of peace and wonder.
Your 24-Hour Rule
Within the next 24 hours, take one small, concrete step. Do not wait for “perfect conditions.” Choose one:
– If undecided on type: Sit in your intended location at three different times today (morning, noon, evening). Close your eyes. Listen. What sound would enhance this moment? Gentle trickle? Steady cascade? Silent reflection? Write down the answer.
– If planning is underway: Measure your space precisely. Sketch the outline on paper. Note the exact spot of your primary viewing point (kitchen window, favorite chair). Mark where sunlight hits at 3 PM.
– If ready to source: Call one local nursery or landscape supplier. Ask: “What native stone do you recommend for a natural-looking pond edge in this area?” Listen to their expertise.
Action, however small, breaks inertia and builds momentum. Your oasis begins not with a grand gesture, but with this single, intentional step.
The Bigger Picture
Your water feature is more than a personal retreat. In an era of habitat fragmentation, it becomes a tiny sanctuary for local wildlife—a drinking spot for birds, a breeding ground for beneficial insects, a refuge for amphibians. It contributes to watershed health by slowing runoff and filtering pollutants when designed thoughtfully. It models sustainable practices: rainwater harvesting, native plantings, energy-efficient technology. In nurturing this small piece of earth, you participate in a larger story of stewardship and renewal. You create a legacy of beauty that ripples outward, inspiring neighbors, delighting future generations, and reminding all who encounter it of water’s timeless, life-giving power.
Explore Our Complete Landscape Harmony System:
Designing with Native Plants: A Region-by-Region Guide | Sustainable Hardscaping: Permeable Patios and Paths | The Mindful Gardener: Cultivating Presence in Your Outdoor Space | Rainwater Harvesting for Homeowners: From Barrels to Cisterns | Creating Wildlife Corridors in Suburban Yards | The Art of Garden Lighting: Safety, Ambiance, and Ecology | Seasonal Garden Journal: A Template for Observation and Growth