Move beyond fleeting trends and craft a home that exudes enduring charm, sophistication, and comfort—rooted in centuries of design wisdom.
Traditional design isn’t merely a collection of antique furniture or ornate moldings. It’s a deeply intentional philosophy of creating spaces that feel both elegant and deeply welcoming—a sanctuary where every element works in harmony to support how you live. Drawing from centuries of architectural evolution across Georgian, Federal, Victorian, and Colonial Revival movements, this approach prioritizes proportion, craftsmanship, and emotional resonance over transient aesthetics. Whether you inhabit a historic home or a modern build, this comprehensive guide provides the actionable framework to infuse timeless elegance into every corner of your living environment, with practical adaptations for every budget, skill level, and architectural context.
Introduction: Why Timeless Design Endures
Walk into a truly traditional space, and you feel it immediately—a sense of calm order, warmth, and belonging. This isn’t accidental. Traditional design principles emerged from centuries of human experience refining how environments support well-being, social connection, and daily ritual. Unlike trends that shout for attention, traditional design whispers confidence through balanced proportions, layered textures, and details that reveal themselves slowly. You might notice the gentle curve of a Chippendale chair leg, the rhythmic cadence of crown molding meeting wainscoting, or how afternoon light filters through leaded glass windows onto rich walnut floors. These elements accumulate into an atmosphere of quiet sophistication that feels lived-in, not staged.
Historical design movements—from the restrained symmetry of Georgian architecture to the romantic flourishes of the Victorian era—evolved through cultural exchange, technological advancements in craftsmanship, and deep observation of how light, space, and material interact with human emotion. A Federal-style mantelpiece isn’t just decorative; its precise proportions reference classical ideals of harmony. The deep window seats common in Colonial homes maximized scarce glass panes while creating intimate nooks for reading or conversation. Understanding this why behind traditional elements transforms them from stylistic checkboxes into meaningful choices that serve your life today. This foundation of intentionality allows traditional design to feel perpetually fresh. It’s not about replicating a museum piece; it’s about adopting a mindset where beauty and function coexist gracefully. Contemporary preservation resources and architectural pattern books consistently affirm that these principles remain powerfully relevant when thoughtfully adapted.
The Six Pillars Framework: Your Blueprint for Timeless Spaces
Forget fragmented Pinterest boards or room-by-room guesswork. True traditional elegance emerges from six interconnected pillars that work synergistically. Master these, and you’ll develop an intuitive eye for creating cohesive, emotionally resonant spaces—regardless of your home’s age, size, or renovation budget. This framework synthesizes enduring patterns observed across historic preservation guidelines, architectural archives, and contemporary applications where traditional principles solve modern living challenges. Each pillar builds upon the last, creating a cumulative effect far greater than isolated decorative choices.
Pillar 1: Symmetry and Balanced Proportion
Symmetry functions as the quiet backbone of traditional design—not rigid duplication, but a thoughtful arrangement that creates visual calm and guides movement through a space. Architecturally, this manifests in aligned windows across a facade, centered doorways, and fireplaces anchoring focal points. Inside, furniture arrangements follow conversational groupings where seating faces each other at comfortable distances, with matching lamps flanking a sofa or chairs creating visual bookends.
Why this pillar matters: Environmental psychology research indicates that balanced spatial arrangements often reduce cognitive load and promote perceived spaciousness. In a visually busy world, intentional symmetry provides subconscious order. Consider a hallway: identical sconces spaced evenly along a corridor create rhythm and depth. Conversely, significant visual imbalance (a single large artwork dominating one side of a wall) may create subtle unease for some occupants.
Practical implementation across scenarios:
– Ideal approach: For new construction or major renovations, collaborate with design professionals to establish a modular system—using consistent measurements to govern window placement, cabinet widths, and molding heights. This creates inherent harmony.
– Budget adaptation: In existing homes, create perceived symmetry. If your living room has one large window and one small closet door on opposite walls, hang identical floor-length curtains over both. Place matching console tables beneath them with symmetrical arrangements of books and lamps. The eye registers balance, not the functional difference behind the fabric.
– Rental-friendly solution: Use removable adhesive hooks to hang two identical framed botanical prints at precise eye level (57–60 inches from floor to center) on either side of a bed or sofa. Add matching table lamps with identical shades. This costs modestly and transforms visual equilibrium instantly.
– Nuanced balance: True balance sometimes allows for asymmetrical balance—a large but visually light bookshelf on one side balanced by a dense grouping of smaller art pieces on the other. Test balance by squinting at the room; if one side feels “heavier,” adjust thoughtfully.
The Fundamental Principle: Symmetry isn’t about perfection—it’s about intention. Every deviation should feel deliberate, not accidental.
Pillar 2: Architectural Details and Layered Millwork
Millwork forms the permanent architectural character of a space—the bones that define scale and personality. This includes crown molding, chair rails, wainscoting, coffered ceilings, built-in cabinetry, and paneled doors. Historically, these elements served dual purposes: chair rails protected plaster walls; wainscoting added durability; crown molding concealed imperfect joints. Their enduring appeal lies in how they frame space and invite the eye to appreciate craftsmanship.
Understanding millwork types and their impact:
– Crown molding: Creates a graceful transition between wall and ceiling. In rooms with standard 8-foot ceilings, a modest 3–4 inch profile adds definition. For higher ceilings, proportionally larger profiles restore visual balance. Profile choice matters: an “ogee” curve feels softer than a sharp “cove”; multi-layered profiles add complexity.
– Wainscoting: Typically installed at chair-rail height (32–36 inches). Beadboard offers cottage charm; raised-panel conveys formality; board-and-batten delivers rustic elegance. Painting wainscoting a contrasting color can visually adjust perceived ceiling height.
– Ceiling treatments: Coffered ceilings add dimension; medallions anchor light fixtures; even simple tray ceilings introduce architectural interest.
– Built-ins: Bookshelves flanking a fireplace, window seats with storage, or a butler’s pantry between kitchen and dining room maximize function while embedding character.
Accessible millwork enhancements:
1. Faux wainscoting with MDF panels: Measure wall sections. Cut 1/4-inch MDF panels (wear safety goggles and mask; use a circular saw with guide). Attach with construction adhesive and finishing nails. Caulk seams, sand smooth, prime, and paint. Critical tip: Use a level consistently. Imperfect lines undermine the intended effect.
2. Chair rail installation: Determine height (measure 33 inches from floor at multiple points; floors aren’t always level). Cut molding with a miter saw (45-degree angles for corners). Secure with finishing nails into wall studs. Fill holes with wood putty. Pro insight: Running chair rail continuously through doorways often enhances visual flow.
3. Adhesive-backed options: For renters or hesitant DIYers, high-quality adhesive-backed foam crown molding mimics wood profiles. Clean wall surface thoroughly, apply adhesive, press firmly, caulk seams, and paint. Less durable but visually effective.
When professional assistance is advisable: Complex crown molding miters (especially on vaulted ceilings), structural modifications for built-ins, or working with historic plaster walls. Skilled carpentry prevents costly corrections. Costs vary significantly by region and project complexity.
Pillar 3: Rich, Layered Color Palettes
Traditional color philosophy emphasizes depth, nuance, and atmospheres that evolve with natural light. Authentic traditional palettes use layering: a base neutral (warm white, soft gray, beige), a secondary accent (deep navy, forest green, burgundy), and tertiary highlights (metallics, wood tones, textile patterns). Colors are often muted—achieved by adding gray or brown undertones (“greige” instead of stark beige; “slate blue” instead of royal blue). This prevents visual fatigue and allows architectural details to shine.
Developing your personalized traditional palette:
1. Start with fixed elements: Note undertones in flooring, stone fireplace, or existing woodwork. Pull colors that harmonize. Warm wood floors pair beautifully with creamy whites and earthy accents; cool gray stone calls for soft blues and silvers.
2. The 60-30-10 guideline: Approximately 60% dominant color (walls, large rugs), 30% secondary (upholstery, curtains), 10% accent (pillows, art, accessories). In a library: warm taupe walls, deep green leather chairs, brass lamp accents.
3. Historical inspiration: Explore paint collections from Farrow & Ball, Benjamin Moore Historical Collection, or Sherwin-Williams Williamsburg Palette. Colors like “Railings,” “Hague Blue,” or “Revere Pewter” have endured because their complex undertones interact gracefully with light.
4. Room-specific considerations:
– Entryways: Warm neutrals create welcoming first impressions. Darker accent walls can add drama in larger foyers.
– Living rooms: Earthy greens, warm grays, or muted blues foster conversation. Avoid cool, sterile whites that may feel unwelcoming.
– Dining rooms: Deep reds, burgundies, or forest greens can encourage lingering. Pair with warm wood tones.
– Bedrooms: Soft lavenders, dusty roses, or serene blues promote rest. Keep ceilings slightly lighter than walls to avoid feeling closed in.
– Kitchens: Creamy whites with sage green or navy accents feel fresh yet timeless. Avoid highly trendy two-tone cabinets that may date quickly.
Advanced technique: Color washing for depth
Create subtle texture using a glaze technique. Mix 1 part satin paint with 2 parts glaze. Apply base coat and let dry. Using a dry brush, lightly drag the glaze mixture vertically over the base coat, then immediately wipe with a clean cloth in random motions. This reveals hints of the base color beneath. Test thoroughly on a sample board first. Safety note: Ensure room is well-ventilated; wear gloves.
Common considerations:
– Using pure white trim with off-white walls may create unintended contrast. Consider using the wall color in a semi-gloss finish for trim, or choose a trim color just one shade lighter.
– North-facing rooms often benefit from warm undertones to counteract cool light; south-facing rooms can handle cooler tones without feeling cold.
– Painting ceilings the same color as walls (diluted 50% with white) can create a cohesive “envelope” effect, avoiding the disconnected feel of standard “ceiling white.”
Pillar 4: Quality Materials and Tactile Textures
Traditional design engages multiple senses, especially touch. It celebrates the inherent beauty of natural materials and the subtle variations that reflect human craftsmanship. This pillar favors warmth, patina, and authenticity over sterile uniformity. When selecting materials, prioritize honesty—allowing wood to show its grain, stone to reveal its character, and metal to develop a gentle patina over time.
Material considerations by category:
– Wood: Solid hardwoods (oak, walnut, cherry, maple) for floors and furniture offer durability and character. Reclaimed wood adds instant history. Note grain direction: Quarter-sawn oak has dramatic “ray fleck” patterns; plain-sawn offers classic cathedral arches.
– Stone: Marble (veined, cool to touch) for fireplace surrounds; limestone (softer, warmer) for flooring; slate (textured, durable) for entryways. Seal natural stone as recommended by the supplier.
– Metal: Wrought iron for railings or fixtures; unlacquered brass (develops a warm patina) for hardware; oil-rubbed bronze for timeless warmth. Chrome may read as modern in traditional contexts—consider your overall intent.
– Textiles: Linen (breathable, wrinkles gracefully), wool (durable, warm), cotton (versatile), silk (lustrous, for accents). Look for subtle textures: herringbone weaves, bouclé, needlepoint. Avoid overly shiny synthetics where authenticity is desired.
– Wall treatments: Grasscloth wallpaper adds organic texture and sound absorption. High-quality matte paint offers more depth than flat sheen.
Budget-conscious material strategies:
– The “one splurge” approach: Invest in one high-impact authentic material per room. In a bedroom, a solid wood bed frame; use affordable linen-look cotton for bedding. In a kitchen, real butcher block for an island countertop; quartz for perimeter counters.
– Strategic alternatives: High-quality vinyl plank flooring can mimic wide-plank oak convincingly. Look for products with embossed grain texture and varied plank lengths. For countertops, concrete overlays on existing laminate create a custom appearance.
– Thrifted authenticity: Hunt antique stores or salvage yards for genuine materials: marble remnants, vintage brass hardware, or reclaimed wood elements. Clean thoroughly; minor imperfections often add character.
– Texture layering: Combine inexpensive textiles to create richness. Layer a flat-weave cotton rug over a sisal base. Mix velvet-look throw pillows with chunky knit blankets. Hang unlined linen curtains—they filter light beautifully and develop soft folds over time.
Material care considerations:
– Unlacquered brass hardware naturally darkens. Many appreciate this evolving patina as “living finish.” If consistent shine is preferred, lacquered brass is an option, though finishes may wear over decades.
– Hardwood floors will show signs of use. This isn’t failure—it’s evidence of life within the home. Use felt pads under furniture, remove shoes indoors, and refinish only when deeply worn (typically every decade or more, depending on traffic).
– Natural stone requires appropriate sealing. Test by sprinkling water on the surface; if it darkens after 15 minutes, resealing may be needed. Use pH-neutral cleaners to preserve sealant.
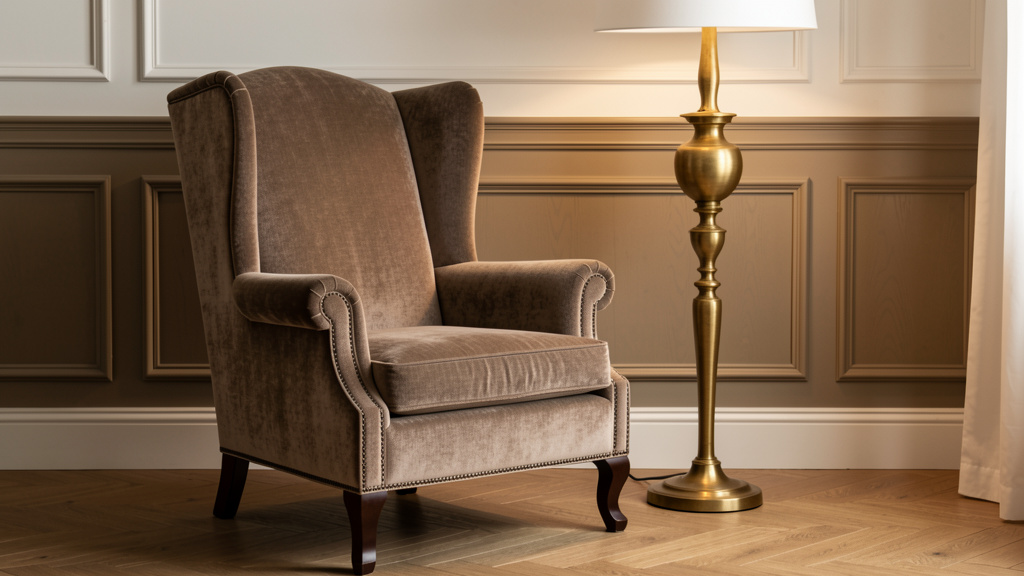
Pillar 5: Classic Furniture Lines and Purposeful Layouts
Traditional furniture prioritizes comfort, proportion, and craftsmanship. Silhouettes draw from historical periods but adapt to contemporary lifestyles. Key characteristics include tapered legs, rolled arms, carved details (acanthus leaves, shell motifs), and frames built with durable joinery. Layouts follow the room’s architecture, creating defined zones for specific activities rather than floating furniture in empty space.
Understanding traditional furniture styles:
– Chippendale (18th century): Cabriole legs (S-curved), ball-and-claw feet, intricate latticework backs. Ideal for formal dining chairs or accent chairs. Modern reproductions often simplify carvings for everyday use.
– Sheraton (Neoclassical): Straight tapered legs, geometric inlays, lighter proportions. Works well in smaller spaces. Look for shield-shaped chair backs or reeded legs.
– Queen Anne: Similar to Chippendale but softer—smooth cabriole legs without carved knees, vase-shaped splats. Known for comfort.
– Federal: Delicate, refined lines; often features eagle or urn motifs. Common in American historic homes. Think Hepplewhite shield-back chairs.
– Victorian: Ornate, heavy, deeply carved. Best used sparingly as statement pieces to avoid overwhelming a room.
Creating functional traditional layouts:
– Living rooms: Arrange seating in a U- or L-shape facing the fireplace or primary window. Include a central coffee table (wood with a lower shelf) and side tables within arm’s reach. Ensure comfortable clearance (approximately 18 inches) between coffee table and sofa. Add a “conversation chair” angled slightly toward the group.
– Dining rooms: Allow generous clearance behind chairs for walking space (approximately 36 inches). A rectangular table suits formal rooms; round tables encourage intimacy. Position the table parallel to the room’s longest wall, centered under a chandelier hung 30–36 inches above the table surface.
– Bedrooms: Place the bed against the wall opposite the entry door if possible. Nightstands should be within easy reach (height matching mattress top). Include a comfortable chair in the corner for reading. Avoid blocking windows with tall furniture.
– Home offices: Position desk perpendicular to windows to reduce glare. Built-in bookshelves flanking the desk create symmetry. Ensure task lighting illuminates the work surface without casting shadows.
Thoughtfully mixing styles:
Traditional design isn’t a museum. Incorporating contemporary elements can prevent sterility. The key is intentional contrast:
– Pair a modern sofa (in a traditional fabric like wool herringbone) with antique side tables.
– Place a minimalist glass-top coffee table atop a vintage rug.
– Use a contemporary abstract painting in a classic gilt frame.
– Guiding principle: Maintain consistent wood tones or metal finishes to tie disparate pieces together. Avoid mixing numerous contrasting wood tones in one room.
Comfort considerations: Traditional furniture was often designed for smaller historical frames. Test seat depth (ideal: 20–22 inches deep; knees should form a 90-degree angle with feet flat on floor) and arm height. Many reproduction companies offer customizable dimensions. For vintage finds, a skilled upholsterer can rebuild frames and adjust proportions for modern comfort.
Pillar 6: Curated Accessories and Meaningful Art
Accessories function as the jewelry of traditional design—thoughtfully selected, never excessive. This pillar favors objects with purpose, history, or emotional significance. Every item should earn its place. Artwork connects walls to furniture; textiles add softness and color layers; objects tell stories. The goal is collected over time, not purchased in a single shopping trip.
Artwork selection and hanging considerations:
– Scale: Art should occupy approximately two-thirds to three-quarters of the wall space above furniture. A tiny painting above a large sofa may feel lost; oversized art can overwhelm a narrow console.
– Groupings: Create gallery walls with consistent spacing (2–3 inches between frames). Mix frame styles (gilt, wood, black) but unify with mat colors (all white or all off-white mats). Arrange on the floor first to test composition. Center the entire grouping at eye level (57–60 inches to center point).
– Subject matter: Landscapes, botanical prints, classical portraits, or architectural drawings align with traditional sensibilities. Abstract pieces can work when intentionally contrasted (see Pillar 5).
– Mirrors: Essential for reflecting light and creating depth. Place opposite windows to amplify natural light. Ornate gilt or carved wood frames enhance traditional character. Oval or rectangular shapes are versatile.
Textile layering for comfort and color:
– Window treatments: Layer for function and beauty. Start with wood blinds or roman shades for light control. Add floor-length curtains in a heavy fabric (velvet, damask) for insulation and drama. Hang rods 6–8 inches above window frame and extend 8–12 inches beyond frame on each side to make windows appear larger. Pro tip: Line curtains with blackout fabric for bedrooms; use unlined linen for airy sunrooms.
– Rugs: Define seating areas. In living rooms, front legs of main furniture should rest on the rug. Choose patterns that complement (not match) other textiles: a Persian rug with intricate motifs pairs well with solid-color upholstery; a subtle stripe rug works with patterned chairs. Natural fibers (wool, jute) are durable and age gracefully.
– Throws and pillows: Vary sizes (20×20, 22×22, lumbar) and textures. Include one “pop” pillow in an accent color. Fold throws neatly over sofa arms or chair backs. Rotate seasonally: wool blankets in cooler months, lightweight cotton in warmer months.
Curating meaningful objects:
– Books: Stack horizontally with a small sculpture on top; arrange vertically by color gradient for visual calm. Fill empty shelf space with books turned spine-in for a neutral backdrop.
– Collections: Display like items together (vintage apothecary jars, ceramic pitchers). Odd numbers (3, 5, 7) often feel more organic than even groupings. Vary heights using books or small boxes as risers.
– Greenery: Fresh flowers in a simple vase (a weekly ritual). Potted topiaries (boxwood, myrtle) in classic urns. For low-light areas, high-quality preserved moss in shadow boxes offers maintenance-free greenery.
– Lighting layers: Ambient (ceiling fixtures), task (desk lamps, reading lights), and accent (picture lights, sconces). Dimmers on fixtures allow mood adjustment. Lampshades should be wider than the lamp base; fabric shades diffuse light more softly.
The “edit thoughtfully” principle: Periodically walk through your room and assess accessories. If an object doesn’t bring genuine connection or serve a purpose, consider storing or donating it. Traditional elegance thrives on negative space—the quiet moments between details.
Room-by-Room Application: Bringing the Framework to Life
Understanding the pillars is one thing; applying them cohesively across your home is where transformation happens. This section translates theory into actionable steps for each critical space, addressing unique challenges and opportunities. Consistency in principles (symmetry, quality materials) matters more than uniformity in execution. Your kitchen can feel traditional without matching your bedroom exactly—through shared color undertones, repeated wood species, or consistent metal finishes.
The Entryway: Setting the Tone for Welcome
Your entryway is the overture to your home’s atmosphere. It should feel intentional, uncluttered, and inviting—a transition from the outside world to your personal sanctuary. Traditional entryways often feature architectural definition: a paneled wall, chair rail, or coffered ceiling. Even modest spaces can achieve this through strategic choices.
Step-by-step considerations:
1. Define the zone: If your entry lacks walls, use a console table (30–36 inches high) against the nearest wall. Flank with two identical sconces or table lamps. Add a narrow runner rug (27 inches wide) to anchor the space.
2. Functional furniture: A bench (with storage for shoes) or pair of chairs invites removing outerwear. Include a small table for keys/mail. All pieces should share proportional scale—avoid overwhelming a tiny foyer with massive furniture.
3. Mirror placement: Hang a substantial mirror (oval or rectangular) above the console. It reflects light, creates depth, and allows last-minute checks. Choose a frame with subtle detailing (rope twist, leaf motifs).
4. Textural layers: A wool or hooked rug withstands foot traffic. A woven basket holds umbrellas. Fresh eucalyptus in a ceramic vase adds scent and greenery.
5. Lighting: A single pendant centered over the space provides ambient light. Ensure it’s hung high enough (7 feet minimum from floor) to avoid head bumps. Dimmable bulbs allow mood adjustment.
Illustrative example: In a narrow urban apartment entry with only 3 feet of wall space, a solution included a slim console (14 inches deep), a vertically oriented mirror to elongate the space, a single sconce at 66 inches height, and a 2×5 foot vintage-style runner. The result felt expansive and curated.
The Living Room: Crafting Conversation and Comfort
This is the heart of traditional home life—a space designed for connection, relaxation, and showcasing personality. Avoid the “showroom trap” where furniture is too perfect to use. Traditional living rooms feel lived-in through layered textiles, personal collections, and comfortable seating arrangements that encourage face-to-face interaction.
Layout considerations:
– Fireplace as anchor: If present, arrange seating to face it. Place two chairs angled toward the sofa, forming a conversational triangle. Include a coffee table within easy reach (14–18 inches from sofa edge).
– No fireplace? Create a focal point with a large piece of art above a console table, or built-in bookshelves flanking the main seating area. Use area rugs to define the zone distinctly from adjacent spaces.
– Traffic flow: Maintain clear pathways (minimum 36 inches wide) around seating groups. Avoid blocking doorways or windows.
Textile strategy for depth:
– Start with a neutral large-scale rug (wool blend, 9×12 feet minimum for average rooms).
– Upholster main sofa in a durable solid (linen-look performance fabric in warm gray or cream).
– Add two armchairs in a complementary pattern (subtle stripe, small-scale floral).
– Layer pillows: two large solids matching the chairs, two medium patterns pulling accent colors from the rug, one lumbar pillow in a contrasting texture (velvet).
– Drape a chunky knit throw over one arm of the sofa.
Personalization without clutter:
– Display 3–5 meaningful objects on the coffee table: a stack of favorite books, a small ceramic vase with seasonal branches, a vintage brass compass.
– Use bookshelves to mix books (spine-out for color, spine-in for calm) with a few carefully chosen objects: a framed family photo in a silver frame, a small bronze sculpture, a collection of sea glass in a glass bowl.
– Rotate seasonal elements: a bowl of pinecones in cooler months, fresh hydrangeas in warmer months.
Common adjustment: “My living room feels cold and formal.” Consider adding warmth through textiles (replace leather pillows with wool), introducing wood tones (a walnut side table), lowering lighting levels (swap bright overheads for lamps), and including personal items (a child’s artwork in a simple frame on a side table).
The Dining Room: Nurturing Connection and Ritual
Traditional dining rooms honor the ritual of shared meals. They balance formality with warmth, encouraging lingering conversation. Key elements include a well-proportioned table, supportive seating, ambient lighting focused on the table surface, and surfaces for serving.
Table and seating considerations:
– Table shape: Rectangular suits formal entertaining (seats more); round fosters intimacy (no “head” of table); oval offers compromise. Ensure generous clearance around the table for chair movement (approximately 36 inches).
– Chair comfort: Test seat depth and cushion firmness. Upholstered seats are traditional and comfortable. Consider host/hostess chairs with slightly different details to denote importance without disrupting symmetry.
– Buffet/sideboard: Essential for storage and serving. Position against the longest wall. Style the top with a mirror above (to reflect light and art), a pair of lamps, and a seasonal centerpiece (not too tall to block sightlines).
Lighting precision:
– Chandelier should be approximately 12 inches narrower than table width. Hang so the bottom is 30–36 inches above the table surface—low enough to illuminate food, high enough to see across the table.
– Add wall sconces or buffet lamps for layered ambient light. Dimmers are highly recommended for setting mood.
Tabletop styling philosophy:
– Everyday: Simple linen placemats, cloth napkins in a coordinating color, a low centerpiece (a single bud vase with one flower, a small candle cluster).
– Entertaining: Layer textures—lace undercloth beneath a solid linen tablecloth. Mix vintage and new china if patterns complement. Use charger plates for visual weight. Place cards add a personal touch.
– Avoid: Overly themed decor year-round, cluttered centerpieces that hinder conversation, mismatched flatware that feels haphazard.
Adaptation for open plans: Define a dining zone with a distinctive rug under the table, a pendant light centered above, and a narrow console against the nearest wall for serving. Consistent wood tones with adjacent furniture create cohesion.
The Kitchen: Blending Heritage Charm with Modern Function
Traditional kitchens feel warm, organized, and connected to culinary heritage—not like sterile laboratories. They celebrate craftsmanship through cabinetry details, natural materials, and layouts that support workflow (the “work triangle” between sink, stove, and refrigerator remains vital).
Cabinetry as architecture:
– Door styles: Shaker (simple recessed panel) offers timeless versatility; raised-panel doors convey formality; beadboard panels add cottage charm. Avoid slab doors or excessive glass fronts if seeking traditional character.
– Finishes: Painted cabinets (soft white, sage green, navy) feel fresh and classic. Stained wood (cherry, maple) showcases grain. Critical detail: Cabinet hardware should align with other metal finishes in the home (all unlacquered brass, for example). Bin pulls, cup pulls, or classic knobs—choose one style consistently.
– Open shelving: Use sparingly for displaying beautiful dishware. Limit to 1–2 shelves to avoid visual clutter. Style with intention: group by color or function.
Material authenticity:
– Countertops: Butcher block (warm, repairable) for islands; soapstone (develops patina) or honed granite (soft sheen) for perimeter. Avoid high-gloss surfaces that may feel less authentic.
– Backsplash: Subway tile (3×6 inch) in a warm white with contrasting grout (dark gray) is perpetually classic. Handmade zellige tile adds subtle variation. Avoid intricate mosaic patterns that may date quickly.
– Flooring: Wide-plank hardwood (oak, hickory) with matte finish. If durability is a primary concern, high-quality vinyl plank with realistic wood texture and varied plank lengths offers a practical alternative.
Functional traditional touches:
– Butler’s pantry: If space allows, a narrow pass-through between kitchen and dining room with storage for serving pieces, wine, and coffee service. Even a shallow cabinet with glass doors functions as a mini-butler’s pantry.
– Window seat: In a breakfast nook, built-in seating with storage beneath. Upholster cushions in durable fabric (indoor/outdoor performance linen).
– Lighting: Pendant lights over island should be spaced evenly, hung 30–36 inches above surface. Under-cabinet lighting is essential task lighting—choose warm LED strips (2700K color temperature).
Modern integration: Panel-ready appliances maintain cabinetry lines. Place microwave in a dedicated cabinet with ventilation. Hide small appliances in deep drawers with electrical outlets.
The Bedroom: Sanctuary of Rest and Renewal
A traditional bedroom prioritizes tranquility, comfort, and personal retreat. It avoids visual stimulation that may hinder rest—clutter, bright screens, harsh lighting. Instead, it wraps you in soft textures, calming colors, and thoughtful details that support rest.
Bed as focal point:
– Bed frame: Upholstered headboard (linen, velvet) adds softness and scale. Wooden frames with carved details (like a sleigh bed) offer classic appeal. Ensure height feels proportional to room size.
– Bedding layers: Start with high-thread-count cotton sheets (300–600 thread count). Add a wool or down alternative duvet. Fold a coverlet or quilt at the foot of the bed for texture and extra warmth. Pro tip: Use a duvet cover in a solid neutral; layer with decorative shams and pillows in subtle patterns.
– Nightstands: Match or complement the bed frame. Include drawers for bedside essentials. Surface should hold a lamp, book, and water glass comfortably.
Lighting for relaxation:
– Primary: Wall-mounted swing-arm lamps on either side of bed free up nightstand space and provide focused reading light. Choose fabric shades to diffuse light softly.
– Ambient: A single dimmable ceiling fixture or discreet cove lighting. Avoid bright overhead lights.
– Accent: A small table lamp on a dresser or chest.
Closet and storage integration:
– Built-in wardrobes with paneled doors maintain wall lines. If using freestanding armoires, position symmetrically if possible.
– Use matching hangers (wooden, velvet) for visual calm inside closets.
– Under-bed storage bins (fabric-covered) keep off-season items accessible but hidden.
Sensory details for serenity:
– Blackout curtains lined with thermal fabric ensure darkness and quiet.
– A small upholstered bench at the foot of the bed provides seating and softens the room’s edge.
– Fresh flowers or a single stem in a bud vase on the nightstand.
– Scent: A subtle reed diffuser with lavender or sandalwood (avoid overpowering synthetic fragrances).
Small bedroom considerations: Use light, reflective colors on walls and ceiling. Choose furniture with slender legs to maintain visual airflow. Mount shelves high on walls for storage without crowding floor space. A large mirror opposite the window amplifies light and space.
The Bathroom: Elegant Function and Spa-Like Calm
Traditional bathrooms balance timeless aesthetics with rigorous moisture management. They feel like a natural extension of the home’s design language—not an afterthought. Key considerations include material durability, logical layout, and creating a serene atmosphere.
Fixture selection with longevity:
– Faucets and hardware: Widespread faucets (handles separate from spout) feel more substantial than centerset. Choose finishes that patina gracefully: unlacquered brass, oil-rubbed bronze. Chrome may work when intentionally contrasting with other elements.
– Bathtub: Freestanding clawfoot tubs are iconic but require floor reinforcement and careful plumbing. Alcove tubs with tile surrounds are practical. For showers, frameless glass doors often feel cleaner than framed options.
– Vanity: Custom cabinetry (not stock “bathroom vanities”) with furniture-style details: raised panels, turned legs, antique-inspired hardware. Include deep drawers for organization.
Tile and material strategy:
– Floor: Small-format tiles (hexagon, penny round) with contrasting grout add traditional charm and hide dirt. Ensure proper slope toward drain. Use slip-resistant finishes.
– Walls: Subway tile (classic 3×6 inch) laid in a brick pattern. Add a decorative border tile (listello) at chair-rail height for architectural interest. For shower walls, larger format tiles (12×24 inch) reduce grout lines and maintenance.
– Countertops: Honed marble (seal regularly) for luxury; quartzite for durability with marble-like appearance; solid surface for seamless sinks.
Storage and organization:
– Recessed medicine cabinets with mirrored fronts save space. Flank with sconces for balanced grooming light (avoid shadows from overhead fixtures).
– Open shelving for frequently used items (towels, baskets of toiletries). Style with matching containers for visual calm.
– Linen closet organization: Use matching bins labeled for towels, washcloths, cleaning supplies. Fold towels uniformly for a tidy appearance.
Atmosphere enhancers:
– Heated floors (electric mat system under tile) add luxurious comfort.
– A small stool or bench provides seating and surfaces for items.
– Fresh eucalyptus hung in the shower releases calming scent with steam.
– Towels in coordinated colors (creams, taupes, soft blues) feel intentional. Roll or fold neatly on open shelves.
Powder room opportunity: Even a small half-bath can shine. Use bold wallpaper (a classic damask or botanical print) on all walls. Install a vintage-style pedestal sink. Add a small console table with a bowl for hand towels. A single dramatic light fixture makes a statement.
Exterior and Garden: Extending Elegance Outdoors
Traditional design doesn’t stop at the front door. The home’s exterior and surrounding landscape complete the narrative, creating curb appeal that feels established and welcoming. This extends the Six Pillars framework to architecture, hardscaping, and planting design.
Architectural cohesion principles:
– Front door: The “face” of the home. Paint in a rich, traditional color (navy, forest green, deep red). Add sidelights and a transom window for symmetry and light. A classic brass knocker and matching mail slot elevate details.
– Windows: Maintain consistent style (double-hung, divided lites). Shutters should be functional width (not purely decorative)—they should cover the window opening if closed. Paint shutters a contrasting color (dark green on white house; black on cream).
– Roof and trim: Roof color should complement siding (charcoal gray with white; brown with beige). Trim (windows, corners, soffits) should be crisp and well-maintained. Crown molding at the roofline adds architectural definition.
Garden design as outdoor rooms:
– Pathways: Meandering brick or flagstone paths feel more organic than straight concrete. Edge with low boxwood hedges or creeping thyme.
– Planting layers: Follow the “thriller, filler, spiller” principle:
– Thriller: Focal point tree (dogwood, Japanese maple) or sculpture.
– Filler: Medium-height perennials (peonies, hydrangeas, lavender) in repeating groups of 3 or 5.
– Spiller: Groundcovers (ivy, ajuga) or trailing plants (sweet potato vine in containers).
– Color palettes: Restrict to 3–4 harmonious colors. Classic combinations: white roses with blue hydrangeas and green foliage; purple salvia with yellow coreopsis. Avoid rainbow assortments.
– Hardscaping elements: A stone patio with a central fire pit or dining set defines an outdoor room. Add a pergola draped with wisteria or climbing roses for vertical interest and shade. Include comfortable seating with weather-resistant cushions in traditional patterns (stripes, toile).
Seasonal rhythm considerations:
– Spring: Early bulbs (daffodils, tulips) naturalized in grassy areas. Plant in fall for spring bloom.
– Summer: Peak bloom perennials; container plantings by entryways. Water deeply during dry spells.
– Fall: Ornamental grasses for texture; chrysanthemums in urns. Prepare plants for dormancy.
– Winter: Evergreen structure (boxwood spheres, holly); berry-producing shrubs (winterberry) for wildlife and color. Clean and store outdoor cushions before first frost.
Small-space adaptation: For urban townhouses, focus on the entry zone. A pair of matching planters (clay urns) flanking the door with seasonal arrangements. A wall-mounted lantern on either side of the door. A small bench with storage for gardening tools. Vertical gardening on fences with espaliered fruit trees or climbing roses maximizes impact.
Budget-Friendly Pathways to Traditional Elegance
Achieving traditional design doesn’t require significant financial resources or a historic mansion. With strategic prioritization and creative resourcefulness, you can layer timeless elements incrementally. This section provides actionable tiers—from immediate low-cost adjustments to phased multi-year plans—so every reader can begin today, regardless of constraints.
The “First 24 Hours” Starter Kit (Minimal Cost):
– Declutter with intention: Remove items that don’t align with calm, collected aesthetics (mismatched mugs, expired decor). Donate or discard. This creates immediate visual breathing room.
– Symmetry adjustment: Rearrange existing furniture to create balanced groupings. Move two end tables to flanking positions with identical lamps. Hang two existing prints at equal heights on either side of a bed.
– Textile refresh: Wash and neatly fold throws. Swap out bright, patterned pillows for solid-color options in neutral tones (thrift stores often have inexpensive linen or cotton pillow covers). Iron curtains to remove wrinkles—crisp fabric reads as intentional.
– Lighting adjustment: Replace cool white bulbs (4000K+) with warm white (2700K–3000K) LED bulbs throughout the home. Install dimmer switches on key fixtures (living room, dining room)—DIY kits are accessible and transform ambiance instantly.
– Greenery infusion: Place a single stem of eucalyptus or a small potted ivy in a simple ceramic vase on a console table or windowsill. Fresh greenery signals care and life.
Phase 1: Foundational Shifts ($100–$500):
– Paint power: Repaint one high-impact wall in a rich, traditional color (deep navy accent wall in living room; warm taupe in bedroom). Use sample pots first to test in different lights. Pro tip: Painting interior doors and trim the same color as walls can create a modern-traditional blend that feels cohesive.
– Hardware swap: Replace builder-grade cabinet pulls and door handles with unlacquered brass or oil-rubbed bronze options. Measure existing hole spacing (center-to-center) before purchasing. This single change elevates kitchens and bathrooms dramatically.
– Thrifted treasures: Dedicate time to local antique malls, estate sales, or online marketplaces. Hunt for: solid wood frames (refinish or repaint), vintage brass candlesticks, ceramic pitchers, wool blankets. Clean thoroughly; minor imperfections often add character.
– Accessible millwork: Install adhesive-backed foam crown molding in one room (bedroom or dining room). Follow installation instructions precisely for seamless results. Paint to match walls or contrast subtly.
– Rug layering: Purchase a neutral, textured natural fiber rug (sisal, jute) as a base layer. Later, layer a smaller vintage-style rug on top. This adds depth and defines spaces affordably.
Phase 2: Strategic Investments ($500–$2,500):
– Lighting upgrade: Replace a builder-grade flush-mount ceiling light with a semi-flush mount fixture featuring traditional details (crystal accents, fabric shade, wrought iron). Prioritize entryway or dining room for maximum impact. Consult a qualified electrician if uncomfortable with wiring.
– Window treatment foundation: Install wood blinds or roman shades for light control and privacy. Later, add curtains. Measure windows precisely; custom-cut blinds ensure clean lines.
– Furniture restoration: Find a solid wood chair or small table at a thrift store. Strip old finish (safely, with proper ventilation), sand, and refinish with tung oil or paint. Reupholster seat with durable fabric. This builds skills and yields unique pieces.
– Art curation: Commission a local art student to create a landscape or botanical study in a traditional style. Frame simply. Or purchase high-quality prints of public domain artworks (many museum collections offer free downloads). Mat and frame uniformly.
– Built-in illusion: Build simple floating shelves flanking a fireplace or bed using pre-cut wood and brackets. Stain or paint to match existing woodwork. Style with books and a few objects. Creates custom look affordably.
Phase 3: Transformative Projects ($2,500+):
– Millwork installation: Hire a skilled carpenter to add wainscoting to dining room or chair rail to hallway. Get multiple quotes; specify materials (MDF for painted areas, solid wood for stained). This permanently elevates architectural character.
– Kitchen refresh: Reface cabinet doors (replace fronts while keeping boxes) with Shaker-style panels. Change hardware. Update backsplash with classic subway tile. Less disruptive and costly than full remodel.
– Hardwood floor refinishing: If existing floors are hidden under carpet, hire professionals to sand and refinish. Choose a matte or satin finish for authenticity. Stain to complement existing wood tones in home.
– Exterior enhancement: Repaint front door and shutters in traditional colors. Replace porch light fixture with a period-appropriate lantern. Add matching planters with seasonal arrangements.
Mindset shift: Value over initial cost
– Cost per use: A durable wool rug used daily for many years may offer better long-term value than frequent replacements of less durable options.
– Quality consideration: Investing in one well-constructed item (solid wood dining chair) may provide greater longevity than multiple lower-quality versions. Research construction details (mortise-and-tenon joints, hand-tied springs).
– Patience as strategy: Create a dedicated “design fund.” Add a small amount regularly. In time, you’ll accumulate resources for meaningful purchases. Collecting pieces slowly ensures each item is loved and intentional.
Navigating Common Pitfalls and Modern Misconceptions
Even well-intentioned efforts can encounter challenges. This section addresses frequent friction points with clear, actionable solutions—turning potential frustrations into opportunities for deeper understanding. Traditional design is often misunderstood; clarifying these nuances builds confidence in your choices.
Pitfall 1: “Traditional design is dark, stuffy, and outdated.”
Root cause: Misapplication of historical elements without adaptation to modern lifestyles and abundant lighting. Victorian-era homes used darker colors partly due to limited gaslight; today’s electric lighting allows lighter palettes while retaining traditional details.
Solution framework:
– Lighten foundations: Use warm whites, soft taupes, or pale blues on walls instead of deep burgundies. Keep ceilings bright (same as walls or slightly lighter).
– Maximize natural light: Avoid heavy drapes that block windows during daytime. Use sheer underlays with fabric curtains that can be tied back fully.
– Scale appropriately: In smaller rooms, choose furniture with slender profiles (tapered legs vs. bulky rolled arms). Avoid overcrowding—leave generous floor space.
– Material blends: Pair traditional silhouettes with contemporary fabrics (performance linen that resists stains) or finishes (matte black hardware on Shaker cabinets for subtle contrast).
Insight: Preservation resources often emphasize that “historically appropriate” doesn’t mean “historically identical.” Sensitive updates that honor original intent while supporting modern comfort—like adding discreet insulation behind historic plaster walls—are widely supported by heritage organizations.
Pitfall 2: “I can’t do traditional design in a modern/open-concept home.”
Root cause: Viewing traditional design as requiring closed-off rooms and ornate architecture, rather than a flexible philosophy of proportion and layering.
Solution framework:
– Define zones with rugs and lighting: Use area rugs to anchor distinct areas (living, dining) within open space. Hang pendants at varying heights to create visual separation without walls.
– Repeat materials intentionally: Carry the same wood species (oak floors throughout), metal finish (all unlacquered brass), and color undertones (warm neutrals) across all zones for cohesion.
– Architectural illusions: Install floor-to-ceiling bookshelves as room dividers. Add crown molding consistently throughout the open area. Use coffered ceiling details in the main living zone to define it architecturally.
– Furniture as architecture: Position a console table behind a sofa to create a visual backrest and define the living area’s edge. Angle a pair of chairs to face the seating group, reinforcing the zone.
Illustrative case: A loft with high ceilings and concrete floors achieved traditional warmth by installing wide-plank oak flooring, adding substantial crown molding, using a large rug to ground the living area, and selecting furniture with classic lines (rolled-arm sofa, Queen Anne chairs) in performance fabrics. The contrast between industrial shell and traditional furnishings created dynamic, layered elegance.
Pitfall 3: “Authentic traditional pieces are too expensive or hard to find.”
Root cause: Equating “traditional” exclusively with antique stores or high-end reproduction furniture, overlooking accessible alternatives and the power of curation.
Solution framework:
– Thrift with strategy: Visit estate sales in older neighborhoods; focus on solid wood pieces (check for dovetail joints in drawers). Look past outdated finishes—wood can often be refinished. Target smaller items first: side tables, chairs, frames.
– Contemporary retailers: Many mainstream brands offer traditional-inspired pieces at accessible prices. Read reviews for durability notes and construction details.
– DIY transformation: A dated but structurally sound dresser can be painted (chalk paint for matte finish), fitted with new traditional hardware, and lined with vintage-style wallpaper inside drawers. Online tutorials offer guidance for specific techniques.
– Temporary solutions: For special occasions, rent antique dining chairs from local party rental companies. Borrow a vintage rug from a family member for photos or events.
Value perspective: A thrifted solid wood chair, refinished and reupholstered, may offer greater longevity and character than a new reproduction at a similar initial price point. Consider long-term value, not just upfront cost.
Pitfall 4: “Mixing traditional with other styles looks messy.”
Root cause: Random combination without unifying principles, creating visual chaos rather than intentional eclecticism.
Solution framework:
– Anchor with traditional foundation: Let traditional elements form the majority (architectural details, main furniture silhouettes, color palette). Introduce non-traditional pieces as deliberate accents.
– Unify through repetition: If adding a mid-century modern chair, repeat its wood tone elsewhere (a side table) or its color in a pillow. If using a contemporary abstract painting, frame it in a classic gilt frame to bridge styles.
– Respect scale and proportion: A massive modern sculpture may overwhelm a delicate Federal-style room. Choose accent pieces proportional to the space and existing furniture.
– Test before committing: Live with a potential “mix” piece for a week. Place it in the room. Does it feel intentional, or does your eye keep stumbling over it? Trust your perception—if it creates tension rather than interest, reconsider.
Design principle: “Contrast creates interest; cohesion creates comfort.” The goal isn’t uniformity, but harmony. A sleek glass coffee table can work beautifully with a traditional sofa if the rug underneath has traditional patterns and the lamp on the table has a classic base.
Pitfall 5: “Maintaining traditional materials is high-maintenance.”
Root cause: Fear of patina, wear, or specialized care requirements preventing adoption of authentic materials.
Solution framework:
– Embrace patina as character: Unlacquered brass darkens gracefully—this isn’t damage, it’s evolving beauty. Wipe with a soft cloth; avoid harsh polishes that strip developing patina. Many find the warm, mellowed finish more beautiful than shiny new brass.
– Practical protection: Apply felt pads to all furniture legs. Use coasters under glasses. Place rugs in high-traffic areas to protect floors. These small habits prevent major damage.
– Modern material advances: Today’s performance fabrics mimic linen or velvet but resist stains and fading. Engineered hardwood offers the look of solid wood with greater stability in humid climates. High-quality vinyl plank flooring convincingly mimics wide-plank oak with waterproof properties.
– Maintenance rhythm: Create a simple seasonal checklist: Spring—clean windows, refresh mulch; Summer—check outdoor furniture cushions; Fall—seal stone surfaces if recommended, store outdoor textiles; Winter—dust millwork, check HVAC filters near wood surfaces. Small, regular efforts prevent overwhelming tasks.
Philosophical perspective: Traditional design often celebrates the passage of time. A scratch on a wood table tells a story of family meals. Faded curtains recall sunny afternoons. This isn’t neglect—it’s evidence of a life well-lived within beautiful surroundings.
DIY Projects to Infuse Traditional Charm
Hands-on projects build connection to your home while adding authentic character. These carefully selected projects range from beginner-friendly to intermediate, with precise instructions, material lists, and safety considerations. Each reinforces core traditional principles while yielding tangible results. Always prioritize safety: wear eye protection, follow tool instructions, and work in well-ventilated areas. Consult qualified professionals for electrical, structural, or complex plumbing work.
Project 1: Faux Wainscoting with MDF Panels (Beginner)
Transform plain walls into architectural features affordably. Ideal for dining rooms, hallways, or bedrooms.
Materials:
– 1/4-inch MDF panels (calculate based on wall dimensions)
– 1×3 or 1×4 pine boards for frame
– Construction adhesive
– 18-gauge finishing nails (1.5 inch)
– Wood filler
– Sandpaper (120 and 220 grit)
– Primer and paint (semi-gloss for durability)
– Caulk (paintable)
– Level, tape measure, pencil
– Safety goggles, dust mask, work gloves
Step-by-step:
1. Prep wall: Clean thoroughly. Remove outlet covers. Patch holes; sand smooth. Prime entire wall surface.
2. Mark layout: Determine wainscoting height (standard 36 inches). Use level to draw horizontal line around room. Mark vertical panel divisions every 16–24 inches.
3. Cut frame pieces: Miter-cut pine boards at 45 degrees for corners. Cut horizontal rails to fit between vertical stiles. Dry-fit all pieces on floor first.
4. Attach frame: Apply construction adhesive to back of horizontal rails. Position on wall along marked lines. Secure with finishing nails into studs (use stud finder). Repeat for vertical stiles. Check level constantly.
5. Install panels: Cut MDF panels to fit within frame openings (leave 1/8-inch gap for expansion). Apply adhesive to panel back; press into frame. Secure with finishing nails at edges.
6. Finish: Fill nail holes and seams with wood filler. Sand smooth when dry. Caulk all inside corners and panel seams. Prime entire assembly. Paint with two coats of semi-gloss paint.
7. Reinstall: Replace outlet covers. Style with a console table or artwork above.
Pro tips: For raised-panel effect, add a smaller rectangle of MDF centered within each frame section. Use a router with a round-over bit on frame edges for softer profile. Paint frame and panels the same color for seamless look, or contrast colors for definition.
Project 2: Custom Upholstered Headboard (Intermediate)
Create a luxurious focal point for your bedroom with tailored fabric and perfect proportions. Adaptable to any bed size.
Materials:
– 1/2-inch plywood cut to headboard dimensions (width = mattress width + 4 inches; height = desired height, typically 48–60 inches)
– High-density foam (2–3 inch thick, same dimensions as plywood)
– Batting (enough to wrap foam and plywood with 6-inch overlap)
– Upholstery fabric (width = plywood width + 12 inches; length = plywood height + 12 inches)
– Staple gun with 1/4-inch staples
– Scissors, utility knife
– Spray adhesive
– D-ring hangers and screws
– Sandpaper, wood stain or paint (optional)
Step-by-step:
1. Prepare plywood: Sand edges smooth. Stain or paint if desired (let dry completely). Mark center point on top edge for hanging.
2. Attach foam: Lay plywood on floor. Spray adhesive on plywood surface and foam bottom. Press foam firmly onto plywood. Let dry per adhesive instructions.
3. Wrap batting: Lay batting on floor. Place foam-side-down onto batting. Pull batting tightly over edges; staple to plywood back every 2 inches. Trim excess. Critical: Pull batting taut to avoid wrinkles.
4. Attach fabric: Lay fabric pattern-side down. Place batting-wrapped board on top. Pull fabric tightly over edges; staple center of each side first, then work toward corners. Fold corners like wrapping a present for clean finish. Trim excess fabric.
5. Mounting: Attach D-ring hangers to back near top edge (positioned to align with wall studs). Use appropriate wall anchors. Hang securely.
6. Final touch: Steam fabric lightly to remove wrinkles. Position bed against headboard.
Fabric selection guide: Linen-look cotton for casual elegance; velvet for luxury (choose performance velvet for durability); wool blend for texture and warmth. Avoid slippery silks or delicate brocades for DIY projects. Pre-wash fabric to prevent shrinkage.
Project 3: Antique Mirror Restoration (Beginner)
Breathe new life into a thrifted or inherited mirror with cloudy glass or damaged frame. Preserves history while enhancing beauty.
Materials:
– Vintage mirror (check for silvering damage—dark spots may indicate irreparable damage)
– Glass cleaner, microfiber cloths
– Painter’s tape
– Fine steel wool (0000 grade) or silver polish (for frame only)
– Wood cleaner/restorer (if wooden frame)
– Replacement mirror clips (if needed)
– Safety gloves, goggles
Step-by-step:
1. Assess condition: Examine glass for cracks or “desilvering” (black spots). If severe, consult a professional glazier for glass replacement. Minor cloudiness on front surface can often be cleaned; damage behind glass typically cannot be fixed DIY.
2. Clean glass: Spray glass cleaner on microfiber cloth (not directly on mirror to avoid seeping behind). Wipe gently in circular motion. For stubborn spots, use distilled vinegar solution (1:1 vinegar/water).
3. Restore frame:
– Wood frames: Clean with wood cleaner. For scratches, use matching wood stain marker. For deeper restoration, lightly sand with fine grit, apply wood conditioner, then stain. Finish with paste wax for protection.
– Gilt frames: Dust gently with soft brush. For tarnished metal details, use 0000 steel wool very lightly with mineral oil. Avoid water on antique gilt—it can dissolve the finish.
4. Secure glass: Check mirror clips on back. Tighten loose clips; replace missing ones. Ensure glass is snug but not overtightened (can crack glass).
5. Rehang: Use appropriate wall anchors for weight. Hang with wire attached to D-rings on frame back (not just the frame itself). Level carefully.
Ethical note: For historically significant mirrors (pre-1900, maker’s mark), consult a conservator before attempting restoration. Some patina has historical value.
Project 4: Hand-Painted Furniture Accent (Beginner)
Add custom traditional detail to a plain piece—like a floral motif on a dresser drawer front or stripes on a side table.
Materials:
– Clean, primed furniture piece (or existing piece sanded and primed)
– Acrylic craft paints in traditional colors (creams, sage, navy)
– Fine detail paintbrushes (sizes 0, 2, 4)
– Pencil, eraser
– Painter’s tape
– Clear water-based polyurethane (matte finish)
– Paper towels, water cup
Step-by-step:
1. Design transfer: Sketch design lightly on paper. Tape paper to furniture surface. Trace over lines firmly with pencil; remove paper to leave faint graphite impression. Or freehand directly with pencil.
2. Base coat: Paint entire surface with base color. Let dry completely (follow paint instructions). Lightly sand with 220 grit for smoothness; wipe clean.
3. Paint details: Start with lightest color. Use small brush for outlines. Work slowly; let layers dry between colors to prevent bleeding. For stripes, use painter’s tape for crisp edges.
4. Seal: Once fully dry (follow paint instructions), apply 2–3 thin coats of matte polyurethane, sanding lightly with 320 grit between coats. This protects paint while maintaining traditional matte appearance.
5. Distress (optional): For antique effect, lightly sand edges and corners after final sealant coat to reveal base wood or undercoat.
Design inspiration: Chinoiserie-inspired branches with blossoms; Greek key border; delicate vines; monogram. Practice on scrap wood first. Less is more—single accent drawer often has more impact than entire piece covered.
Traditional Design Across Architectural Styles
Traditional design isn’t monolithic. Its expression shifts gracefully across architectural eras, each with distinct characteristics rooted in historical context, regional influences, and technological capabilities. Understanding these nuances allows you to honor your home’s inherent character while making informed choices. This guide clarifies key styles with visual identifiers, period-appropriate details, and respectful adaptation strategies.
Georgian (1714–1830): Order and Proportion
Hallmarks: Strict symmetry, multi-pane windows (often 9-over-9 or 12-over-12), paneled front doors with decorative crowns (pediments), brick or clapboard siding, hipped or side-gabled roofs, dentil molding.
Interior signatures: Elaborate crown molding, raised-panel wainscoting, ornate mantelpieces with broken pediments, rich wood floors (wide plank), formal room layouts. Historic color palettes featured deep reds, blues, and greens derived from natural pigments.
Modern adaptation: Emphasize symmetry in furniture arrangement. Use dentil molding details on built-ins. Choose furniture with cabriole legs and ball-and-claw feet (Chippendale style). Paint wainscoting in historic colors like “Palladian Blue” with cream walls. Avoid overly ornate Victorian details that clash with Georgian restraint.
Federal (1780–1820): Refined Neoclassicism
Hallmarks: Delicate Adamesque details (swags, urns, feathers), fanlights over doors, Palladian windows, low-pitched roofs, brick construction with white trim. More slender proportions than Georgian.
Interior signatures: Oval or circular rooms, delicate plaster ceiling medallions, reeded (fluted) woodwork, Hepplewhite and Sheraton furniture (shield-back chairs, tapered legs), pastel color accents (pale yellow, soft green) against white or cream.
Modern adaptation: Incorporate elliptical shapes—oval mirrors, round dining tables. Use reeded detailing on cabinet doors or table legs. Select furniture with straight tapered legs and subtle inlays. Wallpaper with delicate neoclassical motifs in powder rooms or studies. Keep ornamentation refined.
Victorian (1837–1901): Ornate Eclecticism
Hallmarks: Steeply pitched roofs, ornate gingerbread trim, bay windows, towers/turrets, vibrant “painted lady” color schemes (three+ colors highlighting architectural details).
Interior signatures: Dark woodwork (walnut, rosewood), heavy draperies with tassels, pattern-on-pattern (wallpaper, rugs, upholstery), stained glass transoms, displays of collections. Substyles include Gothic Revival (pointed arches), Italianate (bracketed eaves), and Queen Anne (asymmetrical, wrap-around porches).
Modern adaptation: Edit thoughtfully. Choose one Victorian element to highlight (stained glass window, fireplace surround) and keep other elements simpler. Use rich colors sparingly as accents (emerald velvet pillow, navy library wall). Select furniture with carved details but cleaner lines. Avoid overwhelming small spaces with excessive pattern—limit wallpaper to one accent wall.
Colonial Revival (1880–1955): Nostalgic Homage
Hallmarks: Symmetrical facade, columned porticos, multi-pane double-hung windows (6-over-6), sidelights and transoms around doors, brick or clapboard, shutters.
Interior signatures: Practical layouts, built-in cabinetry (china cabinets, window seats), simpler millwork than Georgian, warm wood tones. A 20th-century interpretation of earlier Colonial styles, designed for modern families.
Modern adaptation: This is often the most accessible traditional style for contemporary homes. Emphasize symmetry and practical built-ins. Use Shaker-style cabinetry in kitchens. Choose furniture with clean lines but traditional proportions (roll-arm sofas, ladder-back chairs). Warm neutrals with deep accent colors (burgundy, forest green) feel authentic.
Craftsman/Bungalow (1905–1930): Handcrafted Simplicity
Hallmarks: Low-pitched gabled roofs with wide eaves, exposed rafters, tapered square columns, porches, natural materials (wood, stone, brick).
Interior signatures: Built-in cabinetry and benches, coffered ceilings, art glass windows (geometric patterns), mission-style furniture (straight lines, visible joinery), earthy color palettes (ochre, olive, rust).
Modern adaptation: Celebrate wood grain—use stained wood trim instead of paint. Incorporate built-ins wherever possible. Choose furniture with mortise-and-tenon construction. Use art glass or leaded glass reproductions in doors or transoms. Textiles should feature natural fibers and Arts and Crafts patterns.
Respecting your home’s character:
– Research first: Check local historical society records, original blueprints (if available), or architectural style guides. Note original window configurations, door styles, and trim profiles.
– Preserve where possible: If original windows are drafty, explore restoration with weatherstripping and storm windows instead of replacement. Original wood floors can often be refinished; patch damaged sections with matching reclaimed wood.
– Sensitive additions: When adding millwork, match existing profiles. Take a sample of existing crown molding to a millwork shop for replication. Use period-appropriate hardware.
– When to adapt: If original features are missing or damaged beyond repair, choose replacements that harmonize with the style and support modern living. A Colonial Revival home might benefit from a butler’s pantry addition that echoes original cabinetry details while providing needed storage.
Your Questions, Answered
Q: Is traditional design only for large, old houses?
A: Not at all. Traditional design principles—symmetry, quality materials, thoughtful proportion—are scalable to any space. In a small apartment, focus on layered textiles, intentional furniture arrangement, and curated accessories. A well-placed mirror, consistent color palette, and one architectural detail (like adhesive crown molding) create traditional elegance regardless of square footage. Many historic urban homes were modest in size; their charm came from intentional details, not vast rooms.
Q: How do I incorporate family heirlooms that don’t match my current style?
A: Heirlooms often bring soul and story to traditional design. Instead of forcing them to “match,” create intentional contrast. A modern room gains warmth from a vintage quilt draped over a sofa. Place a grandmother’s porcelain vase on a contemporary console; its history becomes a talking point. If an heirloom feels jarring, consider gentle adaptation: recover an outdated chair in a fabric that complements your palette, or display inherited china in a glass-front cabinet as art. The goal is integration, not perfection.
Q: Can traditional design work with an open floor plan?
A: Yes, by using “soft architecture” to define zones. Area rugs anchor distinct areas (living, dining). Consistent millwork (crown molding throughout) creates visual continuity. Repeat materials intentionally: the same wood species in flooring and furniture, identical metal finishes on lighting and hardware. Furniture arrangement is key—position a console table behind a sofa to create a visual backrest for the living area, or use a bookshelf as a room divider. Lighting layers (pendants over dining table, floor lamps in seating area) further delineate spaces without walls.
Q: What’s the difference between traditional and farmhouse style?
A: Farmhouse is often considered a subset of traditional design with specific rustic influences. Traditional design encompasses Georgian, Federal, Victorian, and other historical styles with emphasis on proportion, symmetry, and refined details. Farmhouse style draws specifically from rural agricultural homes: simpler millwork (board-and-batten instead of raised panels), utilitarian furniture (trestle tables, ladder-back chairs), and materials like galvanized metal, reclaimed wood, and apron-front sinks. Think of traditional as the broader philosophy; farmhouse as one expression within it.
Q: How do I avoid making my home look like a museum?
A: Prioritize comfort and lived-in authenticity. Choose upholstery fabrics that invite sitting (not just looking). Include personal items: family photos in simple frames, children’s artwork displayed thoughtfully, books you actually read. Allow textiles to show gentle use—a slightly rumpled linen sofa cushion feels welcoming. Mix high and low: a vintage rug with a comfortable modern sofa. Most importantly, design for your rituals: a deep windowsill for morning coffee, a well-lit corner for reading, a dining table sized for your typical gatherings. A home should serve life, not display it.
Q: Are there eco-friendly ways to achieve traditional design?
A: Traditional design aligns naturally with sustainable values—emphasizing quality over quantity, natural materials, and longevity. Source reclaimed wood for projects (check salvage yards). Choose FSC-certified wood furniture. Use low-VOC paints and finishes. Restore existing pieces instead of buying new. Select natural fiber textiles (organic cotton, linen, wool). Even small choices matter: LED bulbs in traditional fixtures reduce energy use while maintaining ambiance. The “buy once, use long-term” mindset reduces waste over time.
Q: How do I handle traditional design with young children or pets?
A: Adapt materials without sacrificing aesthetics. Performance fabrics (Crypton, Revolution) mimic linen or velvet but resist stains and odors. Choose durable finishes: matte paint hides scuffs better than gloss; honed stone countertops are less slippery than polished. Secure rugs with non-slip pads. Place delicate accessories on high shelves. Embrace the philosophy that wear tells a story—a scratch on a wood table from family game nights is part of your home’s history. Designate a “kid-friendly” zone with durable, washable pieces so formal areas can remain elegant.
Q: What if I inherit a home with mismatched traditional elements?
A: Create cohesion through unifying threads. Identify the dominant architectural style (check window styles, roof shape, original trim). Restore or replicate those details where possible. Use a consistent color palette throughout—paint all trim the same warm white, choose one wood stain tone for floors and built-ins. Repeat metal finishes (all unlacquered brass hardware). Edit accessories to reflect the primary style. If elements are truly incompatible, consult a preservation specialist for sensitive solutions—sometimes removing non-historic additions restores integrity.
Q: Can I mix traditional design with bold, modern art?
A: Yes, when done intentionally. Anchor the room with traditional architecture and furniture. Choose one or two significant modern art pieces as focal points. Unify through framing: place contemporary art in classic gilt or wood frames. Repeat a color from the artwork in traditional textiles (a pillow, rug accent). Avoid scattering many small modern pieces—they can create visual chaos. The goal is dialogue between old and new, not competition.
Q: How do I find authentic traditional furniture on a budget?
A: Shift focus from “antique” to “authentic construction.” Hunt estate sales in older neighborhoods for solid wood pieces (check for dovetail joints, mortise-and-tenon frames). Visit salvage yards for architectural elements (doors, mantels). Many reproduction companies offer entry-level lines with traditional joinery. Online marketplaces often have hidden gems—search “solid wood,” “dovetail,” “refinish.” Learn basic restoration: sanding, staining, reupholstering. A thrifted chair, restored with care, yields a unique, durable piece with character.
Q: Is white trim always necessary in traditional design?
A: No—this is a modern convention. Historically, trim was often painted the same color as walls to create seamless, expansive spaces (common in Georgian homes). Or, trim was stained to match wood floors and doors. Today, choose based on desired effect: warm white trim adds crisp definition; matching wall color creates calm flow; stained wood trim celebrates craftsmanship. Test samples: paint a large board with your wall color and trim color options; view at different times of day. The right choice enhances your home’s architecture and light.
Q: How do I maintain traditional elegance while working from home?
A: Integrate workspace thoughtfully. Place a desk in a secondary area (alcove, corner) rather than dominating the main living space. Choose a desk with traditional lines (roll-top, partners desk style) in a wood tone that complements the room. Conceal cords with cable management sleeves or by routing them behind furniture. Use a desk lamp with a traditional base for task lighting. Store work materials in a closed cabinet or drawer at the end of the day to maintain the room’s serene appearance. This preserves the traditional ambiance while accommodating modern needs.
Conclusion and Next Step
-
Recap: Traditional design is not about rigid rules but a flexible framework centered on symmetry, architectural integrity, layered palettes, authentic materials, purposeful layouts, and curated accessories. By adapting these pillars to your unique space, budget, and lifestyle—and learning from common pitfalls—you create environments that feel both timeless and deeply personal. The goal is intentionality: every choice reflecting how you live and what brings you comfort.
-
The 24-Hour Rule: Within the next day, select one small area in your home (a bookshelf, a windowsill, or a single wall) and apply one principle from this guide. Rearrange two items to improve visual balance, swap a harsh lightbulb for a warm 2700K LED, or add a single stem of greenery. Notice how this intentional shift alters the atmosphere. Small, consistent actions build lasting change without overwhelm.
-
The Big Picture: Traditional design connects us to a continuum of human craftsmanship and mindful living. In a world of disposability, choosing quality, honoring history, and creating spaces that nurture daily rituals is a quiet act of stewardship. Your home becomes more than shelter—it’s a sanctuary for connection, a canvas for your story, and a legacy of care that evolves gracefully across seasons and generations. The most enduring elegance isn’t found in perfection, but in the warmth of a space that truly feels like home.
Explore Our Complete System:
The Art of Architectural Millwork | Color Theory for Timeless Interiors | Sustainable Sourcing for Heritage Homes | Furniture Restoration Fundamentals | Garden Design Through the Seasons | Lighting Layers for Ambiance | The Philosophy of Proportion and Scale