Stop Guessing, Start Knowing: A Step-by-Step Framework to Evaluate Damage Severity, Prioritize Repairs, and Know Exactly When to Call a Professional
You walk into your basement and spot a hairline crack along the foundation wall. Later, you notice a faint water stain blooming on the ceiling beneath the bathroom. Your finger brushes a section of baseboard that feels strangely soft. In that moment, your mind races: Is this dangerous? How urgent is it? Should I call someone tonight? Without a clear system to assess damage, homeowners face unnecessary stress, delayed repairs that escalate costs, or wasted resources on non-urgent issues. This guide presents a structured framework adapted from established assessment protocols used by building professionals to objectively evaluate any home damage—structural, water, fire, pest, electrical, or weather-related—so you can make informed decisions that protect safety, preserve your home’s integrity, and maintain peace of mind. No jargon. No panic. Just clarity grounded in observable evidence.
Introduction: Why Damage Assessment Is a Foundational Homeownership Skill
Homes function as interconnected systems where a single symptom may signal anything from harmless seasonal movement to progressive deterioration. A hairline crack in drywall at a non-structural corner often reflects normal humidity shifts; the same-width crack in a load-bearing foundation wall could indicate soil movement requiring attention. The critical distinction lies not in the visible mark alone, but in context, location, progression patterns, and underlying causation. Effective damage assessment cultivates a repeatable methodology to gather evidence, interpret physical clues, and prioritize actions with precision. This approach aligns with principles documented in building science resources and assessment guidelines referenced by certified home inspectors and restoration specialists. By internalizing this system, you shift from reactive uncertainty to proactive stewardship—transforming observation into actionable insight while safeguarding occupants and your home’s long-term resilience.
The Severity Spectrum Framework: Your Four-Level Damage Assessment System
Before examining specific damage types, master this universal framework. It categorizes any observed issue into one of four severity levels using three objective dimensions: Safety Risk (immediate threat to occupants), Structural/Systemic Impact (effect on core integrity or critical systems), and Progression Speed (how rapidly the condition changes without intervention). Apply this spectrum consistently—it reduces emotional guesswork and creates a shared language for discussing concerns with professionals.
Level 1: Cosmetic or Minor (Low Priority)
- Safety Risk: None. Zero immediate hazard to occupants or pets.
- Impact: Purely aesthetic. Does not affect functionality, structural elements, or system performance. No risk of secondary damage.
- Progression: Static or extremely slow (years). Unlikely to change without external catalysts.
- Documented Examples:
- Nail pops or hairline cracks (<1/16 inch) in drywall at non-structural corners
- Minor scuff marks on hardwood flooring from furniture movement
- Faded paint on sun-exposed exterior trim
- Small chip in ceramic tile grout (non-moisture areas)
- Action Protocol: Monitor during routine home checks. Repair for appearance at your convenience. No professional consultation required. Why this matters: Addressing Level 1 issues prevents psychological clutter (“I should fix that”) but avoids misallocating resources from genuine priorities.
Level 2: Moderate Concern (Schedule Repair Within Weeks)
- Safety Risk: Low. No acute danger, but potential for minor injury if ignored (e.g., tripping on a lifted floorboard).
- Impact: Affects functionality of a component or creates conditions for secondary damage. Does not threaten structural integrity.
- Progression: Gradual. Noticeable change over weeks to months. Early intervention prevents escalation.
- Documented Examples:
- Foundation crack 1/16 to ¼ inch wide with no displacement, appearing after seasonal freeze-thaw cycle
- Persistent water stain (3–6 inches diameter) on ceiling below bathroom, dry to touch but recurring after showers
- Minor wood rot (less than 2 inches deep) on non-structural exterior window sill
- Sticking interior door due to humidity-induced wood swelling (resolves in dry weather)
- Action Protocol: Investigate source thoroughly. Document with dated photos. Schedule repair within 1–4 weeks. May require handyman, plumber, roofer, or carpenter depending on root cause. Critical nuance: Level 2 issues often act as “silent escalators.” A small roof leak staining attic insulation, if unaddressed, may progress to framing damage or mold growth over time.
Level 3: Serious (Requires Professional Evaluation Within 72 Hours)
- Safety Risk: Moderate to high. Potential for injury, health hazards (mold exposure, electrical shock), or significant property deterioration.
- Impact: Compromises structural components, major systems (electrical, plumbing, HVAC), or creates conditions for rapid deterioration. May affect insurability.
- Progression: Active and accelerating. Visible worsening within days or weeks. Delay increases complexity and cost.
- Documented Examples:
- Foundation crack wider than ¼ inch with stair-step pattern in block wall, accompanied by sticking basement door
- Active water leak causing ceiling drywall to sag visibly (more than ½ inch deflection)
- Visible mold growth exceeding 10 square feet on wallboard behind refrigerator
- Frayed electrical cord on fixed appliance with exposed copper strands
- Termite mud tubes actively extending up foundation wall with live insects present
- Action Protocol: Limit exposure to the area. Implement temporary mitigation only if safe (e.g., place bucket under leak, turn off circuit breaker for affected outlet). Contact qualified professional within 24–72 hours. Do not attempt structural repairs, electrical work, or mold remediation beyond surface cleaning of small areas. Why timing matters: Delaying evaluation can allow compounding damage—such as moisture spreading to adjacent framing—to significantly increase repair scope.
Level 4: Critical/Emergency (Immediate Action Required)
- Safety Risk: Severe and immediate. Life-threatening conditions present (fire, gas leak, structural collapse risk, electrocution hazard).
- Impact: Catastrophic failure of structure or critical system. Irreversible damage likely without urgent intervention. Occupant evacuation may be necessary.
- Progression: Rapid or imminent. Situation can escalate within minutes to hours. Every moment counts.
- Documented Examples:
- Foundation wall bowing inward more than 1 inch with horizontal crack
- Strong odor of natural gas (rotten egg smell) near appliance or meter
- Visible electrical arcing/sparks from outlet, panel, or appliance
- Major flooding from burst pipe with water rising rapidly
- Fire damage compromising load-bearing beam (charring deeper than ¼ inch)
- Large tree limb resting on roof with visible structural deformation
- Action Protocol: Prioritize human safety above all. Evacuate immediately if structural instability, gas, fire, or electrical hazards are suspected. Call 911 or emergency utility line (e.g., gas company emergency number). Do not re-enter until cleared by authorities. Contact insurance provider promptly. Non-negotiable rule: Never attempt DIY fixes for Level 4 scenarios. Your role is evacuation, notification, and documentation from a safe location.
The Fundamental Principle: Severity is defined not by the size of the visible symptom alone, but by the intersection of risk, systemic impact, and progression velocity. A 1/8-inch crack in a load-bearing beam header warrants greater attention than a 2-inch crack in non-structural drywall. Context is everything.
Applying the Framework: A Step-by-Step Assessment Walkthrough
Follow this sequence for every observed issue. Consistency builds confidence.
- Ensure Personal Safety First: Before approaching damage, scan for Level 4 red flags: gas odor, sparks, structural sagging, standing water near electricity. If present, evacuate and call professionals. Never enter unstable crawl spaces, attics with compromised framing, or areas with extensive visible mold without proper respiratory protection.
- Document Objectively: Use your smartphone to capture multiple angles. Include a ruler, coin, or tape measure in one photo for scale. Note date, time, weather conditions (e.g., “after heavy rainfall”), and location (“north wall, 3 feet from corner”). This creates an immutable baseline for tracking changes.
- Identify Damage Type: Categorize broadly: structural, water, fire/smoke, pest, electrical, weather-related. This directs your investigative questions.
- Gather Contextual Clues:
- Location: Is it near plumbing penetrations? Exterior wall? Load-bearing point? Window header?
- Timing: Did it appear suddenly (burst pipe) or gradually (seasonal crack)? Correlate with recent events (storm, temperature swing, new appliance installation).
- History: Check home maintenance records. Has this area been repaired before? Review previous inspection reports if available.
- Measure and Describe Factually: Width, length, depth. Color (yellow stain vs. brown stain indicates relative age). Texture (powdery efflorescence vs. slimy mold). Moisture level (use finger test cautiously; better: inexpensive moisture meter). Avoid subjective terms like “huge” or “terrible”—stick to observable data.
- Assess Progression: Compare current state to prior documentation. Is the crack wider? Stain larger? New cracks radiating from original? Place removable tape across cracks and date it; check monthly for separation.
- Cross-Reference Severity Levels: Apply the three-dimensional criteria (Risk, Impact, Progression). When evidence straddles levels, default to the higher severity classification. Caution is prudent.
- Determine Immediate Action: Based on assigned level, execute the protocol. For Levels 3 and 4, have professional contact information ready (more on vetting later).
This methodology transforms subjective worry into objective analysis. Practice it on minor, known issues (e.g., a seasonal door stick) to build muscle memory for higher-stakes scenarios. Mastery develops through consistent application.
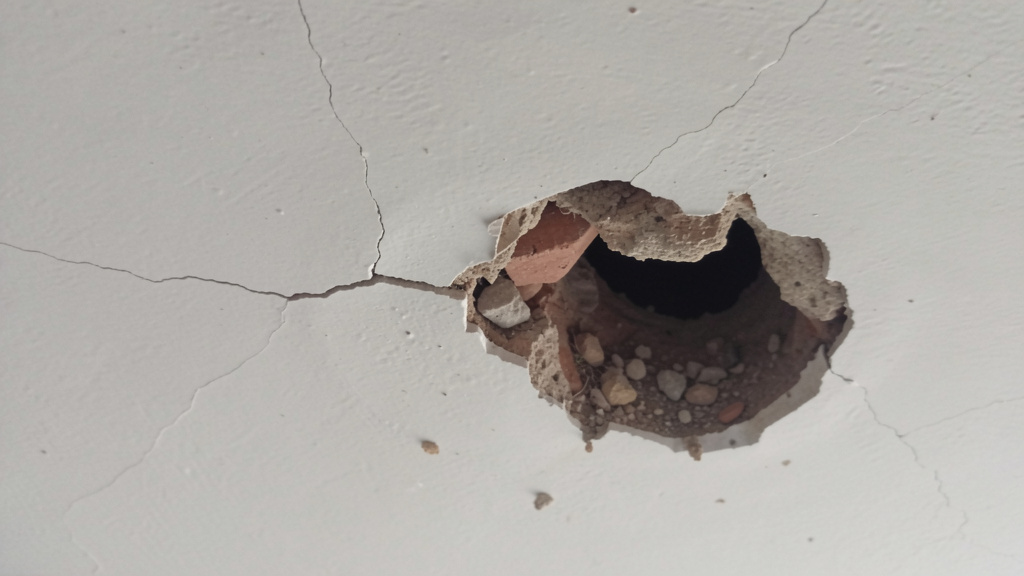
Structural Damage Assessment: Decoding Cracks, Shifts, and Settlement Patterns
Structural concerns understandably trigger anxiety. Yet panic is counterproductive. Most foundation and framing issues follow predictable patterns with clear assessment pathways. Learn the language of structural distress: crack orientation, location, width, and accompanying symptoms reveal the story.
Foundation Cracks: Reading the Concrete Narrative
Foundations endure constant pressure—from soil, moisture, temperature shifts. Cracks are common; their meaning varies dramatically by type.
Vertical Cracks in Poured Concrete Foundations
- Typical Cause: Shrinkage during curing (common in first 1–3 years) or minor, uniform settling. Concrete naturally contracts as it dries.
- Severity Assessment:
- Level 1: Hairline crack (<1/16 inch), straight, no water leakage, stable over 6+ months. Often appears mid-wall. Cosmetic only.
- Level 2: Crack 1/16 to ¼ inch wide, dry, but located near corner or utility penetration. Monitor quarterly. May allow minor moisture vapor transmission in humid climates.
- Level 3: Crack wider than ¼ inch, actively leaking water during rain, showing efflorescence (white, chalky mineral deposits), or widening measurably over 3 months. Indicates hydrostatic pressure or differential settlement requiring professional evaluation.
- Critical Differentiator: Use a feeler gauge or folded paper to measure width consistently. Track with dated photos. A crack growing from 1/8 inch to 3/16 inch in two months signals active movement—elevate to Level 3.
- Pro Assessment Tip: Shine a bright flashlight parallel to the wall surface. Shadows reveal subtle displacement invisible under direct light. Check both interior and exterior faces if accessible.
Horizontal Cracks: The High-Alert Signal
- Typical Cause: Lateral soil pressure (expansive clay soils), hydrostatic pressure from poor drainage, or frost heave in cold climates. Walls bow inward under force.
- Severity Assessment:
- Level 3 Minimum: Any continuous horizontal crack warrants professional assessment. Even hairline versions indicate sustained pressure. Risk escalates rapidly.
- Level 4 Indicators: Crack accompanied by visible bowing (use straightedge or level to measure deflection), bulging wall section, or cracks radiating upward/downward from the horizontal line. Deflection exceeding 1 inch over 8 feet is critical.
- Regional Note: In regions with expansive soils (parts of Texas, Colorado, California), horizontal cracks after prolonged drought followed by heavy rain are common failure points. Proactive drainage management is key prevention.
- Why This Matters: Horizontal cracks compromise the wall’s ability to resist soil load. Unlike vertical shrinkage cracks, they rarely stabilize without intervention. Delaying evaluation risks progressive bowing.
Stair-Step Cracks in Block or Brick Foundations
- Typical Cause: Differential settlement—uneven sinking of foundation sections due to soil variation, poor compaction, or moisture changes under footings.
- Severity Assessment:
- Level 2: Short crack confined to 1–2 mortar joints, less than 1/8 inch wide, no displacement. Common in older homes on stable soil. Monitor.
- Level 3: Crack spans 3+ courses of block, wider than 1/8 inch, shows stepped pattern progressing upward, or has measurable offset (one block higher than adjacent). Often accompanied by interior drywall cracks directly above.
- Level 4: Significant displacement (visible step between blocks), crack extending into above-grade framing, or accompanied by chimney separation from roofline. Indicates active, severe settlement.
- Field Test: Place a marble on the basement floor near the crack. If it consistently rolls toward the cracked wall, slope indicates settlement. Document direction and degree.
Above-Grade Structural Clues: Floors, Walls, and Framing
Damage manifests beyond the foundation. Learn these critical indicators.
Drywall and Plaster Cracks: Context Is King
- Level 1 Patterns:
- Hairline cracks at inside corners of doors/windows (common with seasonal wood framing movement)
- Vertical cracks at seam between drywall panels (poor taping during installation)
- Spiderweb cracking in plaster over wood lath (normal aging in pre-1950s homes)
- Level 2 Patterns:
- Cracks wider than 1/8 inch recurring in same location after repair
- Diagonal cracks extending from window/door corners more than 12 inches
- Cracks accompanied by seasonal sticking of doors/windows on that wall
- Level 3 Red Flags:
- Long diagonal cracks traversing entire wall section (not confined to corners)
- Cracks wider at top than bottom (or vice versa), indicating rotational movement
- Cracks aligned vertically across multiple floors (suggests foundation issue below)
- Visible separation between wall and ceiling/floor (gap >1/16 inch)
- Documentation Strategy: Sketch a simple floor plan. Mark crack location, direction, length, and width. Note correlation with exterior features (e.g., “crack aligns with downspout location”). This visual map is invaluable for professionals.
Sagging Floors: Beyond “Old House Charm”
All floors have slight deflection; concern arises with magnitude and change.
– Level 1: Uniform, slight bounce in older homes with dimensional lumber joists (e.g., 2x8s spaced 16″ apart). Common in center of long spans. No visible slope.
– Level 2: Noticeable slope detectable by marble test (marble rolls consistently in one direction over 10-foot span). May correlate with seasonal humidity changes. Check for undersized joists or removed support walls historically.
– Level 3: Measurable slope exceeding 1 inch over 10 feet, accompanied by:
– Cracks in walls/ceilings directly above
– Gaps appearing between floor and baseboards
– Creaking that intensifies over time
– Visible sag in ceiling below (if accessible basement/crawlspace)
Common Causes: Overspanned joists, deteriorated support beam, compromised sill plate from moisture, or removed load-bearing wall without proper header.
– Level 4 Emergency: Sudden sagging (noticed overnight), spongy feeling underfoot, visible gaps between floorboards, or floor pulling away from walls. Evacuate area immediately. Risk of collapse.
– Assessment Tool: Use a 4-foot level on the floor surface. Measure gap at end of level. Repeat in multiple directions. Document readings on sketch.
Chimney and Porch Movement: Independent but Telling
These elements often settle independently but can signal broader issues.
– Chimney Leaning:
– Level 2: Slight gap (<1/4 inch) between chimney and roof flashing. Monitor annually.
– Level 3: Visible lean (gap >1/2 inch at roofline), cracked mortar joints (spalling), or separation from house wall. Chimneys are heavy; leaning indicates foundation movement beneath chimney footing. Requires mason and structural evaluation.
– Porch/Settlement:
– Level 2: Minor crack where porch slab meets house foundation. Common with soil settlement.
– Level 3: Porch pulling away from house (gap >1 inch), uneven steps, or posts showing rot at base. Indicates footing failure. Safety hazard for occupants.
When to Engage a Structural Engineer: Clear Triggers
Do not delay professional evaluation if you observe:
– Any foundation crack wider than ¼ inch with evidence of movement (tape test shows separation)
– Horizontal cracks in foundation walls of any width
– Doors or windows that suddenly stick or won’t latch (not correlating with seasonal humidity changes)
– Visible bowing, bulging, or leaning of walls
– Stair-step cracks spanning multiple courses of masonry with displacement
– Sagging floors exceeding 1 inch over 10 feet with accompanying wall cracks
– Cracks that reappear identically after professional repair
A licensed structural engineer provides a detailed report outlining cause, severity classification, repair specifications, and monitoring recommendations. This documentation supports informed decisions for repairs, insurance claims, or future home transactions. The investment in professional evaluation is typically minor compared to risks of misdiagnosis.
Water Damage Assessment: Tracing the Invisible Path of Moisture
Water is deceptive. A small ceiling stain may originate from a roof leak 20 feet away. Moisture travels along framing, hides inside walls, and breeds biological hazards long after the source is gone. Accurate assessment requires detective work: find the source, map the path, evaluate saturation, and gauge secondary risks.
Step 1: Identify the Source—Before Assessing Damage
Repairing symptoms without stopping the source is futile. Systematically trace backward.
Roof Leak Investigation
- Attic Check (Critical): During or immediately after rain, enter attic with flashlight. Look for:
- Water stains on roof sheathing (plywood/OSB), rafters, or insulation
- Wet insulation (discolored, matted down—fiberglass loses effectiveness when wet)
- Daylight visible through roof boards (indicates missing shingles/underlayment)
- Pro Tip: Water follows the path of least resistance. A stain on the north side of the attic may originate from a south-facing roof leak due to wind-driven rain tracking under shingles. Trace the stain upward to the highest moisture point.
- Exterior Check: Use binoculars from ground. Look for:
- Missing, cracked, or curled shingles
- Damaged or missing flashing around chimneys, vents, skylights
- Clogged gutters causing water to back up under shingles
- Moss/lichen growth (indicates prolonged moisture retention)
Plumbing Leak Investigation
- Under-Sink Scan: Check supply lines, shutoff valves, P-trap for moisture, corrosion, or mineral deposits (white crust = slow leak).
- Toilet Base Test: Rock toilet gently. Movement indicates failed wax ring seal. Check floor around base for softness, discoloration, or odor.
- Appliance Connections: Inspect washing machine hoses (replace rubber with braided stainless steel periodically), dishwasher inlet/outlet, refrigerator ice maker line.
- Hidden Leak Detection:
- Water Meter Test: Ensure all water sources are off (no running toilets). Check meter dial. If it moves, you have a leak.
- Dye Test: Add food coloring to toilet tank. Wait 15 minutes. Color in bowl indicates flapper leak.
- Moisture Meter: Scan walls near plumbing stacks, under sinks, behind toilets. Readings consistently above baseline warrant investigation.
Window and Door Leak Investigation
- Exterior Inspection: Check caulking integrity around frame. Look for cracked sealant, missing drip caps, or clogged weep holes in vinyl windows.
- Interior Clues: Peeling paint, bubbling wallpaper, soft rotting wood on sill or jamb. Water often enters at top of window and travels down inside wall cavity.
- Spray Test (Dry Weather Only): Have helper spray water around window frame with garden hose while you observe inside with flashlight. Start at bottom, move upward. Note exactly where water appears.
Foundation Seepage Investigation
- Exterior Grading Check: Soil should slope away from foundation at least 6 inches over 10 feet. Flat or negative grading directs water toward walls.
- Gutter/Downspout Check: Downspouts should extend minimum 5 feet from foundation. Clogged gutters overflow near walls.
- Interior Signs: Damp smell, efflorescence (white powder) on walls, rust on metal fasteners, buckling paneling. Often worse after heavy/prolonged rain.
Step 2: Assess Visible Damage Severity
Once source is identified (or suspected), evaluate impact using Severity Spectrum.
Ceiling and Wall Stains
- Level 1: Small (<3 inch), dry, yellowish-brown stain with sharp edges. Indicates old, resolved leak. No current moisture. Cosmetic only.
- Level 2: Stain 3–12 inches, dry but recurring after rain/shower use. Edges may be fuzzy. Indicates intermittent leak. Requires source repair within weeks to prevent progression.
- Level 3: Stain larger than 12 inches, damp to touch, actively growing, or causing paint to bubble/peel. Ceiling drywall may feel soft or show slight sag (<½ inch). Place bucket, limit occupancy below, contact roofer/plumber within 48 hours.
- Level 4: Significant sagging (>½ inch), bulging drywall, or active dripping/pouring. Structural integrity of ceiling assembly compromised. Evacuate area below. Emergency repair required.
Flooring Damage: Material-Specific Assessment
- Solid Hardwood:
- Cupping (edges raised): Caused by moisture exposure on underside. Level 2 if minor and resolves with dehumidification. Level 3 if persistent, indicating subfloor moisture issue.
- Crowning (center raised): Moisture exposure on top surface. Usually Level 2; sanding may restore.
- Gapping: Normal seasonal expansion/contraction. Level 1 unless gaps exceed 1/8 inch consistently.
- Engineered/Laminate:
- Swelling at seams, bubbling surface. Typically Level 3. Core is compromised; replacement of affected planks usually required. Investigate subfloor moisture source.
- Vinyl Sheet/LVT:
- Bubbling indicates moisture vapor transmission from concrete subfloor. Level 2 if minor; Level 3 if widespread, requiring moisture barrier installation before re-coverage.
- Carpet:
- Damp padding, musty odor. Level 3. Mold can colonize within 24–48 hours. Requires professional extraction, antimicrobial treatment, and padding replacement. Never reinstall over wet pad.
Mold Growth: Size, Location, and Material Matter
- Level 1: Isolated spots (<10 sq ft) on non-porous surfaces (tile, glass, metal). Clean with detergent/water. Ensure ventilation. Fix moisture source.
- Level 2: Growth 10–30 sq ft on semi-porous surfaces (painted drywall, wood trim). Requires removal of affected material (cut out drywall section), cleaning of adjacent areas, and source correction. Wear N95 mask, gloves, eye protection. Contain area with plastic sheeting to prevent spore spread.
- Level 3: Growth exceeding 30 sq ft, hidden growth (inside walls, under floors), growth on structural wood, or pervasive musty odor throughout room. Requires certified mold remediation professional. Health hazard, especially for sensitive individuals. Critical Note: Any extensive mold indicates prolonged moisture intrusion requiring thorough source elimination.
- Health Precaution: If occupants experience unexplained respiratory symptoms correlating with time in affected area, treat as Level 3 regardless of visible size. Consult physician and remediation specialist.
Step 3: Hunt for Hidden Damage—The Silent Escalator
Visible damage is often the tip of the iceberg. Probe strategically:
– Behind Baseboards: Remove a section near suspected leak. Check subfloor, bottom plate of wall framing for softness, discoloration, or mold. Use moisture meter.
– Inside Cabinets: Under sinks, vanities—check back panels, floor corners.
– Attic and Crawlspaces: Wear protective gear. Check insulation, framing, ductwork for stains, mold, or animal activity. Crawlspaces should be dry; standing water or damp soil requires vapor barrier and drainage solution.
– Around HVAC Units: Dripping condensate pan, rusted drain line, wet insulation on ducts. Clogged condensate drain is a common hidden water source.
– Moisture Meter Protocol: Take readings on suspect materials and compare to unaffected area of same material. Wood: <12% = dry; 12–16% = caution; >16% = wet (risk of rot/mold). Drywall: >1% moisture content warrants investigation.
Immediate Mitigation Protocol for Active Water Intrusion
- Stop Source: Shut off main water valve for plumbing leaks. Cover roof holes with tarp (secure edges). Redirect downspouts.
- Remove Standing Water: Wet/dry vacuum, mops, towels. Extract from carpets immediately.
- Dry Thoroughly:
- Open windows if outdoor humidity is lower than indoor
- Position fans to blow across wet surfaces (not directly at walls)
- Run dehumidifier continuously; empty frequently
- Remove wet area rugs, furniture pads
- For saturated drywall: Drill small holes at bottom to allow drainage (temporary measure only)
- Document: Photograph damage and mitigation steps for insurance.
- Monitor: Check adjacent rooms, floors below, and hidden areas daily for 7 days. Moisture migrates.
Fire and Smoke Damage Assessment: Seeing Beyond the Flames
Fire damage extends far beyond charred surfaces. Heat, smoke, soot, and firefighting water create layered challenges requiring specialized assessment. Safety must govern every step—structural integrity and hazardous residues are invisible threats.
Structural Integrity: The Non-Negotiable First Question
- Level 4 Protocol: After any fire involving structural elements (walls, beams, roof), do not re-enter until the fire department or a licensed structural engineer declares the building safe. Heat exposure weakens wood and metal components. Hidden voids may collapse unexpectedly.
- Professional Assessment Only: Certified fire restoration specialists and structural engineers use thermal imaging cameras to detect hidden hot spots and moisture meters to assess water saturation in framing. They evaluate:
- Depth of charring on wood members
- Spalling (flaking) of concrete/masonry from rapid heating/cooling
- Warping or discoloration of metal beams/fasteners
- Compromise of fire-rated assemblies (walls, doors designed to contain fire)
- Critical Reminder: Even a small kitchen fire can generate enough heat to weaken attic framing. Trust professional clearance—not visual appearance.
Smoke and Soot Residue: Types, Risks, and Severity
Soot is acidic, oily, and deeply penetrating. Its composition depends on materials burned:
– Natural Materials (wood, cotton): Gray, dry soot. Less corrosive but still stains.
– Synthetic Materials (plastics, foam, electronics): Sticky, oily, black soot. Highly acidic—etches glass, corrodes metal, embeds permanently in porous surfaces if not cleaned promptly.
– Protein Fires (burned meat, grease): Invisible residue with strong, persistent odor. Requires specialized enzymatic cleaners.
Severity Assessment by Residue Characteristics
- Level 2: Light soot deposition on non-porous surfaces near source (e.g., wall above fireplace). Cleanable with appropriate agents (dry chemical sponge for walls, specialized cleaners for electronics). Minimal odor.
- Level 3: Pervasive soot covering multiple rooms, especially on:
- Electronics (soot infiltrates vents, causes short circuits)
- Upholstery, curtains, porous drywall
- HVAC system (soot circulates through ducts)
Requires professional cleaning. Soot is acidic; delayed cleaning causes permanent etching on glass, corrosion on metals. Strong, lingering odor indicates deep penetration. - Health Hazard Note: Soot particles are microscopic (PM2.5). Inhalation risks include respiratory irritation. Always wear N95 respirator during initial assessment. Do not operate HVAC system until ducts are professionally cleaned—this spreads contamination.
Water Damage from Firefighting Efforts: The Secondary Crisis
Water used to extinguish fire causes significant collateral damage, compounded by soot contamination.
– Assessment Protocol: Treat as combined water + contaminant damage. Porous materials (drywall, insulation, carpet, furniture) saturated with soot-laden water are typically unsalvageable. Soot binds to fibers; cleaning is ineffective and risks cross-contamination.
– Critical Areas:
– Walls/Ceilings: Remove drywall to 12+ inches above visible water line. Insulation must be replaced. Soot in wall cavities is difficult to fully remove.
– Floors: Hard surfaces may be cleanable; carpet/pad almost always requires replacement.
– Contents: Electronics, documents, fabrics require specialized restoration (ultrasonic cleaning, freeze-drying). Consult contents restoration specialist.
– Mold Risk: Damp, soot-contaminated environments are ideal for mold growth. Drying must begin promptly. Professional restoration companies use industrial air movers and dehumidifiers for rapid moisture removal.
Odor Assessment: When Smell Signals Severity
- Level 1: Faint, localized odor after minor incident (e.g., burnt toast). Resolves with ventilation and surface cleaning.
- Level 2: Noticeable odor in one room after small fire. May require professional treatment. Indicates soot embedded in surfaces.
- Level 3: Persistent odor throughout home, returning after initial cleaning, or detectable in HVAC airflow. Signals deep contamination in walls, ducts, or structural cavities. Requires comprehensive remediation: sealing affected surfaces, duct cleaning, possibly demolition of compromised materials.
- Professional Tools: Restoration specialists use hydroxyl generators or ozone machines in unoccupied spaces to break down odor molecules. Never attempt ozone treatment yourself—ozone is hazardous to lungs at ground-level concentrations.
Pest Damage Assessment: Uncovering Silent Invaders
Pests cause insidious damage that escalates unseen. Early detection hinges on recognizing subtle signs before structural compromise occurs. Focus on evidence, not just sightings.
Termite Damage: The Stealth Destroyer
Subterranean termites work hidden within wood, leaving surfaces intact until severe damage exists.
Key Evidence to Document
- Mud Tubes: Pencil-thin tunnels of soil/mud on foundation walls, piers, or floor joists. Termites use these to travel between soil and wood.
- Level 2: Abandoned tubes (dry, crumble easily), no live termites found. Monitor quarterly.
- Level 3: Active tubes (moist, smooth appearance), especially if extending upward from soil. Probe gently with screwdriver; live termites indicate active infestation. Requires immediate pest control evaluation.
- Wood Damage Assessment:
- Probe Test: Use ice pick or sharp screwdriver. Sound wood resists penetration. Damaged wood feels soft, hollow, or crumbles. Termites eat soft springwood first, leaving hard summerwood layers—creating a honeycombed appearance inside.
- Level 2: Surface damage to non-structural wood (fence post, deck railing). Probe shows minor softness.
- Level 3: Damage to structural components (floor joists, sill plates, support beams). Probe penetrates easily >1/4 inch. Hollow sound when tapped. Requires treatment and structural repair assessment.
- Critical Locations: Focus inspection in crawlspaces, basements, areas with moisture (leaky pipes, poor ventilation). Termites seek moisture.
- Swarmers: Winged reproductive termites emerging indoors (especially after rain). Finding swarmers inside living space is Level 3—indicates mature colony established within structure. Save specimens in jar for pest control ID.
Carpenter Ant Damage: Moisture’s Partner
Carpenter ants excavate galleries in moist, decaying wood—they nest in it but don’t consume it like termites.
Differentiating from Termites
- Ants: Pinched waist, bent antennae, front wings longer than hind wings. Leave coarse sawdust-like frass (often with insect parts).
- Termites: Straight waist, straight antennae, equal-length wings. Leave smooth, pellet-like frass.
- Damage Pattern: Ant galleries are smooth, clean tunnels following wood grain. Termite galleries are muddy, packed with soil.
Severity Assessment
- Level 2: Frass piles near window sills or door frames with minor softness. Indicates moisture issue attracting ants. Fix moisture source; treat nest.
- Level 3: Active ants found in structural wood (joists, beams), especially with visible galleries or significant frass accumulation. Requires pest control treatment and moisture correction.
- Critical Insight: Carpenter ants are a symptom of moisture intrusion. Finding them means you have a leak, condensation issue, or ventilation problem that must be resolved to prevent recurrence.
Rodent Damage: Beyond Gnaw Marks
Mice and rats cause physical damage and health hazards.
Evidence and Severity
- Droppings:
- Level 2: Few droppings in garage, attic, or shed. Indicates occasional activity. Seal entry points (>1/4 inch gaps).
- Level 3: Fresh droppings (shiny, soft) in kitchen cabinets, pantry, or living areas. Requires immediate trapping, sanitation, and exclusion. Health risk: certain pathogens.
- Gnawing:
- Level 2: Chewed packaging, non-critical items.
- Level 3: Gnawed electrical wires (fire hazard), insulation, or structural wood. Inspect attics, crawlspaces, behind appliances. Use flashlight to check wire insulation for teeth marks.
- Nesting Materials: Shredded paper, insulation, fabric in quiet areas. Level 3 if found indoors—indicates established nest.
- Safety Protocol: Never sweep dry droppings (aerosolizes pathogens). Spray with disinfectant, wait 5 minutes, then wipe with paper towel. Wear gloves and N95 mask. Ventilate area.
Wood-Boring Beetles: The Slow Burn
Common in older homes or imported wood furniture.
Signs and Assessment
- Exit Holes: Small (1–2mm), round holes in wood surfaces. Powderpost beetles leave fine, flour-like frass; old house borers leave coarse sawdust.
- Level 2: Few holes in non-structural wood (trim, furniture), no fresh frass. Monitor annually.
- Level 3: Numerous holes in structural beams, active frass (fine powder accumulating below holes), or holes appearing in previously unaffected areas. Requires professional identification and possible treatment.
- Pro Tip: Place white paper under suspect wood. Check weekly for new frass—indicates active infestation.
Electrical Damage Assessment: Respecting the Invisible Hazard
Electrical faults pose immediate fire and electrocution risks. When assessing, prioritize caution over curiosity. If you lack confidence, stop and call a professional.
Visible Warning Signs: Decoding the Clues
- Warm Outlets or Switches (Level 3):
- Cause: Loose connections, overloaded circuit, failing device.
- Action: Turn off circuit at breaker. Do not use outlet/switch. Label “Do Not Use.” Contact licensed electrician promptly. Never ignore—loose connections generate heat that can damage wire insulation.
- Buzzing, Sizzling, or Crackling Sounds (Level 3–4):
- From Panel: Indicates arcing fault—immediate fire risk. Turn off main power if safe to do so. Evacuate and call fire department/electrician.
- From Outlet/Switch: Turn off circuit. Level 3—schedule electrician promptly.
- Flickering or Dimming Lights:
- Level 1: Brief dimming when AC compressor kicks on (normal voltage drop).
- Level 3: Persistent flickering unrelated to appliance use, especially if accompanied by burning smell. Indicates loose service connection or failing panel component. Urgent evaluation needed.
- Scorch Marks or Discoloration (Level 3):
- Brown/black marks around outlet faceplate or switch. Sign of arcing. Turn off circuit. Replace device only after electrician verifies wiring integrity.
- Frequently Tripped Breakers or Blown Fuses (Level 2–3):
- Level 2: Occurs only when specific high-draw appliance is used on shared circuit. Solution: Reduce load or dedicate circuit.
- Level 3: Breaker trips with normal load, or won’t reset. Indicates short circuit or ground fault. Do not repeatedly reset—this stresses components. Call electrician.
Post-Water Exposure Protocol: Absolute Caution
- Level 4 Scenario: Any electrical component (outlet, switch, panel, appliance) exposed to water—flood, leak, firefighting efforts.
- Action: Do not touch. Turn off main power at meter/disconnect only if safe to approach. If water is near panel or you feel vibration/humming, evacuate and call utility company/fire department.
- Critical Fact: Water causes corrosion invisible to the eye. Even after drying, compromised insulation can lead to short circuits later. All affected components require evaluation and likely replacement by licensed electrician.
Age-Related Wiring Concerns: Historical Context Matters
- Knob-and-Tube Wiring (Pre-1950s):
- Risk Profile: Not inherently dangerous if undisturbed and properly insulated. Becomes Level 3 hazard if:
- Covered by insulation (traps heat—fire risk)
- Modified with modern connectors (improper splices)
- Serving modern high-draw appliances (circuits not designed for load)
- Assessment: Have licensed electrician evaluate condition, load capacity, and safety. Many insurers have specific requirements.
- Aluminum Branch Wiring (Common 1965–1973):
- Risk Profile: Level 3 due to fire risk from loose connections (aluminum oxidizes, expands/contracts differently than copper).
- Critical Fix: Requires COPALUM crimp connectors or AlumiConn connectors applied by electrician certified in aluminum remediation. Never use standard wire nuts.
- Temporary Mitigation: Install AFCI (Arc-Fault Circuit Interrupter) breakers on affected circuits—they detect dangerous arcing and shut off power. Not a substitute for proper repair.
Safety-First Assessment Protocol
- Observe from Distance: Note symptoms without touching components.
- Power Down: If safe, turn off circuit at breaker before closer inspection.
- Use Tools: Non-contact voltage tester confirms if wires are live. Never rely on sight alone.
- Document: Photo of panel labeling, affected outlets, visible damage. Note circuit number.
- When in Doubt, Shut It Off: Turn off main power and call a licensed electrician. Professional evaluation is a prudent investment.
Weather and Exterior Damage Assessment: Post-Storm Protocol
Storms deliver visible and hidden damage. A systematic post-event assessment prevents minor issues from becoming major failures. Safety first: watch for downed power lines, unstable trees, or structural compromise before approaching.
Roof Damage: Beyond Missing Shingles
- Ground-Level Inspection (Binoculars Essential):
- Level 2: Few missing shingles (1–3), granule loss in patches (bare spots on asphalt shingles), minor dents on metal flashing. Repair within weeks to prevent leaks.
- Level 3: Multiple missing shingles (>5), torn underlayment visible, widespread granule loss (gutters full of granules), damaged ridge vent. Tarp affected area immediately. Schedule roofer within days. Risk of interior water damage escalates with next rain.
- Level 4: Large sections of roofing material missing, visible sagging of roof deck, daylight visible through attic. Evacuate rooms below. Emergency tarping and repair required. Structural integrity compromised.
- Attic Check (Post-Storm): Enter attic with flashlight. Look for new water stains, wet insulation, or daylight through roof boards. Even without interior leaks, damaged underlayment reduces roof lifespan.
- Insurance Tip: Document damage with dated photos before temporary repairs (tarping). Most policies require reasonable mitigation but allow documentation first. Note storm date/time.
Siding, Windows, and Exterior Envelope
- Hail Damage:
- Vinyl Siding: Dents are usually Level 2 (cosmetic). Cracks or holes allowing water intrusion = Level 3. Replace damaged panels.
- Wood Siding: Dents may hide splintering. Probe with screwdriver. Soft spots indicate compromised integrity—Level 3.
- Windows: Check glass for cracks (Level 3—board up immediately). Inspect frames for dents affecting seal. Test operation—sticking may indicate frame damage.
- Wind Damage:
- Loose or missing siding boards: Level 2 if cosmetic; Level 3 if exposing sheathing to elements.
- Damaged soffits/fascia: Level 3—compromises attic ventilation and invites pest entry.
- Compromised seals around windows/doors: Level 2—re-caulk promptly to prevent water intrusion.
Tree and Landscape Damage: Safety Over Sentiment
- Hanging Limbs (Widowmakers):
- Level 3: Limb caught in tree canopy, especially over roof, driveway, or walkway. High risk of falling. Contact certified arborist. Do not attempt removal yourself.
- Tree Leaning or Uprooted:
- Level 4: Tree resting on house, garage, or power lines. Evacuate structure. Call fire department and utility company. Do not approach.
- Level 3: Tree uprooted but not contacting structure; significant lean with exposed roots. Arborist evaluation needed for removal safety.
- Root Damage to Hardscapes:
- Cracked driveway/sidewalk from roots: Level 2 if trip hazard minor. Level 3 if displacement >½ inch. Address root cause (grinding, redirection) before repair to prevent recurrence.
Post-Storm Documentation Protocol
- Safety Sweep: Walk perimeter noting immediate hazards (downed lines, unstable limbs). Mark area; keep family/pets away.
- Photograph Systematically:
- Overall house views from all four sides
- Close-ups of damage with ruler/coin for scale
- Ground debris (shingles, branches) showing correlation
- Interior checks (attic, ceilings under damaged roof areas)
- Temporary Mitigation:
- Tarp roof holes (use 6-mil plastic, secure with 2x4s—not nails that cause more damage)
- Board up broken windows with plywood
- Clear gutters of debris to prevent water backup
- Contact Insurance: Report claim promptly. Provide documentation. Ask about preferred vendors for emergency tarping/board-up (often covered).
The Decision Matrix: Translating Assessment into Action
Knowledge without action is incomplete. This matrix converts your Severity Spectrum classification into clear next steps. Print and keep in your home maintenance binder.
| Severity Level | Immediate Action | Who to Contact | Timeline | DIY Considerations |
|---|---|---|---|---|
| Level 1 (Cosmetic) | Document; monitor quarterly | None required | At convenience | Spackling cracks, touch-up paint, minor caulk repair. Ensure you understand root cause isn’t hidden. |
| Level 2 (Moderate) | Mitigate further damage (seal crack temporarily, redirect water). Investigate source thoroughly. | Handyman, roofer, plumber, carpenter (verify license/insurance) | Schedule within 1–4 weeks | Only if you have verified skill: replacing damaged siding board, fixing leaky faucet washer, re-caulking window. Never guess at structural or system repairs. |
| Level 3 (Serious) | Limit area use. Implement safe temporary mitigation (bucket under leak, turn off circuit). | Licensed contractor specializing in issue, structural engineer, certified pest control operator, mold remediation specialist | Contact within 24–72 hours | Do not attempt repairs. Your role: document, secure area, facilitate professional access. |
| Level 4 (Critical) | EVACUATE if safety risk present. Call 911 or emergency utility line. | Emergency services (911), utility company emergency line, insurance emergency line | Immediately | Zero DIY. Human safety is sole priority. Wait for professional clearance. |
Vetting Professionals: Avoiding Costly Mistakes
- Verify Credentials:
- License: Check state licensing board website. Ensure active status and classification matches work needed.
- Insurance: Request certificate of insurance for general liability and workers’ compensation. Protects you if worker is injured on your property.
- Certifications: For specialties: IICRC (water/fire restoration), ASHI/InterNACHI (home inspectors), ACE (pest control), state engineering seal.
- Get Detailed Quotes:
- Require written scope: materials, labor, timeline, cleanup, warranty.
- Beware of vague estimates (“ballpark,” “around $X”).
- For non-emergencies, obtain 2–3 quotes. Significant outliers warrant scrutiny.
- Check References Critically:
- Ask: “Can you share contact for a client with similar damage?”
- Online reviews: Look for patterns (e.g., “communicated well,” “left site clean”) not just star count. Beware of identical phrasing across reviews.
- Payment Safety:
- Never pay excessive deposit before work begins (varies by state law).
- Avoid contractors demanding full payment upfront or pressuring immediate signing.
- Pay by credit card when possible for dispute protection.
Common Assessment Mistakes to Avoid: Lessons from Practice
Even vigilant homeowners fall into predictable traps. Recognizing these pitfalls builds resilience.
- The “It’s Always Been There” Fallacy: Assuming a crack or stain is “normal” because you’ve seen it for years. Document when you first noticed it. New changes to old issues signal progression. A crack stable for years that widens after significant weather events requires evaluation.
- Surface-Only Inspection: Focusing solely on visible damage while ignoring the source path. That ceiling stain? Trace it upward through the attic. That soft baseboard? Remove it to check subfloor and wall cavity. Moisture and pests travel hidden routes.
- Misapplied Repair Methods: Sealing a foundation crack from the interior without addressing exterior hydrostatic pressure. The water finds another path, often causing worse damage. Match repair to root cause: drainage correction for water pressure, structural reinforcement for settlement.
- Cost-Driven Delay: Fear of repair costs leads to inaction. Addressing issues at Level 2 often prevents escalation to more complex Level 3 repairs. Many contractors offer payment plans; insurance may cover sudden damage. Document progression to justify timely action.
- Inadequate Documentation: Relying on memory (“I think it was smaller last month”). Use dated photos, sketches, moisture meter readings. This evidence is crucial for insurance claims, tracking progression, and communicating clearly with professionals.
- Underestimating Health Hazards: Assuming “a little mold” is harmless. For sensitive individuals, even small mold colonies trigger reactions. Similarly, rodent droppings require careful cleanup protocol. When health is a factor, elevate severity classification.
- Overlooking Insurance Policy Nuances: Not knowing your coverage limits, deductibles, or exclusions (e.g., gradual damage vs. sudden event). Review policy annually. Report claims promptly—many policies require notification within a specified timeframe. Mitigate further damage (e.g., tarp roof) but avoid permanent repairs before adjuster visit.
- Ignoring Regional Factors: Applying universal fixes without local context. Expansive soils in the Southwest demand different foundation solutions than frost-heave zones in the Northeast. Consult local professionals familiar with regional building practices and soil conditions.
Proactive assessment and documentation can significantly reduce the likelihood of major repair emergencies over time. Your vigilance is an investment with compounding returns.
Your Questions, Answered
Q: How do I know if a crack in my drywall is serious or just normal settling?
A: Apply the Severity Spectrum. Hairline cracks (<1/16 inch) at inside corners of doors/windows, especially in newer homes (<10 years), are typically Level 1—caused by seasonal wood framing movement. Cracks wider than 1/8 inch, diagonal across a wall section (not confined to corners), recurring identically after repair, or accompanied by sticking doors/windows on that wall elevate to Level 2 or 3. Document with photos and a simple sketch noting location and width. Monitor for 3 months. If stable, likely cosmetic. If growing or correlating with other symptoms (foundation cracks directly below), consult a home inspector.
Q: After a small kitchen grease fire, the smoke smell lingers in the cabinets. Is this a health hazard?
A: Lingering odor indicates residual soot particles embedded in porous surfaces like wood cabinets. While not an immediate emergency (Level 3 concern), it requires attention. Soot from synthetic materials is acidic and can cause long-term corrosion on surfaces. Steps: 1) Wipe cabinets thoroughly with dry chemical sponge (specialized soot sponge), 2) Clean with TSP substitute solution, 3) If odor persists, hire a fire restoration specialist for thermal fogging or hydroxyl treatment. Address promptly to prevent permanent embedding. Avoid using ozone generators yourself—they produce lung irritants.
Q: I found a small patch of black mold (about the size of my hand) behind the washing machine. Can I clean it myself?
A: Yes, with strict precautions. Since it’s on a non-porous surface (likely metal back panel) and under 10 square feet, it qualifies as Level 1. Protocol: 1) Wear N95 respirator, gloves, eye protection, 2) Seal area with plastic sheeting taped to floor/walls to contain spores, 3) Clean with detergent and water (avoid bleach on metal—it corrodes), 4) Dry completely with fan, 5) Fix the moisture source (check hose connections, ensure proper drainage). If mold returns within weeks, or if it’s on drywall/wood, elevate to Level 2/3 and consult a remediation professional. Never sand or dry-brush mold—this aerosolizes spores.
Q: My basement has a persistent damp, musty smell but no visible water or mold. Should I be concerned?
A: Yes—this is a classic Level 2 concern requiring investigation. Musty odor indicates microbial activity, often hidden. Steps: 1) Use a hygrometer to check relative humidity (ideal: 30–50%; >60% promotes mold), 2) Scan walls/floors with moisture meter—readings above baseline warrant probing, 3) Inspect exterior grading, gutters, downspouts for water directed toward foundation, 4) Check for condensation on cold water pipes (insulate them), 5) Improve ventilation (install exhaust fan, use dehumidifier). Address within weeks to prevent escalation. If odor persists after these steps, hire an indoor air quality specialist.
Q: How urgent is a sagging floor in an older home? My inspector called it “character.”
A: Context determines urgency. Slight, uniform bounce in a century-old home with dimensional lumber joists may be Level 1 “character.” However: 1) Perform the marble test—if marble rolls consistently in one direction over 10 feet, it’s Level 2, 2) Check for accompanying symptoms: gaps between floor and baseboards, cracks in walls above, creaking that worsens—these elevate to Level 3, 3) Measure slope with level: >1 inch drop over 10 feet requires structural engineer evaluation. Never dismiss sagging without objective measurement. What one inspector calls “character,” another identifies as early failure. When in doubt, get a second opinion from a structural engineer—not a contractor with potential repair bias.
Q: Can I accurately assess termite damage myself, or is a professional inspection always needed?
A: You can identify signs of termite activity (mud tubes, swarmers, hollow-sounding wood), but accurately assessing the extent of damage requires professional tools and expertise. Probing wood with a screwdriver reveals surface softness but not hidden damage inside wall cavities or deep within structural members. Moisture meters and borescopes help professionals map damage non-invasively. If you find active mud tubes or swarmers indoors, treat as Level 3 and schedule a licensed pest control inspection immediately. Early detection saves significant repair costs. Annual inspections are often recommended in regions with known termite activity.
Q: After a hailstorm, my roof looks fine from the ground. Do I really need a professional inspection?
A: Yes, especially if hail was substantial or if neighbors are getting roof repairs. Hail damage is often invisible from ground level: 1) Granule loss on asphalt shingles compromises UV protection, shortening roof life, 2) Bruising on shingles (soft spots) leads to premature failure, 3) Damage to flashing, vents, or seals invites water intrusion. Schedule a roof inspection by a qualified roofer within 2 weeks. Document with photos. Insurance claims typically have time limits; delays risk denied claims if damage is deemed “pre-existing.” A professional inspection report provides objective evidence.
Q: Is water damage from a burst pipe covered by standard homeowners insurance?
A: Typically, yes—sudden and accidental discharge from plumbing is a standard covered peril. However: 1) Review your specific policy for exclusions or sub-limits, 2) Gradual damage (leaky faucet dripping for months) is usually excluded, 3) Flood damage (rising water from outside) requires separate flood insurance, 4) You must mitigate further damage (shut off water, dry area) but avoid making permanent repairs before the insurance adjuster visits. Document everything: photos of damage, source, mitigation steps. Report claim promptly—many policies require notification within a specified timeframe. Keep receipts for temporary repairs (tarps, fans) and lodging if home is uninhabitable.
Q: What’s the single most important tool for a homeowner to have for damage assessment?
A: A moisture meter ($20–$50). This small device transforms guesswork into data. Use it to: 1) Verify if a stain is active moisture or old residue, 2) Check subfloors after plumbing leaks, 3) Monitor drying progress after water events, 4) Identify hidden moisture behind walls (scan at different heights), 5) Assess wood for rot risk (readings >16% moisture content warrant investigation). Pair it with a digital camera (smartphone) for documentation. These two tools empower objective assessment far beyond visual inspection alone. Supplement with a bright flashlight (reveals surface texture changes), tape measure, and notebook.
Q: How do I find a trustworthy contractor for serious damage without getting scammed?
A: Follow this vetting protocol: 1) Get referrals from neighbors who had similar work done, 2) Verify state license and insurance certificate (call insurer to confirm validity), 3) Check with Better Business Bureau and state contractor board for complaints, 4) Request 3 detailed written estimates with scope, materials, timeline, payment schedule, and warranty, 5) Contact references—ask “Would you hire them again? Were there unexpected costs?”, 6) Avoid contractors who: demand large upfront payment, pressure immediate signing, lack physical business address, or refuse to provide references. For Level 3/4 issues, consider hiring a public adjuster (for insurance claims) or construction attorney to review contracts. Trust your instincts—if something feels off, walk away.
Conclusion and Next Step: Building Lasting Home Resilience
Accurately assessing home damage is not about cultivating fear—it’s about cultivating competence. By internalizing the Severity Spectrum Framework and applying its objective criteria, you replace uncertainty with clarity. You transform from a passive observer into an informed steward of your home’s health. This skill protects your family’s safety, preserves your property’s value, and empowers confident decision-making when challenges arise. Remember the three enduring pillars of effective damage management: document with precision, prioritize safety without exception, and address root causes—not just symptoms.
Recap: The Three Non-Negotiable Principles
- Context Defines Severity: A tiny crack in a critical structural location outweighs a large cosmetic flaw. Always evaluate using the three dimensions: Safety Risk, Systemic Impact, and Progression Speed.
- Progression Is the Silent Amplifier: Static issues may wait; evolving ones demand action. Consistent monitoring turns minor interventions into major savings.
- When Evidence Is Ambiguous, Elevate: It is always wiser to over-classify severity and consult a professional than to underestimate and face preventable consequences. Caution is competence.
The 24-Hour Rule: Your Immediate Action Plan
Within the next 24 hours, dedicate 20 minutes to conduct a proactive “Damage Scan” of your home. Walk through each room, basement, attic access point, and exterior perimeter. Note any existing anomalies—cracks, stains, odd smells, sticking doors—with a photo and brief description in your phone notes or a dedicated journal. Do not attempt repairs yet. This baseline inventory takes minimal time but creates immense future value: it establishes a reference point for detecting new issues or changes. Store it digitally with clear date labels. Revisit quarterly. This simple habit builds situational awareness and transforms reactive panic into proactive peace of mind.
The Bigger Picture: Stewardship Over Fear
Your home is a dynamic system—a continuous interplay of structure, environment, and use. Regular assessment isn’t paranoia; it’s respectful stewardship. It honors the investment you’ve made and the sanctuary you’ve created. By mastering this framework, you join countless homeowners who navigate challenges with calm competence. Share this knowledge with neighbors, friends, or family members. Resilience multiplies when shared. You’ve now equipped yourself with a lifetime skill—one that safeguards not just walls and beams, but the well-being of everyone who calls your house home.
Explore Our Complete Home Resilience System:
Understanding Home Systems: A Visual Guide to What’s Behind Your Walls | Preventative Maintenance Calendar: Seasonal Tasks to Avoid Costly Repairs | Emergency Preparedness Kit: What Every Homeowner Needs for Disasters | Decoding Contractor Quotes: A Step-by-Step Guide to Fair Pricing | When to File an Insurance Claim: A Homeowner’s Decision Framework | Moisture Meter Mastery: Reading the Hidden Language of Your Home | The Documentation Habit: Building Your Home’s Health Record