Transform Your Backyard Into a Functional, Beautiful, and Year-Round Culinary Sanctuary—With a Step-by-Step Framework That Prevents Costly Mistakes and Maximizes Joy
Imagine the sizzle of garlic shrimp hitting a hot plancha as golden hour light filters through string lights above. Laughter echoes as guests gather around a granite-topped counter, sipping cocktails while you effortlessly flip burgers without missing a conversation. The scent of rosemary from your nearby herb garden mingles with woodsmoke from the pizza oven. This isn’t a resort fantasy—it’s the everyday reality an intelligently designed outdoor kitchen delivers. Yet too many homeowners invest significant resources only to face frustration: countertops compromised by weather exposure, awkward workflows that turn cooking into a chore, or appliances stranded far from utilities. This definitive guide dismantles the overwhelm. We’ve synthesized building science principles, climate-responsive material considerations, ergonomic research, and field-tested installation patterns into an actionable framework. Whether you have a compact urban patio or sprawling suburban yard, you’ll discover precisely how to align layout, materials, utilities, and ambiance with your cooking habits, local environment, and long-term vision—creating not just a cooking space, but a cherished extension of home life for years to come.
Introduction: Beyond the Pinterest Dream
Outdoor kitchens have surged in popularity, reflecting a growing desire to blend indoor comfort with the joy of al fresco living. Homeowners increasingly view them as essential extensions of their living space, designed for year-round enjoyment rather than seasonal use. Yet beneath the glossy magazine spreads lies a critical truth: beauty without function creates disappointment. A stunning stone facade means little if rainwater pools around your sink, or if you’re constantly trekking back to the house for utensils. True success lies in the invisible details—the drainage slope beneath pavers, the frost-resistant faucet valve, the strategic placement of task lighting over the prep zone.
This guide operates on a foundational principle: Your outdoor kitchen must serve your life, not a generic ideal. Are you the weekend entertainer hosting twenty? The quiet couple enjoying morning coffee and evening grilled vegetables? The family needing durable, kid-friendly surfaces? Your answers dictate every decision ahead. We’ll move systematically from big-picture vision to granular execution, emphasizing choices that withstand weather, usage, and time. Building codes and safety standards exist for critical reasons—this guide consistently references established residential and electrical code benchmarks where applicable for structural integrity and utility safety, though local regulations always supersede generalized guidance. Always consult your municipal building department early; requirements vary significantly by region. This isn’t merely bureaucratic caution—it’s the difference between a seamless project and costly rework. Let’s begin building not just a kitchen, but a legacy space where memories are forged over flame and fellowship.
The “Foundations First” Framework: Building Intelligence Before Beauty
Most design guides start with appliance shopping or countertop samples. This is precisely where projects derail. Without anchoring decisions in three non-negotiable layers—Site Reality, Human Flow, and Material Resilience—you risk creating a space that looks perfect in renderings but fails in daily use. The “Foundations First” Framework flips the script. We prioritize invisible infrastructure over visible aesthetics, ensuring every beautiful element rests on a bedrock of practicality. Think of it as architectural triage: address critical structural and environmental factors first, then layer in functionality, and finally, adorn with style. This sequence prevents the most common and expensive regrets: relocating gas lines after countertops are installed, replacing compromised cabinetry after one humid season, or realizing too late that your dream pizza oven blocks the path to the garden.
This framework mirrors approaches used by landscape professionals for complex residential projects. By dedicating the majority of your planning energy to Layers 1 and 2 before selecting a single finish material, you create a resilient skeleton upon which beauty naturally follows. Rushing to choose a “statement” backsplash while ignoring drainage paths is like buying wedding shoes before confirming the venue has stairs. Let’s build your kitchen’s intelligence layer by layer.
Layer 1: Site & Climate Intelligence—Your Unseen Blueprint
Before sketching a single line, become a detective of your own property. The land itself holds answers to questions you haven’t yet asked. This layer demands honest observation over wishful thinking. Spend time documenting your site at different times of day and across seasons if possible: morning sun patterns, afternoon wind direction, evening shade pockets. Note where water naturally flows during rain. Observe existing traffic paths between house, patio, garden, and driveway. These observations form your non-negotiable constraints—the boundaries within which brilliant design flourishes.
Micro-Climate Mapping: Beyond “Sunny” or “Shady”
“Full sun” is meaningless without context. In northern climates, generous sun exposure is welcome; in intense southern sun, mitigation becomes essential. Create a simple site map (sketch on paper or use a free app). Mark:
– Sun Path: Trace shadows at key times across seasons. Is your proposed location blasted by western sun (hottest, most challenging for users and appliances) in summer? Does morning sun hit the spot where you’d prep breakfast?
– Wind Corridors: Stand in the space on a breezy day. Does wind consistently funnel from a particular direction? This impacts grill flare-ups, candle stability, and conversation comfort. A windbreak (existing fence, planned hedge) may be essential.
– Water Flow: After rain, where does water pool? Even slight depressions matter. Your kitchen’s foundation must sit above natural drainage paths. Never position appliances where runoff collects.
– Existing Utilities: Locate outdoor faucets, electrical outlets (GFCI-protected?), gas lines, or septic vents. Extending utilities often represents a major budget variable—proximity to existing lines can significantly reduce complexity.
– Sightlines & Privacy: What do you see from the proposed spot? A neighbor’s structure? Your own serene garden? Can neighbors easily see into the space? Privacy influences layout orientation and screening needs.
Illustrative Scenario: A homeowner initially chose a spot under a mature tree for “natural shade.” Site analysis revealed the area became problematic after rain (poor drainage), dropped debris onto cooking surfaces, and blocked sightlines. Relocating slightly—into a sunnier area—allowed for proper grading, installation of adjustable shade, and clear views to the garden. The initial adjustment led to a far more functional space.
Climate-Responsive Material Guidance
Your regional conditions dictate material suitability. Ignoring this invites premature deterioration. Below is a climate-responsive decision framework—treat it as your material filter before falling in love with a sample.
| Climate Challenge | Material Considerations | Generally Avoid |
|---|---|---|
| Freeze-Thaw Cycles | Countertops: Dense natural stone, properly sealed concrete with slope. Cabinetry: Stainless steel (marine-grade where applicable), polymer composites engineered for exterior use. Flooring: Textured porcelain tile with proper substrate and expansion joints. | Highly porous stone without treatment, untreated wood cabinetry, materials prone to water absorption |
| Intense UV & Heat | Countertops: Lighter tones where feasible, materials verified for UV stability. Cabinetry: Powder-coated aluminum, stainless steel with heat-reflective properties. Appliances: Models rated for high-ambient operation. | Dark surfaces that absorb excessive heat, materials known to degrade under prolonged UV exposure without protection |
| High Humidity & Salt Air | Countertops: Non-porous options like solid surface or verified exterior quartz. Cabinetry: Marine-grade stainless steel, powder-coated aluminum. Hardware: Corrosion-resistant alloys. | Standard stainless steel near oceanfront, untreated ferrous metals, materials susceptible to salt corrosion |
| Heavy Rain & Humidity | Countertops: Sloped surfaces toward drainage. Non-porous materials preferred. Cabinetry: Fully welded stainless or sealed polymer boxes. Flooring: Textured surfaces with excellent drainage. | Flat surfaces without slope, materials prone to mold/mildew without rigorous maintenance |
Why This Layer is Non-Negotiable: Material choices must align with environmental stressors. A countertop beautiful in one climate may deteriorate rapidly in another. These aren’t “quality” failures—they’re mismatches between material properties and local conditions. Your site analysis isn’t about limitation; it’s about empowerment. It directs resources toward solutions that endure, freeing you to enjoy your space without constant repair anxiety. This layer answers the silent question every homeowner considers: “Will this still function beautifully through changing seasons?”
Layer 2: Function & Flow—Designing for Your Rituals
Now that your site constraints are clear, shift focus inward: How do you actually cook and gather? This layer transforms generic layouts into personalized workflows. Forget rigid rules like “always use the work triangle.” Outdoor kitchens have unique dynamics—multiple cooks, social interaction needs, integration with seating areas. We’ll build your layout around observed behaviors, not textbook ideals.
The Cooking Style Audit: Define Your Core Activities
Grab a notebook. For a typical week, jot down notes during cooking sessions:
– Primary Cooking Methods: Do you grill most meals? Smoke monthly? Bake pizza weekly? Fry often? (This dictates appliance priorities)
– Prep Zone Needs: Do you chop extensive vegetables? Need room for multiple cutting boards? Require easy sink access?
– Social Dynamics: Are you the “theater cook” who wants to face guests? Or do you prefer a dedicated prep zone away from foot traffic? Do children help cook? (Impacts counter height, safety zones)
– Storage Reality: What lives outside permanently? Tools, pizza peel, seasonings? What must stay protected? (Drives cabinet sizing and type)
– Adjacent Zones: Where do guests naturally congregate? Is seating integrated or separate? How far is the indoor kitchen?
Example Scenarios:
– The Entertainer (Hosts frequently): Prioritize multiple work zones (grill station, prep station, beverage center). Need ample counter space for plating, clear circulation paths to avoid bottlenecks. Seating should face the cooking area for interaction.
– The Intimate Duo (Cooks for two): Focus on efficiency and ambiance. A compact L-shaped layout with integrated seating may suffice. Prioritize quality over quantity of appliances. Cozy lighting and proximity to a fire feature matter more than expansive counter space.
– The Family Hub (Casual meals, kids involved): Durability and safety are paramount. Rounded counter edges, non-slip flooring, secure storage for tools, easy-clean surfaces. Consider a “kid zone” counter section at lower height.
Layout Logic: Matching Form to Function
With your audit complete, evaluate these proven configurations against your space and style:
-
Linear (Single Wall): Ideal for narrow spaces (along a fence or house wall), smaller budgets, or minimalist setups. Flow Tip: Place sink closest to house water source, grill at far end to draw smoke away from seating. Maximize vertical storage. Best For: Urban patios, balcony extensions, supplemental cooking zones.
-
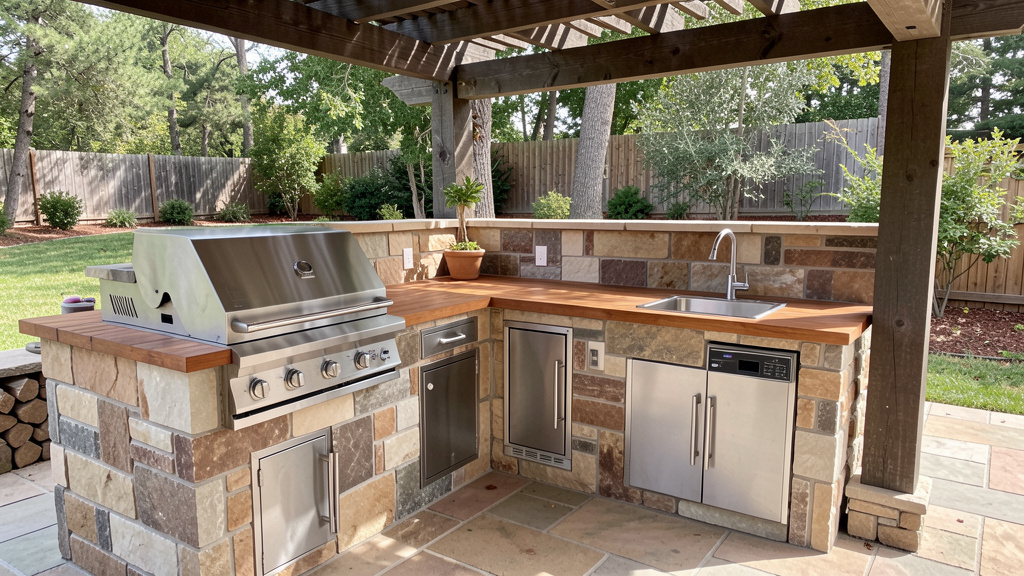
L-Shaped: The most versatile layout. Creates a natural workflow between grill, sink, and prep zone. Defines the cooking area while leaving the corner open for traffic flow or integrated seating. Flow Tip: Position the corner as the primary prep zone—the most accessible spot. Place heavier appliances on the longer leg. Best For: Most medium to large yards; balances efficiency, social interaction, and space definition.
-
U-Shaped: Maximizes counter and storage space within a contained footprint. Excellent workflow efficiency. Flow Tip: Ensure the opening is wide enough for easy entry/exit. Avoid placing all appliances on one wall—distribute tasks. Best For: Dedicated outdoor rooms with ample square footage; serious cooks needing extensive workspace.
-
Galley (Parallel Walls): Highly efficient workflow with two facing counters. Creates a defined “kitchen corridor.” Flow Tip: Maintain adequate space between counters for comfortable movement. Assign functions logically (e.g., one wall: storage/prep; opposite wall: cooking/cleaning). Best For: Long, narrow spaces between house and fence.
-
Island (Freestanding): Offers ultimate flexibility and social integration. Can serve as a central hub. Flow Tip: Critical for utility access—requires underground conduit for gas/electric/water before installation. Ensure clearance on all sides for circulation. Best For: Large, open patios; spaces where the kitchen is the focal point.
The Flow Test: Sketch your top layout option. Cut out scaled paper shapes of your planned appliances. Physically move them around the layout. Walk through the sequence: “Open fridge → grab meat → place on prep counter → season → carry to grill.” Does the path feel logical? Are you crossing your own path? Is the trash bin conveniently located near prep and cleaning zones? Does the path to the indoor kitchen feel natural? This tactile exercise reveals flow flaws no digital render can.
Ergonomic Nuances Often Overlooked
– Counter Height Variations: Standard outdoor counter height is typically 36″. But consider: A dedicated pizza prep counter at a slightly lower height may be more comfortable. A raised bar section creates comfortable seating for guests without blocking the cook’s view. Layering heights adds functionality and visual interest.
– Clearance Zones: Safety codes often mandate specific clearances around appliances for ventilation and heat dissipation—always check your specific appliance manual and local requirements. Never place combustible materials closer than manufacturer specifications. Allow adequate aisle width for comfortable movement.
– The “Dirty Path” Principle: Minimize trips back to the house. Position the outdoor kitchen as close as feasible to the indoor kitchen door. If practical, include a small under-counter refrigerator and dedicated trash storage outside. Every eliminated trip enhances the outdoor experience.
Layer 3: Materials & Maintenance—Beauty That Endures
With site constraints defined and workflow mapped, we arrive at material selection—but now with intelligence. Every choice is filtered through Layers 1 and 2. This isn’t about chasing trends; it’s about selecting partners that share your commitment to longevity. We’ll dissect each component with climate-aware criteria, maintenance realities, and budget-smart strategies.
Countertops: The Workhorse Surface
Your countertop endures heat, moisture, stains, and constant use. Prioritize performance over pure aesthetics.
-
Granite: Highly durable, heat-resistant, and available in varied colors. Critical Nuance: Density varies. Denser granites generally resist staining better than more porous varieties. Typically requires sealing upon installation and periodic resealing (test by sprinkling water—if it beads, seal is effective; if absorbed, reseal). In freeze-thaw zones, ensure proper slope toward drainage to prevent water accumulation in seams. Consideration: Remnants from indoor projects can offer value.
-
Quartz (Engineered Stone): Non-porous (typically no sealing needed), highly stain-resistant, consistent appearance. Critical Nuance: UV sensitivity varies by formulation and manufacturer. Some quartz products may experience discoloration or degradation under intense, prolonged sun exposure. Always verify with the manufacturer that the specific product is rated for exterior use. Darker tones may absorb significant heat in sunny climates. Best suited for covered areas or regions with less intense UV exposure.
-
Concrete: Offers customization (color, aggregates, shape). Can be cast in place for seamless, drain-integrated surfaces. Critical Nuance: Requires skilled installation. Poorly mixed or cured concrete may crack. Must be sealed with a high-quality penetrating sealer designed for exterior use, and resealed periodically. Develops a patina over time but can stain if spills aren’t addressed. Ideal for modern, industrial, or rustic aesthetics where character is valued.
-
Stainless Steel: Commercial-grade durability. Heat-proof, non-porous, and hygienic. Critical Nuance: Shows fingerprints, water spots, and scratches readily. Requires frequent wiping to maintain appearance. Can become very hot in direct sun. Often best used as an accent surface (e.g., dedicated grill prep zone) rather than entire countertop. Ensure edges are smoothly finished.
-
Tile (Porcelain): Excellent for patterns or using remnants. Critical Nuance: Grout is critical. Standard cement grout may degrade outdoors. Use grout specifically rated for exterior/wet areas. Choose larger-format tiles to minimize grout lines. Ensure substrate is perfectly level and stable—any movement risks damage. Professional installation is recommended.
-
Soapstone: Heat-resistant and develops a soft patina. Critical Nuance: Softer stone—scratches more easily (though often repairable). Requires periodic oiling to maintain appearance and prevent drying. Generally not recommended for freeze-thaw climates due to porosity. Best for covered, temperate-climate kitchens where its aesthetic is valued over minimal maintenance.
Maintenance Reality Check: Before choosing, honestly assess: “Am I willing to perform [specific maintenance task] regularly?” If not, eliminate that material. A beautiful material neglected becomes a liability. Honesty here prevents future frustration.
Cabinetry: Structure Meets Storage
Outdoor cabinets face constant environmental exposure. Material choice is paramount.
-
Stainless Steel (Appropriate Grades): Highly durable. Resists corrosion, insects, and fire. Higher grades offer enhanced salt-air resistance where needed. Critical Nuance: Look for fully welded construction where feasible, as welded seams better prevent moisture ingress than screwed assemblies. Powder-coated finishes add color options and extra UV protection. Higher initial investment, but minimal maintenance beyond occasional cleaning.
-
Marine-Grade Polymer (e.g., PVC, HDPE): Non-porous, impervious to moisture, insects, and rot. Won’t warp or fade significantly with quality formulations. Available in wood-grain finishes. Critical Nuance: Quality varies. Seek brands specifically engineered for outdoor cabinetry with UV inhibitors throughout the material. Ensure structural frames are robust. Excellent balance of longevity and value. Maintenance: Simple soap-and-water cleaning.
-
Aluminum (Powder-Coated): Lightweight, rust-proof, and strong. Powder coating provides color and UV resistance. Critical Nuance: Ensure high-quality, even coating application, especially on edges. Check hinge and hardware quality—these are stress points. A solid choice, particularly for modular systems.
-
Wood (Teak, Ipe, Cedar): Offers unmatched warmth and natural beauty. Critical Nuance: This is a high-maintenance choice. Even durable hardwoods require regular cleaning, sealing, or oiling to prevent graying, cracking, and splintering. Left unfinished, teak will weather to a silvery-gray (some prefer this). In humid climates, mold/mildew can develop. Only choose wood if you genuinely enjoy seasonal maintenance rituals. Never use standard softwoods or composites not rated for exterior use.
-
Avoid: Particleboard, MDF, standard plywood, vinyl-wrapped cabinets in direct sun, untreated metals. These often lead to premature failure.
Smart Storage Solutions Within Cabinets:
– Pull-Out Bins: Keeps waste contained and out of sight. Use bins that slide smoothly on full-extension hardware.
– Spice Racks & Utensil Trays: Install on cabinet doors or inside panels for easy access without cluttering counters.
– Ventilated Shelving: For storing charcoal, wood chunks, or fire starters—allows airflow to prevent moisture buildup.
– Secure Storage: Essential if storing fuel containers (verify local code requirements), chemicals, or if you have curious children/pets.
Flooring: Safety and Stability Underfoot
Slip resistance is non-negotiable. A wet surface near a cooking area is a hazard zone.
- Textured Porcelain Tile: Highly durable, frost-resistant options available, with slip-resistant finishes. Mimics wood, stone, or concrete. Install on a properly prepared substrate with adequate slope away from structures and toward drainage. Use jointing material rated for exterior use.
- Natural Stone (Granite, Slate, Bluestone): Beautiful and durable. Critical Nuance: Must be textured or flamed for slip resistance. Avoid polished surfaces. May require sealing. Ensure adequate thickness for stability. Professional installation is highly recommended.
- Stamped Concrete: Cost-effective for larger areas. Can mimic stone or brick patterns. Critical Nuance: Must include texture (broom finish or exposed aggregate). Requires control joints to manage cracking. Sealant is essential and needs periodic reapplication. Prone to staining if spills aren’t cleaned promptly.
- Modular Pavers (Concrete or Stone): Allow for easier repair (replace a single paver) and good drainage if installed correctly. Interlocking design provides stability. Choose pavers with textured surfaces. Ideal for those with moderate DIY experience.
- Avoid: Smooth tile, polished stone, standard concrete without texture, wood decking directly under cooking appliances (fire risk, staining).
The Fundamental Principle: Every material choice reflects a commitment to future care. Selecting marine-grade polymer cabinetry signifies a preference for decades of low-maintenance storage. Choosing textured porcelain tile signifies a commitment to safety for every guest, rain or shine. This layer transforms your kitchen from a collection of parts into a cohesive, resilient system designed to age gracefully alongside your memories.
Deep Dive: Utility Integration—The Invisible Backbone
Utilities are the circulatory system of your outdoor kitchen. Done right, they enable seamless function. Done poorly, they create hazards, limit usability, and trigger costly repairs. This section provides actionable guidance grounded in safety standards and practical installation patterns. Critical Reminder: Gas, electrical, and plumbing work often legally require licensed professionals. This information empowers you to have informed conversations with contractors and verify their plans—not to DIY complex utility runs.
Gas Line Installation: Safety as Non-Negotiable
Natural gas or propane? This decision impacts everything.
-
Natural Gas (Piped from Home Supply):
Pros: Continuous fuel supply—no tank changes. Generally lower long-term operational cost if already available.
Cons: Requires professional trenching to run a dedicated line. Permits and inspections are mandatory. Initial installation complexity is higher.
Critical Safety Protocol: Installation must be performed by a qualified gas fitter. Material specifications (e.g., black iron pipe) and methods follow local code requirements. Install a sediment trap (drip leg) near the appliance connection. Include a manual shut-off valve within accessible reach of each appliance. The line must be pressure-tested and inspected by your local building department before covering or use. Always contact your local “Call Before You Dig” service to locate underground utilities before any excavation. -
Propane (Tank-Based):
Pros: No trenching needed if tank is placed nearby. Lower initial installation complexity. Ideal for properties without natural gas access.
Cons: Requires tank refills/replacements. Tanks must be stored upright in a well-ventilated area, away from building openings, ignition sources, and direct sun. Local fire codes strictly regulate tank size and placement (e.g., minimum distances from structures, property lines).
Critical Safety Protocol: Use only tanks and regulators rated for outdoor appliance use. Never store propane tanks indoors or in enclosed spaces without specific ventilation designed for propane (verify appliance and cabinet manufacturer specifications and local codes). For built-in installations where the tank is housed in a cabinet, the cabinet must have ventilation per code requirements (propane is heavier than air; leaks pool low) and be constructed of non-combustible materials. Connection should be performed by a qualified technician. Never attempt to modify tank connections yourself.
Appliance Connection Best Practices:
– Use stainless steel braided gas hoses rated for outdoor/wet locations (look for appropriate safety listings). Avoid hoses not rated for exterior use—they degrade in UV light and ozone.
– Secure connections properly.
– Perform a leak test after connection per manufacturer instructions (e.g., soap-bubble test). Bubbles indicate a leak—shut off immediately and address.
– Install appliances on non-combustible surfaces with required clearances per manufacturer specs. Never place a grill directly against combustible siding or under low-hanging branches.
Electrical Systems: Powering Comfort and Safety
Outdoor electricity demands respect for moisture and shock hazards. Electrical codes universally require GFCI (Ground Fault Circuit Interrupter) protection for all outdoor receptacles. This safety feature is critical—it cuts power instantly if current leakage is detected.
-
Circuit Planning:
A dedicated circuit from your main panel is typically recommended for the outdoor kitchen. Why? Shared circuits can overload when multiple appliances run simultaneously. Circuit size (amperage) depends on planned appliance load—consult a qualified electrician.
Critical Detail: Wiring methods and conduit types must comply with local electrical code requirements for underground or exposed runs. Conduit must be buried at code-required depths. All outdoor-rated boxes, covers, and components must be used. -
Outlet Placement Strategy:
- Task Outlets: Install GFCI-protected outlets inside weatherproof cabinets (with “in-use” covers) for refrigerators or other fixed appliances. Position away from splash zones.
- Convenience Outlets: Include GFCI-protected outlets on the backsplash (behind weatherproof covers) for temporary use.
- Lighting Circuits: Separate low-voltage landscape lighting circuits from appliance circuits. Use a transformer rated for outdoor use.
-
Heating/Cooling: Confirm power requirements early for overhead heaters or misting fans—these may need dedicated circuits.
-
Lighting Layers for Function and Ambiance:
- Task Lighting: Waterproof LED strip lights under upper cabinets or within soffits, focused precisely on prep zones and cooktops. Warm white light (2700K-3000K) is generally flattering.
- Ambiance Lighting: Low-voltage path lights along approach routes, subtle uplighting on nearby features, integrated step lights for safety. Dimmable controls are essential.
- Safety Lighting: Motion-sensor lights near steps or dark pathways. Ensure all step edges are illuminated.
Pro Tip: Install a weatherproof outdoor switch box near the kitchen entrance to control zones without returning to the house. Smart switches allow remote control and scheduling.
Plumbing: Water Where You Need It
An outdoor sink transforms functionality—but adds complexity.
-
Water Supply Line:
Run a dedicated cold-water line from your home’s main line. Include a frost-proof sillcock (faucet) if the line terminates at a wall. For a sink, install shut-off valves inside the house before the line exits, allowing winterization. In freeze-prone areas, the line must slope back toward the house so water drains out when valves are closed. Insulate where it passes through the foundation. -
The Sink Itself:
Choose stainless steel for durability and freeze resistance. Avoid materials prone to cracking. Ensure the sink has an overflow drain. The faucet should be frost-proof or easily disconnected for winter. A pull-down sprayer is invaluable. -
Drainage—The Most Overlooked Element:
This is critical. You cannot simply drain sink water onto the ground (illegal in most areas, creates mud, attracts pests). Options: - Connect to House Sewer Line: Ideal but complex. Requires trenching to tie into the main drain line downstream of the house’s P-trap. Must include a P-trap under the sink to prevent sewer gases. Requires venting per code.
- French Drain System: For areas where sewer connection isn’t feasible. Water drains into a gravel-filled trench that slopes away, allowing percolation. Must be designed by a professional to handle volume and prevent pooling. Not suitable for soapy water in large quantities.
- Holding Tank/Pump System: Water collects in a buried tank and is pumped away. Complex and costly; usually a last resort.
Consult a licensed plumber early. Drainage solutions are highly site-specific and regulated. Guessing leads to problems.
The Utility Coordination Checklist (Share with Your Contractor)
- [ ] All utility routes mapped and marked (call-before-you-dig completed)
- [ ] Gas line: Material and method specified per code, shut-off valves located, sediment trap included, pressure test scheduled
- [ ] Electrical: Circuit plan confirmed, conduit and burial depth verified, GFCI protection planned for all outlets, lighting zones mapped
- [ ] Plumbing: Water line slope confirmed (for freeze zones), shut-off valves located inside house, drainage solution approved by plumber and building department
- [ ] All utility connections positioned before countertop installation—verify exact appliance cutout locations with manufacturer specs
- [ ] Post-installation: All connections tested per code (gas leak test, electrical GFCI test, water pressure/drain test), permits closed out with inspections passed
Integrating utilities thoughtfully transforms your kitchen from a static structure into a living, functional extension of your home. This invisible work is the bedrock of daily joy—enabling you to focus on the sizzle of the steak, not the worry of a tripped breaker or empty fuel tank.
Appliance Selection: Tools That Elevate Your Craft
Appliances are the heart of your cooking experience. Choosing wisely means aligning tools with your documented cooking style (Layer 2 Audit). Resist the allure of “having it all.” A rarely used specialty appliance consumes valuable space and budget better spent on a high-quality primary grill you’ll use weekly. Prioritize based on frequency of use.
The Grill: Your Primary Engine
- Built-In Gas Grills:
Ideal For: Daily/weekly cooks who value convenience, precise temperature control, and quick start-up.
Key Selection Criteria: - BTU Rating: Balanced heat distribution matters more than maximum BTUs. Look for appropriate BTUs per square inch of cooking surface.
- Burner Configuration: Minimum two independent burners (allows 2-zone cooking: direct heat + indirect heat). Three or four burners offer greater flexibility. Check burner material quality.
- Grates: Stainless steel rod grates generally conduct heat well and last longer than porcelain-coated options (which may chip over time).
- Ignition: Reliable electronic ignition is standard. Ensure backup match-light access is available.
-
Construction: Look for corrosion-resistant materials. Check warranty coverage.
Top Consideration: Measure your cabinet cutout before buying. Built-in grills require precise framing. Allow manufacturer-specified clearance on all sides. -
Charcoal/Kamado Grills (Built-In or Freestanding):
Ideal For: Flavor enthusiasts who enjoy the ritual of fire-building, low-and-slow smoking, and superior searing.
Key Selection Criteria: - Ceramic Kamados: Exceptional heat retention and fuel efficiency. Excellent for smoking, baking pizza, searing. Heavy (requires sturdy base). Learning curve for temperature control.
-
Traditional Charcoal: Affordable, versatile. Requires more active management. Built-in charcoal inserts exist but are less common.
Critical Note: Charcoal produces ash. Ensure easy ash removal access. Never place directly on combustible surfaces. Requires dedicated storage for charcoal and tools. -
Hybrid Grills: Offer gas ignition for charcoal or dual-fuel capability. Great flexibility but higher cost and complexity. Verify reliability of the hybrid mechanism.
Essential Supporting Appliances
- Outdoor Refrigerator:
Not just a luxury. Keeps drinks cold, ingredients fresh, and reduces trips inside.
Critical Specs: Must be rated for outdoor use (standard indoor fridges fail rapidly outdoors). Look for: - All-Stainless or Corrosion-Resistant Construction
- High Ambient Temperature Rating: Must operate reliably in your region’s peak temperatures (check specs)
- UV-Resistant Components: Seals, gaskets, and finishes must withstand sun exposure
-
Drainage: Should have a drain hole for defrosting/water removal
Size Tip: A modest-sized model is often sufficient. Place in shade if possible to improve efficiency. Ensure adequate ventilation space around unit per manufacturer specs. -
Sink:
As discussed in Utilities, a stainless steel sink with frost-proof faucet is transformative. Include a cutting board that fits over the sink for extra prep space. A small pull-out sprayer hose is invaluable. -
Side Burners & Griddles:
Side Burner: Perfect for sauces, boiling corn, heating beans. Ensure it has a windscreen.
Griddle/Plancha: Expands cooking versatility dramatically—eggs, pancakes, smash burgers, stir-fries. Look for thick steel for even heat retention. Some grills offer reversible grates. -
Pizza Oven:
Wood-Fired: Authentic flavor, high heat, requires skill and time to manage fire. Needs significant clearance and non-combustible surround.
Gas-Fired: More convenient, faster heat-up, consistent temperatures. Less “authentic” smoke flavor but excellent results.
Critical Consideration: Placement! Ovens radiate intense heat. Position away from seating, traffic paths, and combustible materials. Requires dedicated non-combustible base. Factor in storage for fuel (if applicable) and tools. -
Ice Maker:
A true entertainer’s delight. Like refrigerators, must be outdoor-rated. Produces clear ice. Requires water line connection and drainage. Place near beverage center.
The “Phased Implementation” Strategy
Budget constraints? Build smartly over time. This avoids compromising core infrastructure.
- Phase 1 (Foundation Year): Install the permanent structure—countertops, cabinetry base, utility hookups (gas line stubbed out, electrical outlets in place, plumbing rough-in), flooring. This is the most complex part. Do it right once.
- Phase 2 (Core Function): Add your primary appliance (grill), sink, and essential storage. You now have a fully functional kitchen.
- Phase 3 (Enhancement): Add refrigerator, side burner, or lighting upgrades as budget allows.
- Phase 4 (Luxury): Integrate pizza oven, ice maker, or advanced entertainment systems.
Why This Works: The structural and utility work represents the majority of project complexity. Completing it upfront means future appliance additions are simpler. You avoid disruptive retrofits later. This strategy also lets you “test drive” your layout before committing to every appliance.
Ambiance & Comfort: Crafting the Sensory Experience
A functional kitchen becomes a beloved sanctuary when you intentionally design for human comfort. This layer addresses the subtle elements that determine whether guests linger for hours or retreat indoors after dinner. It’s about engaging all five senses.
Climate Control: Extending Your Season
- Shade Solutions:
- Pergolas (Fixed or Retractable): Define the space architecturally. Retractable canopy systems offer on-demand sun/rain protection. Add climbing plants (wisteria, jasmine) for natural cooling and fragrance—but ensure they won’t drop debris on cooking surfaces.
- Umbrellas: Market umbrellas with heavy-duty bases work for small zones. Cantilever (offset) umbrellas provide shade without a center pole obstructing the table. Choose UV/fade-resistant fabric.
-
Sail Shades: Modern, sculptural, and highly effective for targeted shade. Install with proper tensioning hardware rated for wind loads. Angle to block afternoon sun.
-
Heating for Cool Evenings:
- Overhead Patio Heaters (Electric or Gas): Mounted on pergola beams or walls. Electric models are cleaner (no fumes); gas models provide more intense heat. Ensure proper clearance from combustibles.
- Fire Pits or Fire Tables: Dual-purpose—provides warmth and a mesmerizing focal point. Place downwind and at a safe distance from the cooking zone to avoid smoke interference and fire risk. Use propane or natural gas for clean, controllable flames.
-
Radiant Floor Heating: The ultimate luxury. Embedded in the flooring substrate, it gently warms the area underfoot. Requires professional installation during the flooring phase. Ideal for stone or tile floors in colder climates.
-
Cooling for Hot Climates:
- Misting Systems: Fine water vapor evaporates quickly, cooling the air without soaking guests. Requires a high-pressure pump and filtered water source to prevent nozzle clogging. Install nozzles angled away from seating.
- Ceiling Fans: Mounted on pergolas or ceilings. Move air effectively. Choose outdoor-rated, damp-location fans with sealed motors.
- Strategic Planting: Deciduous trees provide summer shade and allow winter sun. Evergreen hedges block wind corridors identified in your site analysis.
Sensory Layering: Beyond Visuals
-
Sound:
Mask street noise or create ambiance with a small water feature (wall fountain, bubbling urn). Position away from conversation zones. For music, use outdoor-rated speakers designed to withstand moisture and UV. Place speakers at ear level around the perimeter. Wireless systems offer easy zoning. Pro Tip: Test speaker placement before final installation—sound behaves differently outdoors. -
Scent:
Intentionally plant fragrant herbs within your kitchen zone: rosemary, thyme, lavender, mint (plant mint in pots—it’s invasive!). Brush against them while cooking to release aroma. Place citrus trees (in containers if not hardy in your zone) nearby. Avoid strongly scented flowers near cooking areas—they can clash with food aromas. -
Touch:
Comfort extends to textures underfoot and hand. Choose non-slip flooring. Add weather-resistant cushions to seating (solution-dyed acrylic fabric). Keep a soft, absorbent outdoor towel handy. The warmth of a fire table or the cool smoothness of granite countertops—all contribute to tactile satisfaction.
Seating Integration: Where Function Meets Fellowship
Don’t treat seating as an afterthought. Integrate it thoughtfully:
– Breakfast Bar Style: Extend the countertop with an overhang and add weather-resistant bar stools. Creates interaction between cook and guests. Ensure knee space and proper counter height.
– Adjacent Dining Area: Position a dedicated table a comfortable distance from the cooking zone—close enough for conversation, far enough to avoid heat/smoke. Allow clearance behind chairs for movement.
– Lounge Zone: Create a separate conversation area with deep-seated sofas or chairs around a fire feature. Defines distinct activity zones.
– Material Matters: Choose seating frames of powder-coated aluminum, stainless steel, or sustainably harvested teak. Cushions must be quick-dry foam core with UV-resistant fabric. Store cushions when not in use to prolong life.
Ambiance isn’t decoration—it’s environmental psychology. By consciously designing for comfort across seasons and senses, you transform your outdoor kitchen from a place you use into a place you love—a magnetic hub that draws family and friends outside long after the meal is served.
Budgeting, Phasing, and Professional Partnerships
Transparency about cost prevents stress and empowers smart decisions. Outdoor kitchen costs vary significantly based on size, materials, utilities, and location. Let’s demystify the factors and build a realistic plan.
Understanding Cost Factors
Rather than fixed price ranges (which vary too widely by region and project specifics), focus on these key cost drivers:
– Site Preparation & Foundation: Grading, drainage, footings, and flooring substrate. Complexity depends on slope, soil conditions, and existing landscape.
– Cabinetry & Countertops: Material choice is the largest variable here—from polymer composites to stainless steel frames with natural stone tops.
– Appliances: Prioritize based on your cooking audit. A single high-quality grill often delivers more value than multiple lower-use appliances.
– Utilities (Rough-in): Distance to existing gas, electric, and water lines significantly impacts cost. This is often the least flexible budget item—invest wisely here.
– Lighting & Ambiance: Layered lighting, heating, and sound systems add comfort but can be phased.
– Professional Labor: Varies by region, project complexity, and contractor expertise. Specialized outdoor kitchen builders may command premiums but offer deeper expertise.
– Contingency (Non-Negotiable): Always include a contingency fund (typically 10-20% of total budget) for unexpected site conditions (rock, poor soil), code requirements, or material delays.
Critical Insight: Utilities and foundation work are foundational—they dominate early budget decisions. Appliance selection offers more flexibility. Allocate budget accordingly: prioritize robust infrastructure, then choose appliances that fit the remaining budget. A resilient foundation enables future upgrades; a compromised foundation creates ongoing problems.
DIY vs. Professional: Knowing Your Limits
Be honest about your skills. Mistakes in outdoor kitchens can be costly and hazardous.
-
Consider DIY If:
You have proven experience with masonry, carpentry, and utility work. You understand local building codes. You have time for a multi-month project.
Realistic DIY Scope: Building a non-structural countertop base with pre-fab cabinets, installing paver flooring on a prepared base, assembling modular components, planting landscaping.
High-Risk Areas to Avoid: Gas line installation, electrical wiring beyond simple plug-in lights, structural footings, plumbing drainage. These require licenses for safety and liability reasons. -
Hire Professionals For:
- General Contractor: Manages the entire project, coordinates subs, ensures code compliance. Worth the fee for complex builds.
- Landscape Architect/Designer: Creates detailed plans, site grading, utility routing, material specs. Essential for large or challenging sites.
- Licensed Subcontractors: Gas fitter, electrician, plumber. Non-negotiable for utility work. Verify licenses, insurance, and references.
- Specialized Outdoor Kitchen Builder: Companies focusing only on outdoor living spaces often have deeper expertise in material compatibility and workflow than general remodelers.
Vetting Professionals Checklist:
– [ ] Verify state license and insurance (ask for certificate)
– [ ] Request references for outdoor kitchen projects (not just decks)
– [ ] Review portfolio for projects in your climate zone
– [ ] Get detailed written estimate with line-item costs
– [ ] Confirm who obtains permits and schedules inspections
– [ ] Clarify warranty on workmanship
– [ ] Discuss communication protocol and project timeline
The Phased Budget Approach (Conceptual)
Conceptual Example:
– Phase 1: Foundation, flooring, cabinetry base, utility rough-ins (gas stub, electrical outlets, plumbing rough-in), basic lighting. Result: Structurally complete shell ready for appliances.
– Phase 2: Primary grill, sink, faucet, essential storage. Result: Fully functional cooking station.
– Phase 3: Outdoor refrigerator, enhanced lighting.
– Contingency fund built into Phase 1.
This approach avoids financial strain, allows you to earn interest on saved funds, and lets you refine appliance choices based on actual use. Most importantly, it ensures the foundational work—the part that’s difficult to redo—is completed to a high standard from the start.
Maintenance & Seasonal Care: Preserving Your Investment
An outdoor kitchen isn’t “install and forget.” Proactive care ensures years of beauty and function. Create a simple seasonal maintenance calendar—spending modest time quarterly prevents major repairs later.
Spring Startup Ritual (After Last Frost Risk)
- Inspect Structure: Check for cracks in countertops, loose pavers, or shifted foundations. Repair minor issues promptly.
- Clean Surfaces: Wash countertops with appropriate cleaners. For sealed stone, reapply sealer if water no longer beads. Clean stainless steel with dedicated cleaner.
- Appliance Deep Clean: Remove grill components. Soak, scrub, rinse thoroughly. Check burner ports for clogs. Inspect gas connections.
- Utility Check: Test GFCI outlets. Turn on water slowly, check for leaks. Verify gas shut-off valves operate smoothly.
- Refresh Ambiance: Clean light fixtures, replace bulbs. Clean flooring. Prune nearby plants.
Summer Vigilance (Ongoing)
- After Each Use: Wipe down countertops. Brush grill grates while warm. Empty grease trays.
- Weekly: Check for pest activity in cabinets—place natural deterrents if needed. Ensure drainage paths are clear of debris.
- Monthly: Clean refrigerator condenser coils (improves efficiency). Inspect seals on doors. Tighten any loose hardware.
Fall Shutdown Protocol (Before First Frost Risk)
- Deep Clean Everything: Appliances, countertops, sink, flooring. Remove all food debris.
- Winterize Plumbing (Critical in Freeze Zones):
- Shut off water supply valve inside the house.
- Open outdoor faucet/sink valves to drain residual water.
- Follow manufacturer or plumber guidance for blowing out lines (hire a pro if unsure).
- For sinks: Pour non-toxic RV antifreeze into P-trap per guidance.
- Appliance Protection:
- Remove fuel tanks per safety guidelines; store appropriately.
- Cover grill with a breathable, waterproof cover. Ensure cover is secured.
- Unplug refrigerator; clean interior thoroughly, leave door slightly ajar. Store indoors if possible, or cover securely.
- Cabinet Care: Wipe interiors dry. Leave cabinet doors slightly ajar for air circulation if humidity is high.
- Flooring: Sweep debris. For tile/pavers, ensure joints are clear.
Winter Monitoring (In Harsh Climates)
- After heavy snow, gently brush accumulation off surfaces (avoid metal tools).
- Check covers periodically for ice buildup or wind damage.
- If using the space occasionally, ensure pathways are clear and safe.
Material-Specific Care Guidance
- Sealed Stone Countertops: Clean with pH-neutral cleaners. Reseal as needed (do water test). Avoid acidic cleaners which may etch stone.
- Stainless Steel: Wipe with grain using microfiber cloth and dedicated cleaner. Address hard water spots promptly.
- Polymer Cabinets: Clean with mild soap and water. Avoid abrasive pads. Typically requires no sealing.
- Textured Tile/Pavers: Sweep regularly. Clean stains appropriately. Replenish jointing material if washed out.
- Stainless Steel Appliances: Clean exterior regularly. Lubricate hinge points annually with appropriate lubricant.
Maintenance isn’t a chore—it’s stewardship. Each small action honors the investment you’ve made and ensures the space remains a source of joy, not frustration. Think of it as tending a garden: consistent, mindful care yields abundant rewards season after season.
Navigating Common Pitfalls: Lessons from Real Projects
Even well-planned projects encounter friction. Anticipating these pitfalls builds resilience. Here are frequent challenges and proven solutions, framed not as warnings but as empowering knowledge.
Pitfall 1: “I Didn’t Account for Drainage—Now Water Pools Under the Countertop”
Root Cause: Countertop installed without adequate slope, or foundation not graded away from structure.
Solution Path:
– Prevention (Best): During installation, ensure countertop has a subtle slope toward the front or a designated drain point. Foundation slab should slope away from the house.
– Correction: For minor pooling, redirecting water flow may help. For severe cases, professional assessment is recommended.
Key Insight: Water management is critical. Design with water flow, not against it. Always discuss drainage explicitly with your installer.
Pitfall 2: “My Cabinets Showed Wear After One Season”
Root Cause: Choosing aesthetic over climate suitability; inadequate maintenance commitment.
Solution Path:
– Prevention: In humid or wet climates, prioritize materials engineered for exterior use. Choose based on your willingness to perform required maintenance.
– Correction: Severely compromised cabinets often require replacement. For minor issues, cleaning and resealing might help temporarily.
Key Insight: Material selection reflects your future behavior. If you won’t maintain it, choose a lower-maintenance alternative. Honesty during planning prevents disappointment.
Pitfall 3: “The Grill is Too Far from the Prep Counter—I’m Constantly Walking Back and Forth”
Root Cause: Layout designed for looks, not workflow; skipping the “Flow Test.”
Solution Path:
– Prevention: Rigorously perform the Cooking Style Audit and Flow Test before finalizing plans. Measure your indoor kitchen workflow—replicate what works.
– Correction: Add a small, mobile prep cart positioned between grill and main counter. Not ideal, but functional. For future builds, this is why phased implementation helps—you learn what actually works.
Key Insight: Efficiency compounds. Saving steps per cooking session saves significant effort over time. Design for the cook’s comfort first.
Pitfall 4: “I Got Stuck in Permit Limbo—Construction Halted”
Root Cause: Assuming permits aren’t required; not consulting building department early.
Solution Path:
– Prevention: Before finalizing plans, contact your local building department. Ask: “What permits are required for an outdoor kitchen with gas, electric, and plumbing?” Get requirements in writing. Factor permit timeline into your project schedule.
– Correction: Stop work immediately. Submit required plans. Pay fines if necessary. It’s costly but cheaper than forced demolition.
Key Insight: Permits ensure safety and code compliance. They protect your investment and family. A reputable contractor will secure permits; if they resist, consider it a red flag.
Pitfall 5: “The Space Feels Uninviting at Night”
Root Cause: Treating lighting as an afterthought; relying solely on a single overhead fixture.
Solution Path:
– Prevention: Integrate layered lighting planning into the electrical phase. Budget for task, ambient, and accent lighting.
– Correction: Add battery-operated LED puck lights under cabinets. String commercial-grade lights overhead. Place solar path lights along approach routes.
Key Insight: Darkness amplifies space; light defines it. Thoughtful lighting transforms functionality into atmosphere after sunset.
These pitfalls aren’t failures—they’re learning opportunities. By acknowledging them upfront, you build not just a kitchen, but wisdom. Every challenge navigated strengthens your connection to the space. Remember: the goal isn’t perfection on day one; it’s creating a resilient foundation that adapts and improves with you over time.
Your Questions, Answered
Q: Do I really need a permit for an outdoor kitchen?
A: In most municipalities, yes, if your project includes any of the following: permanent foundation/footings, gas line installation or extension, new electrical circuits or outlets, plumbing (sink, water line), or structural elements (pergola over a certain size). Permits ensure work complies with safety codes and protects you during resale. Requirements vary significantly by location—always contact your local building department before finalizing plans. Skipping permits risks fines, forced demolition, and denied insurance claims. Reputable contractors will secure permits; if a contractor suggests skipping them, consider it a major red flag.
Q: What’s the absolute minimum space needed for a functional outdoor kitchen?
A: You can create a highly functional “grill station” in as little as 6 feet of linear space (e.g., along a fence). Essential elements: a quality grill (24″-30″ wide), 18-24″ of countertop on one or both sides for prep, and a small cabinet or cart for storage. For a true multi-zone kitchen (grill + sink + fridge), plan for a minimum L-shaped layout of 8′ x 6′. Prioritize workflow over square footage—efficient placement of three key zones (prep, cook, clean) in a small space beats a sprawling layout with poor flow. Vertical storage maximizes utility in tight areas.
Q: Can I use my indoor refrigerator or dishwasher outside?
A: Strongly discouraged. Standard indoor appliances lack critical protections:
– Refrigerators: Seals degrade in UV light; compressors overheat in high ambient temperatures; exteriors rust. Outdoor-rated models feature corrosion-resistant construction, enhanced cooling systems for high ambient temps, and UV-stabilized components.
– Dishwashers: Require full weatherproofing, drainage solutions, and GFCI protection not found in indoor units. Outdoor dishwashers are rare; most experts recommend washing dishes indoors or using durable, easy-clean outdoor serveware.
Using indoor appliances outdoors voids warranties and creates safety hazards. The incremental cost of outdoor-rated appliances is a wise investment in longevity and safety.
Q: How do I protect my outdoor kitchen during winter in a freezing climate?
A: Winterization is essential in freeze-thaw zones. Follow this sequence before the first hard frost:
1. Deep clean all surfaces and appliances.
2. Shut off water supply valve inside the house. Open all outdoor faucets/sink valves to drain lines. Follow professional guidance for blowing out residual water. Pour non-toxic RV antifreeze into sink P-trap per instructions.
3. Handle fuel tanks per safety guidelines; store appropriately.
4. Remove grill components; store indoors or in a sealed container. Cover grill with a breathable, waterproof cover.
5. Unplug and clean outdoor refrigerator; leave door slightly ajar. Store indoors if possible.
6. Sweep debris from flooring; ensure drainage paths are clear.
7. For cabinets: Wipe dry, leave doors slightly ajar for air circulation in humid climates.
Never use heat tape on outdoor kitchen plumbing—it’s a fire hazard. When in doubt, consult a local outdoor living specialist familiar with your climate.
Q: Are there eco-friendly options for outdoor kitchens?
A: Absolutely. Sustainability can be woven throughout:
– Materials: Reclaimed brick or stone for accents; FSC-certified wood for non-structural elements; recycled content countertops; locally sourced stone to reduce transport emissions.
– Utilities: Solar-powered pathway lights; rainwater harvesting (with proper filtration and local code compliance) for non-potable uses; energy-efficient LED lighting on timers/dimmers.
– Appliances: Choose grills with high fuel efficiency ratings; consider induction cooktops (powered by electricity) for side burners—they heat faster and use less energy.
– Landscaping: Native, drought-tolerant plants; permeable pavers to reduce runoff.
– Waste: Integrate a compost bin discreetly into cabinetry for food scraps.
Small choices compound: using low-VOC sealants, selecting durable materials that won’t need replacement, and designing for longevity are inherently sustainable acts.
Q: How close can I place the outdoor kitchen to my house or property line?
A: This is strictly governed by local building and fire codes—never guess. General considerations (verify locally):
– Distance from House: Typically requires clearance from combustible siding for grills/appliances. Non-combustible surfaces may allow closer placement, but always follow appliance manufacturer’s clearance specs.
– Property Lines: Setback requirements vary widely. Critical for fire safety and neighbor relations.
– Overhead Clearance: Minimum clearance above grill to any overhead structure unless non-combustible.
– Fuel Tanks: Usually require specific distances from building openings, ignition sources, and property lines.
Submit a site plan to your building department during the permit process—they will specify exact setbacks. Respecting these distances protects your home, neighbors, and investment.
Q: What’s the biggest mistake people make when designing an outdoor kitchen?
A: Prioritizing aesthetics over workflow and climate suitability. Falling in love with a specific material without verifying its performance in your local weather, or designing a beautiful layout that forces inefficient movement. The second most common mistake is underestimating utility complexity—assuming a sink or fridge can be added “later” without planning the rough-ins during construction. Remember the “Foundations First” Framework: Site Reality and Human Flow must dictate choices. A slightly less “Instagrammable” kitchen that functions flawlessly in your life will bring vastly more joy than a stunning space that frustrates you daily.
Q: Can I incorporate a pizza oven into a small outdoor kitchen?
A: Yes, with strategic planning. Compact gas-fired pizza ovens require minimal footprint and can be placed on a sturdy, non-combustible countertop section. Ensure adequate clearance on all sides from combustibles. For wood-fired ovens, even small models need significant space for the oven itself, fuel storage, and safe clearance. Position the oven at the end of the kitchen run, away from main traffic flow and seating, to manage heat and smoke. Verify local codes regarding wood-fired appliances—some municipalities have restrictions. Gas models often offer easier integration.
Q: How do I keep pests (ants, rodents) out of outdoor kitchen cabinets?
A: Prevention is key:
– Seal Entry Points: Fill gaps around utility lines entering cabinets with steel wool and exterior-grade caulk. Ensure cabinet doors close tightly.
– Smart Storage: Store all food in airtight containers inside the house. Never leave food scraps or open bags outside overnight.
– Natural Deterrents: Place food-grade diatomaceous earth along cabinet seams (reapply after rain). Mint plants nearby can deter rodents (contain mint in pots).
– Cleanliness: Wipe spills immediately. Clean grease trays after every use. Install a covered trash bin with a tight-sealing lid; empty frequently.
– Professional Help: For persistent issues, consult a pest control specialist about outdoor bait stations placed away from the kitchen area. Avoid spraying pesticides directly in cooking zones.
Q: Is it worth adding a sink to my outdoor kitchen?
A: For most homeowners who use their outdoor kitchen regularly, yes—it’s transformative. A sink eliminates constant trips indoors for handwashing, rinsing produce, cleaning tools, or filling pots. It elevates the space from a “grill zone” to a true functional kitchen. However, it significantly increases complexity due to plumbing requirements (water supply, drainage solution, freeze protection). If budget or site constraints prevent a permanent sink, consider alternatives:
– A high-quality portable utility sink on casters (with a foot pump) that can be stored when not in use.
– Positioning the outdoor kitchen immediately adjacent to an outdoor faucet with a long, retractable hose.
– Installing a simple prep sink with a hand-pump faucet connected to a hidden freshwater tank underneath—requires manual filling but avoids complex plumbing.
Weigh the convenience against the installation hurdles. For frequent users, the sink’s daily utility often justifies the effort.
Q: How long does an outdoor kitchen typically last?
A: Lifespan depends entirely on material choices, climate, usage patterns, and maintenance diligence. With proper material selection aligned to your climate and consistent care, a well-built outdoor kitchen can provide many years of enjoyment. Premium materials like stainless steel frames and dense natural stone countertops, when maintained, can endure for decades. Mid-range materials like marine polymer cabinets also offer long service life with appropriate care. Appliances typically have a shorter lifespan but can be replaced within the existing structure. The single biggest factor in longevity is proactive maintenance. An outdoor kitchen built with thoughtful material choices and meticulously maintained will outlast a premium kitchen neglected over time. View it as a long-term relationship—consistent care yields enduring rewards.
Conclusion and Your Next Step
You now hold a comprehensive blueprint—not just for building an outdoor kitchen, but for creating a space that deeply enriches your life. We’ve journeyed from the critical site analysis that prevents foundational errors, through the human-centered workflow design that makes cooking effortless, to the climate-smart material choices that ensure lasting beauty. We’ve demystified utilities, empowered appliance selection, and woven ambiance into the very fabric of the space. Most importantly, we’ve framed this not as a single project, but as an evolving partnership between you, your home, and the natural world.
Let’s crystallize the three pillars that will carry you forward:
1. Anchor in Reality: Let your site’s sun patterns, drainage paths, and climate—not magazine ideals—guide your non-negotiable constraints. This isn’t limitation; it’s the source of intelligent, resilient design.
2. Design for Your Rituals: Your cooking style, social habits, and daily rhythms are the true north of every decision. A kitchen built for your life will be used and loved far more than one built for someone else’s dream.
3. Invest in the Invisible: Prioritize robust foundations, proper utility integration, and material suitability over fleeting aesthetics. The beauty that lasts is built on intelligence, not just appearance.
The 24-Hour Rule: Your Tiny, Powerful First Step
Knowledge without action remains potential. Within the next 24 hours, complete this single, specific task:
Go outside at the exact time you’d typically use your future kitchen (e.g., 6 PM on a weekday). Stand in your proposed location for 10 full minutes. Observe without judgment. Note on your phone:
– Where is the sun? Is it in your eyes?
– Which way is the wind blowing?
– What do you hear? (Traffic? Birds?)
– What do you see? (A beautiful tree? A neighbor’s structure?)
– Where does water flow after rain? (Recall recent storms)
– How do you naturally walk from your back door to this spot?
This simple act transforms abstract planning into embodied understanding. It grounds your vision in the living reality of your property. This note becomes your North Star—a touchstone to reference whenever decisions feel overwhelming. It costs nothing but yields immense clarity.
The Big Picture: More Than a Kitchen
An outdoor kitchen is a catalyst. It extends your living space into nature, fostering connection—to food grown in your garden, to seasons marked by changing light, to loved ones gathered around shared creation. It encourages slowing down: the patience of tending a fire, the mindfulness of chopping herbs moments before they hit the pan, the joy of eating under an open sky. In a world of indoor screens and hurried meals, this space becomes a sanctuary of presence. It’s where birthday cakes are grilled, where teenagers learn to flip burgers, where quiet mornings begin with coffee and birdsong. The materials you install today will witness countless ordinary, extraordinary moments.
You are not merely adding square footage. You are cultivating a legacy of warmth, flavor, and fellowship. The journey requires thoughtful steps, but the destination—a space where laughter mingles with the sizzle of dinner—is worth every deliberate choice. Trust the framework. Honor your site. Design for your joy. Then step outside, light the grill, and begin making memories under the sky.
Explore Our Complete Outdoor Living System:
Designing Your Year-Round Patio Oasis | Mastering Backyard Landscaping for Privacy and Flow | The Ultimate Guide to Fire Pits and Outdoor Heating | Sustainable Water Features for Serene Outdoor Spaces | Creating Kid-Friendly Backyards That Spark Imagination | Seasonal Planting Calendars for Edible Landscapes | Budget-Friendly DIY Projects to Enhance Your Outdoor Space