Stop guessing where your energy dollars vanish. Start investing with informed precision.
Rising utility costs need not be an unavoidable burden of modern living. By shifting from fragmented quick fixes to a deliberate, evidence-based investment strategy, households can systematically reduce energy waste while enhancing comfort, resilience, and long-term financial stability. This guide presents a sequential, tiered framework grounded in building science principles to help identify high-impact opportunities first—transforming uncertainty into clarity and empowering confident, incremental progress. No jargon. No hype. Just a practical path toward measurable, sustainable results.
Introduction: Why Random Fixes Fall Short and Systems Succeed
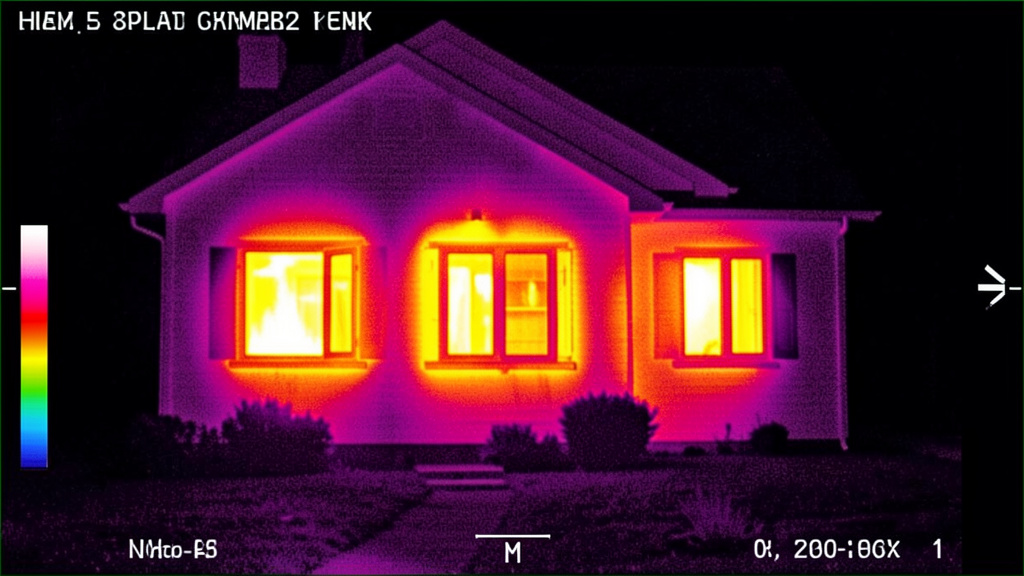
According to the U.S. Energy Information Administration, residential energy expenditures represent a significant portion of household budgets nationwide, with heating and cooling typically accounting for the largest share. Globally, the International Energy Agency notes that buildings remain a major focus for efficiency improvements. Why does progress often stall? Because isolated advice—”replace bulbs,” “seal drafts,” “buy a smart thermostat”—ignores a foundational reality of building performance: energy systems are interconnected. Installing high-efficiency equipment in a leaky, under-insulated structure is like optimizing one component of a complex machine while neglecting systemic flaws that undermine overall performance and return on investment.
This approach is not about deprivation or discomfort. It centers on intelligent resource allocation. Every unit of energy conserved through strategic efficiency represents a permanent reduction in recurring operational costs—a “negawatt” that compounds annually without fuel expenses, maintenance demands, or market volatility. The U.S. Department of Energy indicates that comprehensive, sequenced home energy improvements can meaningfully reduce household energy consumption. Yet many remain hesitant due to conflicting information, concerns about upfront costs, uncertainty about where to begin, or the misconception that substantial savings require major renovation.
This guide addresses that hesitation. We present a sequential, four-tier investment framework aligned with principles endorsed by building science organizations. It begins with zero-cost behavioral adjustments accessible immediately and progresses logically toward structural enhancements—always prioritizing actions that deliver the greatest impact per dollar invested. Crucially, this framework respects individual constraints: whether you own a historic property, rent an apartment, manage budget limitations, or navigate regulatory considerations. By following this adaptable path, energy efficiency transforms from an abstract goal into a documented, trackable process where each step builds confidence and capability for the next.
The Tiered Investment Framework: A Practical Roadmap for Sustainable Progress
This framework organizes energy-focused actions into four sequential tiers. Each tier intentionally builds upon the previous one, creating compounding benefits while minimizing inefficient spending. The core philosophy—supported by building performance standards—is straightforward: reduce demand before upgrading supply. Addressing air leakage and insulation before replacing HVAC equipment helps ensure new systems are appropriately sized, operate more efficiently, experience less wear, and often cost less upfront. Bypassing this sequence is a common oversight that can diminish returns.
The Guiding Principle: Efficiency reflects intentionality. Every thoughtful action taken to reduce energy demand amplifies the effectiveness and value of subsequent upgrades.
Consider two hypothetical scenarios:
– Scenario A: A household replaces an aging furnace with a high-efficiency model. Energy use decreases moderately.
– Scenario B: Another household first addresses significant air leaks and adds attic insulation, then installs a correctly sized high-efficiency heating system. Energy use decreases substantially more, often with lower total investment.
The difference lies not in luck, but in sequence. This framework provides the structure to pursue Scenario B deliberately.
Tier 1: Behavioral & Zero-Cost Adjustments (Building Foundational Awareness)
These actions require no financial investment but cultivate essential awareness, establish sustainable habits, and generate immediate (though modest) reductions. They form the critical baseline for observing patterns and measuring future progress. Skipping this tier risks implementing physical upgrades while unknowingly counteracting them through habitual patterns.
Why this tier matters: Behavioral adjustments alone can contribute to measurable reductions within the first billing cycle. More importantly, they develop the observational skills needed to recognize waste patterns unique to your home and lifestyle. Research published in energy policy journals suggests households combining awareness practices with physical upgrades tend to sustain improvements longer.
Implementing effectively—beyond generic advice:
– Thermostat Strategy, Not Just Settings:
– Cooling season: Set to 78°F (25.5°C) when home; raise when away.
– Heating season: Set to 68°F (20°C) when awake and home; lower when asleep or away for extended periods.
– Key nuance: Avoid extreme setbacks (>10°F). Modern systems may operate less efficiently recovering from deep setbacks. A moderate 7–8°F adjustment is often optimal.
– Illustrative example: Adjusting thermostat settings during unoccupied hours, combined with closing interior doors to isolate zones, has helped some households observe noticeable changes in seasonal energy use without sacrificing comfort.
– Phantom Load Awareness:
– How: Identify devices that draw power continuously (entertainment centers, chargers, kitchen appliances with clocks). An affordable plug-in energy monitor can reveal actual consumption.
– Insight: Older set-top boxes or gaming consoles in standby mode can consume measurable power 24/7. Newer models typically use far less.
– Sustainable practice: Group devices on a smart power strip that cuts peripheral power when the main device (like a TV) is off. Label cords during initial review for easier identification.
– Seasonal Window Management:
– Cooling season: Close light-colored blinds on east-facing windows by mid-morning and west-facing windows by early afternoon. South-facing windows often benefit more from exterior shading (trees, awnings).
– Heating season: Open south-facing curtains on sunny winter days to capture passive solar warmth; close all curtains at dusk to add a layer of insulation.
– Context note: Keeping dark curtains closed on a south-facing window during a sunny winter day may block beneficial heat gain. Adapt strategies to your home’s orientation and local climate.
– Water Heating Habits:
– Opt for shorter showers where feasible.
– Wash clothes in cold water (modern detergents are formulated for this; water heating represents most of a washing machine’s energy use).
– Use air-dry settings on dishwashers.
– Perspective: Shifting even one weekly laundry load from hot to cold water contributes incrementally to annual savings. Small, consistent actions accumulate meaningfully over time.
Common considerations:
– Focus on major loads: While turning off lights is prudent, lighting typically represents a smaller portion of modern home energy use. Prioritize attention on HVAC, water heating, and major appliances where impact is greater.
– Consistency supports habit formation: Use phone reminders initially. Place a subtle note near the thermostat: “Is this setting intentional for current conditions?”
– Adapt to your rhythm: If you work from home, aggressive setbacks may not apply. Tailor strategies to your actual occupancy patterns.
Why renters benefit here: Tier 1 actions are universally accessible. Tenants control thermostat settings (within lease guidelines), plug loads, window coverings, and water usage habits. Documenting utility usage before and after adjustments creates objective data—valuable when discussing potential upgrades with property managers later. This tier builds credibility and evidence.
Tier 2: Low-Cost, High-Impact Upgrades (Creating Momentum)
These projects typically require modest investment (often under $500), offer relatively rapid payback, and are frequently suitable for DIY completion. They target pervasive sources of waste identified in professional assessments: air leakage, lighting efficiency, and uncontrolled plug loads. Successfully implementing Tier 2 validates effort with tangible results, building confidence for future steps.
Why this tier delivers value: These upgrades address well-documented opportunities with strong cost-benefit profiles. Organizations like the American Council for an Energy-Efficient Economy consistently highlight air sealing and targeted lighting upgrades among the most accessible measures. The visible progress—feeling fewer drafts, seeing longer-lasting bulbs—reinforces commitment. This psychological reinforcement is as valuable as the financial return.
Air Sealing: A Foundational Step
Why it matters: Uncontrolled air leakage can significantly impact heating and cooling energy use. Sealing leaks helps retain conditioned air, reducing strain on systems.
How to proceed:
1. Identify leaks: On a breezy day, hold a thin tissue or incense stick near windows, doors, electrical outlets on exterior walls, baseboards, attic hatches, and penetrations for pipes or wires. Observe movement. The back of your hand is sensitive for detecting drafts.
2. Prioritize strategically: Focus first on the attic—heat rises, carrying conditioned air through gaps around chimneys, recessed lights, plumbing vents, and access points. These areas often account for a disproportionate share of leakage.
3. Select appropriate materials:
– Caulk: For stationary gaps under ¼ inch (windows, baseboards, penetrations). Silicone suits damp areas; acrylic latex works well on painted surfaces.
– Weatherstripping: For movable components (doors, operable windows). Options include V-strip, adhesive foam tape, or door sweeps.
– Expanding foam: For larger gaps (⅜ inch to 2 inches) around pipes or rim joists. Use “minimal-expanding” foam near windows/doors to avoid operational issues. Important: Standard expanding foam can warp frames if misapplied.
4. Special consideration—recessed lights: Older fixtures may leak air significantly. Retrofit airtight covers rated for insulation contact above the fixture in the attic, sealed with fire-rated caulk. Safety note: Verify fixture rating before covering; consult a qualified electrician if uncertain.
Potential impact: Addressing major leaks around an attic hatch and penetrations has yielded noticeable reductions in seasonal energy use for some homeowners, with materials costing relatively little.
Important nuance: In very tight, newer homes, extensive sealing without attention to ventilation may affect indoor air quality. Ensure bathroom and kitchen exhaust fans are used during moisture-producing activities. When undertaking significant sealing, especially in older homes, consulting a building professional is prudent.
Lighting Optimization
Why it matters: While lighting’s share of home electricity use has decreased with LED adoption, strategic upgrades still offer quick wins and improved ambiance.
How to proceed:
1. Audit first: Note bulb locations, estimated usage hours, and current technology. Prioritize high-use fixtures (kitchen, porch, garage).
2. Select thoughtfully:
– Color temperature: 2700K–3000K for warm light (living areas, bedrooms); 3500K–4000K for neutral task lighting (kitchens, offices); 5000K+ for daylight simulation (workshops).
– Brightness: Match lumens, not watts. Replace a 60W incandescent (approx. 800 lumens) with an 8–10W LED. Reference:
– 450 lumens ≈ 40W incandescent
– 800 lumens ≈ 60W incandescent
– 1100 lumens ≈ 75W incandescent
– 1600 lumens ≈ 100W incandescent
– Dimmability: Choose “dimmable” LEDs only if paired with compatible dimmer switches. Older dimmers may cause flickering; upgrading the dimmer may be necessary.
3. Smart integration (optional): Smart switches or plugs can automate control for outdoor lights or infrequently used areas. Prioritize based on actual usage patterns.
Budget path: Focus initial replacements on the 5–10 highest-use fixtures.
Maintenance tip: Clean dust from fixtures and bulbs periodically; accumulation can reduce light output, potentially leading to unnecessary additional lighting.
Advanced Power Management
Why it matters: Standby power consumption contributes to baseline energy use across many households.
How to proceed:
– Smart power strips: “Master-controlled” strips cut power to peripherals (like game consoles or soundbars) when the main device (TV) is off. “Timer-controlled” strips suit seasonal items.
– Targeted smart plugs: Useful for individual high-draw devices used intermittently (dehumidifiers, workshop tools), especially if on a time-of-use utility rate.
– Simple ritual: Designate a small basket for frequently unplugged items (chargers, controllers). Makes the habit visible and manageable.
Perspective: Eliminating continuous standby draw from several devices can contribute meaningfully to annual savings with minimal ongoing effort after setup.
Water Efficiency: Dual Savings
Why it matters: Reducing hot water use lowers both water heating energy and water/sewer costs.
How to proceed:
– Showerheads: WaterSense-certified models (1.5–2.0 GPM) often maintain satisfying pressure. Many retailers offer demo units.
– Aerators: Install lower-flow aerators (1.0 GPM) on bathroom sinks; retain slightly higher flow (1.8 GPM) for kitchen functionality.
– Awareness tools: A simple shower timer can build mindfulness around duration.
Savings context: Replacing an older 2.5 GPM showerhead with a 1.8 GPM model reduces water use per shower. For frequent users, this accumulates to significant annual savings on water and energy.
Local consideration: In homes with well systems and pressure tanks, verify minimum flow requirements before installing ultra-low-flow fixtures.
Tier 2 Upgrades: General Guidance
| Upgrade | Typical Cost Range | Potential Annual Impact | Typical Payback | DIY Feasibility | Priority Consideration |
|---|---|---|---|---|---|
| Targeted Air Sealing (materials) | $50–$150 | Meaningful reduction in heating/cooling load | Often <1 year | Moderate | Very High |
| LED Bulbs (top 10 high-use fixtures) | $30–$80 | Reduced lighting energy use | <1 year | Very Easy | High |
| Smart Power Strips (3 units) | $60–$120 | Reduced standby consumption | 1–2 years | Very Easy | Medium-High |
| Low-Flow Showerhead + Sink Aerators | $25–$60 | Savings on water + energy | <6 months | Very Easy | High |
| Hot Water Pipe Insulation (first 3 ft) | $20–$40 | Faster hot water delivery, minor energy savings | <1 year | Easy | Medium |
| Door Sweep + Threshold Seal | $15–$40 | Reduced drafts at primary entry | <1 year | Easy | High |
| Smart Thermostat (replacing basic model) | $100–$250 | Optimized heating/cooling schedules | 1–3 years | Moderate | Medium |
Implementation Tip: Track utility usage before and after completing Tier 2 actions. Note billing periods and check if your utility provides weather-normalized usage data online. This documented change becomes valuable context for evaluating future steps. Acknowledge progress—observing even a modest reduction reinforces continued engagement.
Tier 3: Mid-Range System Optimizations (Enhancing Core Systems)
These investments ($500–$5,000) focus on optimizing core home systems—HVAC, water heating, major appliances. They often require professional installation and careful product selection but deliver sustained benefits in efficiency, comfort, air quality, and equipment longevity. Critically, Tier 3 actions yield the strongest returns after completing Tiers 1 and 2. Reducing the home’s energy load first allows for appropriately sized, more efficient equipment.
Why sequence matters: Installing new high-efficiency equipment before addressing air leakage or insulation is inefficient. The system compensates for uncontrolled losses, operating longer and under greater stress. Building performance standards emphasize: “Right-sizing equipment based on actual load calculations is essential for optimal performance.” Completing earlier tiers equips you to engage contractors as an informed partner.
HVAC Optimization
Thermostat Selection:
– Basic Programmable: Suitable for highly consistent daily schedules. Requires disciplined setup.
– Smart/Connected Models: Beneficial for variable schedules. Features may include remote sensors for multi-room temperature averaging, auto-away detection, and utility program integration.
– Utility Programs: Some models participate in demand-response initiatives, offering small annual credits for allowing minor, infrequent adjustments during peak grid demand. Participation is optional.
Maintenance is essential: Schedule professional tune-ups per manufacturer recommendations. Tasks often include coil cleaning (dirty coils reduce efficiency), refrigerant checks, and airflow verification. Change filters regularly during peak seasons. Select filter MERV ratings compatible with your system’s airflow requirements.
Duct Sealing and Insulation:
– Why it matters: In homes with ducts in unconditioned spaces (attics, crawlspaces), leaks can significantly waste conditioned air.
– DIY possibility: Accessible duct runs in basements may be sealed with mastic paste (superior to duct tape) and insulated with fiberglass wrap.
– Professional assessment: For ducts in attics or confined spaces, a qualified contractor can assess leakage. Techniques like aerosol sealing may address hard-to-reach leaks. Post-sealing verification testing provides objective data.
– Ventilation note: Ensure sealing does not compromise necessary combustion air or whole-house ventilation strategies.
Water Heating Strategies
Heat Pump Water Heaters (HPWH):
– How they work: Transfer heat from surrounding air to water, using significantly less electricity than standard electric resistance heaters. They also provide mild dehumidification and cooling in the installation space.
– Suitability factors: Best in mild to warm climates where the installation space remains above freezing year-round, with adequate clearance (typically 750+ cubic feet of air volume), and replacing an existing electric water heater.
– Considerations:
– Space: Requires installation in an area that won’t drop below freezing (garages, basements, utility rooms often suitable).
– Ambient impact: Cools and dehumidifies the immediate space—beneficial in humid climates, potentially undesirable in cold climates.
– Noise: Operates similarly to a quiet dehumidifier; avoid installing directly below quiet living spaces.
– Backup: Includes electric resistance elements for high-demand periods.
– Alternative path: If not ready for HPWH, lowering an existing tank’s thermostat to 120°F (49°C) can yield modest savings. Every 10°F reduction may reduce water heating costs by several percent.
Tankless (On-Demand) Water Heaters:
– Best suited for: Small households, point-of-use applications (remote bathrooms), or homes with very specific low-demand patterns.
– Considerations: Higher upfront cost. Gas models require proper venting; electric models may need circuit upgrades. Simultaneous high-flow demands (shower + dishwasher) can challenge capacity. Payback periods vary widely based on usage patterns and local energy costs.
– Hybrid approach: Some households combine a small storage tank with a point-of-use tankless unit for balanced performance.
Appliance Upgrades: Strategic Replacement
When to consider replacement:
– Apply a “Repair vs. Replace” lens: If repair cost approaches half the price of a new unit and the appliance is significantly aged, replacement may be prudent.
– General age guidance (varies by model and usage):
– Refrigerators: Pre-2001 models typically use substantially more energy
– Clothes Washers: Older top-loaders often less efficient than modern front-load or high-efficiency top-load models
– Dishwashers: Newer models frequently use less water and heat it more efficiently
– Critical step: Measure your space precisely before purchasing. Note door clearance, plumbing locations, and electrical requirements. Photos can aid retailer consultation.
ENERGY STAR consideration: Prioritize models with the ENERGY STAR label. Review the EnergyGuide label for:
– Estimated yearly energy cost
– kWh/year consumption
– Comparison scale against similar models
Illustrative context: Replacing a very old refrigerator with a new ENERGY STAR model can yield noticeable annual savings on electricity. Factor in available utility rebates, which can improve payback.
Responsible disposal: Arrange haul-away through retailer or municipality. Refrigerants and insulating foams require proper handling. Some utilities offer incentives for recycling old working units.
Window Treatments: Cost-Effective Alternatives
Why full replacement is often unnecessary: Unless windows are single-pane, structurally failing, or severely damaged, replacement rarely offers strong near-term financial return. Air sealing and adding low-cost secondary glazing often deliver substantial comfort and efficiency gains at a fraction of the cost.
Effective solutions:
– Interior insulation kits: Clear plastic film applied to frames and shrunk with a hairdryer creates an insulating air gap. Low cost, removable seasonally. Ideal for historic homes or rentals.
– Removable interior panels: Rigid acrylic panels (mounted with compression tubing) offer better clarity and durability than film, reusable for many years.
– Storm windows: Interior or exterior storms with low-emissivity coatings can approach the performance of replacement windows at lower cost.
When replacement may be justified: During major renovations, for failing windows, or as part of a deep energy retrofit where cumulative improvements matter. If replacing, prioritize ENERGY STAR-certified units with features appropriate for your climate (low-e coatings, gas fills, warm-edge spacers, non-conductive frames). South and west-facing windows often yield the greatest benefit from upgrades.
Tier 4: Major Structural & Renewable Investments (Long-Term Transformation)
These projects ($5,000–$30,000+) fundamentally alter a home’s energy profile. They require professional assessment, significant planning, and a long-term perspective—but offer the deepest potential reductions, enhanced resilience against price volatility, increased comfort, and alignment with sustainability goals. Tier 4 is not merely about technology adoption; it represents strategic asset stewardship. These investments hedge against future utility cost increases and future-proof your largest asset.
Why sequencing remains critical: Installing renewable generation (like solar) on a home with unaddressed efficiency opportunities requires a larger, more expensive system to offset the same energy use. Department of Energy resources indicate that homes implementing envelope improvements before renewables achieve greater net-zero potential at lower overall cost. Patience and preparation in earlier tiers maximize Tier 4 impact.
Professional-Grade Insulation: Targeting Key Areas
Priority sequence (general guidance):
1. Attic/Ceiling: Heat rises; inadequate attic insulation is a primary source of seasonal heat transfer. Target R-values appropriate for your climate zone (ENERGY STAR provides maps).
– Material considerations:
– Blown-in cellulose: Recycled content, good for irregular attic spaces. Requires proper installation depth.
– Blown-in fiberglass: Non-combustible, moisture-resistant.
– Spray foam (open-cell): Seals air leaks while insulating; suitable for rim joists, cathedral ceilings.
– Spray foam (closed-cell): Higher R-value per inch, acts as vapor barrier; used where space is limited.
– Critical detail: Maintain proper attic ventilation. Insulation must not block soffit vents. Install baffles (rafter vents) to preserve airflow from eaves to ridge. Preventing moisture buildup is essential to avoid long-term damage.
– Illustrative outcome: Adding significant attic insulation in a previously under-insulated home has resulted in measurable reductions in seasonal heating fuel use for some households. Utility rebates can improve project economics.
- Walls: More complex but impactful. Options depend on construction and renovation timing:
- Existing finished walls: Dense-packed cellulose injected through small access points. Requires specialized equipment.
- During re-siding: Adding continuous rigid foam board insulation under new siding reduces thermal bridging through studs.
-
Basement/Crawlspace walls: Moisture-resistant rigid foam board attached to foundation walls, sealed at edges. Helps bring these spaces into the conditioned envelope.
-
*Basement/Crawlspace: Insulating foundation walls (rather than floor joists) and sealing crawlspace vents with a ground vapor barrier can significantly reduce moisture and improve HVAC efficiency by mitigating the stack effect.
Renewable Energy: Solar Power Considerations
Prerequisite: Completing Tiers 1–3 first reduces the size (and cost) of the solar system needed to offset remaining usage.
System sizing: Review 12 months of utility bills to understand annual kWh consumption. A typical U.S. home might use 10,000–12,000 kWh/year; a 6–8 kW system may offset a large portion. Local factors (roof angle, shading, climate) significantly affect production.
Ownership models:
– Purchase (cash or loan): Maximizes long-term financial benefit after incentives. System lifespan typically exceeds 25 years. May increase property value; documentation is key.
– Lease/PPA: Lower or no upfront cost, but you pay for the electricity generated. Rates may escalate. You do not own the system or claim tax incentives. Consider implications for home sale.
Due diligence essentials:
1. Roof condition: Solar panels last decades; replacing a roof underneath is costly. Address roof needs before installation if the roof is aging.
2. Shading analysis: Request a detailed assessment. Trees, chimneys, or nearby structures casting shade during peak sun hours reduce output.
3. Equipment quality: Prioritize manufacturers with strong financial stability and comprehensive warranties (product and performance).
4. Inverter technology: Microinverters or DC optimizers can maximize production on complex or partially shaded roofs compared to string inverters.
5. Battery storage (optional): Adds significant cost. Primary value is resilience during grid outages, not immediate financial payback. Pair with a critical loads panel for essential circuits.
Incentive awareness:
– Federal tax credits (percentage of system cost) are available; consult current IRS guidelines.
– State, local, and utility incentives vary widely. The DSIRE database (dsireusa.org) is a reliable resource.
– Critical: Verify all incentive details independently. Requirements, caps, and availability change. Pre-approval is often required.
Financial perspective:* Project economics depend heavily on local electricity rates, system cost after incentives, and financing. Simple payback is one metric; consider long-term value, resilience, and alignment with personal goals.
Heat Pumps: Efficient Heating and Cooling
Why they are significant: Heat pumps move heat rather than generate it through combustion or resistance, achieving high efficiency (Coefficient of Performance often 2.0–4.0+) in suitable conditions. They provide both heating and cooling in one system.
Types:
– Air Source Heat Pumps (ASHP): Most common. Modern “cold-climate” models operate effectively in sub-freezing temperatures.
– Ducted: Replaces existing furnace/AC; requires compatible ductwork.
– Ductless Mini-Splits: Ideal for homes without ducts, additions, or zoned comfort. Highly efficient.
– Ground Source (Geothermal): Uses stable earth temperatures via underground loops. Highest efficiency and longest lifespan, but higher installation cost and site suitability requirements. Often best during new construction or major excavation.
Cold-climate performance: Field studies confirm modern cold-climate ASHPs maintain useful efficiency well below freezing. Backup heat (electric resistance or existing fossil fuel system) activates during extreme cold. For very cold climates, a dual-fuel system (heat pump + existing furnace) offers balanced efficiency and reliability.
Incentives: Significant federal, state, and utility incentives may be available. Consult DSIRE and your utility.
Professional assessment essential: A qualified contractor should perform a Manual J load calculation to ensure proper sizing—critical for performance, comfort, and efficiency.
Home Energy Management Systems (HEMS)
Beyond basic controls: Integrated systems provide deeper insight and control:
– Whole-home energy monitors: Clamp onto the electrical panel to track real-time usage, identify high-consumption devices, and verify upgrade impacts.
– Smart electrical panels: Allow circuit-level control via app—shedding non-essential loads during peak utility rates or optimizing solar/battery use.
– Renewable integration: Systems that coordinate solar production, battery storage, and grid interaction to maximize self-consumption and resilience.
Value: Transforms energy data into actionable intelligence. Seeing which circuits consume the most power informs targeted decisions. For homes with solar and storage, HEMS can enhance system value and usability.
Conducting a Basic Home Energy Assessment: A Step-by-Step Guide
Before investing, observe. This self-assessment builds foundational awareness, identifies your home’s unique characteristics, and informs prioritization within the tiered framework. Professional audits ($300–$600) offer deeper analysis later—but this no-cost review delivers immediate insights. Allocate 60–90 minutes. Involve household members to build shared understanding.
Tools you may find helpful:
– Notebook or smartphone
– Flashlight
– Incense stick or thin tissue paper (for draft detection)
– Tape measure
– Infrared thermometer (optional; affordable models available)
– Camera (phone is sufficient)
Phase 1: Exterior Observation (15 minutes)
– Walk around your home’s perimeter. Note:
– Visible cracks in foundation or siding
– Condition of weatherstripping on doors/windows
– Gaps around utility lines (gas, electric, cable) entering the house
– Roof condition (missing shingles, moss indicating moisture)
– Shading patterns: Which windows receive intense afternoon sun? Are deciduous trees providing summer shade?
– Tip: Observe on a sunny afternoon in summer for heat gain; on a cold, windy day in winter for drafts.
Phase 2: Attic Review (20 minutes—daylight only, prioritize safety)
– Safety first: Place sturdy boards across joists to create a path. Wear eye protection, gloves, and a mask. Avoid stepping between joists.
– Check insulation:
– Measure depth. Compare to recommended R-values for your climate zone (ENERGY STAR resources).
– Is insulation level and consistent? Below joists? More may be needed.
– Look for air leaks:
– Shine flashlight around chimney penetrations, plumbing vents, recessed lights, attic hatch.
– On a windy day, hold incense near gaps—watch for smoke movement.
– Feel for drafts with your hand.
– Verify ventilation: Are soffit vents clear of insulation? Are ridge/roof vents unobstructed?
– Document: Take photos of insulation depth, potential leak locations, and ventilation setup. Helpful for future reference or contractor discussions.
Phase 3: Interior Room-by-Room Check (30 minutes)
– Windows & Doors:
– Close window/door. Slide a dollar bill between sash and frame. Resistance when pulling out indicates a decent seal; easy slip suggests weatherstripping may help.
– On a breezy day, hold incense near edges to detect air movement.
– Check for condensation between panes (indicates seal failure in double-pane windows).
– Electrical Outlets & Switches (on exterior walls):
– Remove cover plates (power off at breaker if uncomfortable). Feel for drafts. Foam gaskets behind plates are a low-cost fix.
– Baseboards & Trim:
– Run hand along seams where wall meets floor/ceiling. Note draft locations.
– Fireplace:
– Ensure damper closes tightly. An inflatable chimney balloon can prevent heat loss if the fireplace is rarely used (remove before use).
– Appliance Notes:
– List major appliances: estimated age, location. Note unusual noises, frost buildup, or frequent cycling.
– Thermal Scan (if using IR thermometer):
– On a cold day, scan interior walls. Spots significantly cooler than surrounding areas may indicate missing insulation.
– Scan windows: Large temperature differences between glass and room air may indicate air leaks or poor glazing.
Phase 4: Utility Bill Review (15 minutes)
– Gather 12 months of electricity and gas bills.
– Note:
– Total usage (kWh, therms) each month
– Billing period dates
– Any weather-normalized usage data provided by your utility
– Look for patterns:
– Summer electric spikes? May relate to cooling efficiency.
– Winter gas spikes? May relate to heating system or envelope issues.
– Consistently high usage? May suggest phantom loads or inefficient appliances.
– Context: Calculate annual kWh per square foot. Compare to regional benchmarks if available (ENERGY STAR Portfolio Manager offers tools).
Interpreting Findings & Next Steps
– Group observations: Multiple drafts on the north side? Prioritize weatherstripping there. Thin attic insulation and leaks around lights? Air sealing becomes a high-priority Tier 2 action.
– Map to framework tiers:
– Drafts at outlets? → Tier 2 (foam gaskets)
– Thermostat set constantly high/low? → Tier 1 (behavioral adjustment)
– Attic insulation well below recommendation? → Potential Tier 4 discussion
– Very old refrigerator? → Tier 3 (replacement evaluation)
– Create a simple action list: Prioritize by:
1. Ease and cost (start with quick, low-cost wins)
2. Potential impact (based on your observations)
3. Alignment with your constraints
– When to seek professional help: If you observe:
– Significant moisture intrusion in walls/attic
– Concerns about knob-and-tube wiring near insulation
– Suspected asbestos-containing materials (do not disturb)
– Persistent comfort issues despite system operation
Note: Certified energy auditors (BPI, RESNET) use standardized protocols (blower door tests, thermal imaging) to quantify issues and provide prioritized recommendations—highly valuable before major investments.
Navigating Incentives, Rebates, and Financing Options
Significant financial support exists for energy efficiency and renewable projects, but navigating programs requires proactive research. Unclaimed incentives represent missed opportunities. This section offers a practical approach—not an exhaustive list—to maximize accessibility.
The Layered Incentive Approach
Combine federal, state, local, and utility programs where possible. Example pathway for a heat pump water heater:
1. Federal tax credit (percentage of cost; verify current IRS guidelines)
2. State rebate (via state energy office)
3. Utility rebate (via local power provider)
4. Municipal program (if available)
Result: Substantial reduction in net project cost. Always verify current details independently.
Your Action Plan for Incentives
1. Start with DSIRE (dsireusa.org):
– Enter your zip code.
– Filter by technology and incentive type (“Rebates,” “Tax Credits”).
– Bookmark your state page; check quarterly for updates.
2. Contact Your Utility Directly:
– Ask: “What current energy efficiency rebates or financing programs support [specific upgrade]?”
– Request their program guide—often more detailed than website listings.
– Clarify: pre-approval requirements, documentation needed, processing timelines.
3. Federal Tax Credits:
– Consult IRS publications or a tax professional for current eligibility (e.g., Inflation Reduction Act provisions).
– Credits typically apply against tax liability; timing purchases may be strategic.
– Critical: Retain all receipts, manufacturer certification statements, and documentation.
4. Income-Qualified Programs:
– Weatherization Assistance Program (WAP): Federally funded program offering no-cost energy upgrades to eligible households. Administered locally; apply via energy.gov/wap.
– LIHEAP: Assists with energy bills and minor repairs. Contact your state office.
– Check eligibility: Income thresholds vary; many middle-income households qualify for partial assistance. Don’t assume you’re ineligible.
Financing Pathways to Consider
– Energy-Efficient Mortgages (EEMs):
– Roll upgrade costs into a mortgage (purchase or refinance).
– FHA, VA, and conventional options may allow borrowing for improvements.
– Potential benefit: Monthly savings may offset added mortgage payment.
– PACE Financing (where available):
– Repayment via property tax bill over 10–25 years.
– Important considerations: Not available in all states; transfers to new owner; verify interest rates and terms carefully. Use only for upgrades with clear, documented ROI.
– Utility On-Bill Financing:
– Repay through monthly utility bill.
– Savings may offset repayment (“bill-neutral” start). Often no credit check.
– Example: Efficiency Maine TRUST program.
– Green Loans:
– Credit unions and banks offer loans for efficiency projects.
– Compare APR, terms, and fees carefully.
– Contractor Financing:
– Exercise caution: Some carry high interest rates. Only consider 0% APR offers with clear terms and a realistic repayment plan within the promo period. Avoid high-interest credit card financing unless paid in full immediately.
Avoiding Common Pitfalls
– Pre-approval: Many rebates require application before purchase or installation. Retroactive claims are often denied.
– Documentation: Keep itemized receipts, model numbers, contractor licenses, before/after photos (for insulation/sealing), and manufacturer certifications.
– Beware of inflated pricing: Get multiple quotes. Verify rebate amounts directly with your utility, not solely through a contractor.
– Timing: Some programs have annual funding caps and close early. Apply early in the year when possible.
– Local resources: Many states and cities have unique programs (e.g., California SGIP for storage, New York EmPower+). Research locally.
– Pro Tip: Create a simple spreadsheet: Project | Estimated Cost | Potential Incentives | Net Cost Estimate | Application Deadline | Status. Update regularly.
This proactive approach transforms incentives from an afterthought into a strategic component of your investment planning—making meaningful upgrades more accessible.
Addressing Real-World Constraints: Practical Pathways for Diverse Situations
Energy advice often assumes ideal circumstances. Reality involves constraints. This section offers empathetic, actionable strategies for common barriers—demonstrating that progress is possible regardless of your situation.
“I’m a Renter—What Can I Do?”
Reality: Tenants control more than they may realize. Focus on reversible, lease-compliant actions while building a case for collaboration.
– Tier 1 & 2 actions are accessible:
– Thermostat management (within reasonable, lease-permitted ranges)
– Replace bulbs with LEDs (store originals for move-out)
– Use smart power strips for electronics
– Apply removable window film seasonally (remove before moving)
– Use draft stoppers (fabric tubes filled with rice/sand—no adhesive)
– Document and propose:
1. Track utility usage for 2–3 months to establish a baseline.
2. Implement your reversible changes. Track usage for another 2–3 months.
3. Prepare a concise summary: “These adjustments reduced my electricity use by approximately X%. I propose we partner on [specific, low-risk upgrade, e.g., weatherstripping] where I cover materials ($Y) and you permit installation. Benefit: Lower utility costs, improved property appeal, potential tenant retention.”
4. Research local tenant energy rights. Some municipalities have ordinances supporting efficiency upgrades. ACEEE’s resources may offer guidance.
– Leverage utility programs: Many utilities provide free efficiency kits (LEDs, aerators, outlet gaskets) directly to renters—no landlord permission needed. Call and ask.
– Perspective: Property management firms increasingly recognize that energy-efficient units attract and retain residents. Frame upgrades as mutual benefit.
“My Home is Historic—How Do I Proceed Respectfully?”
Reality: Efficiency and preservation can coexist. The Secretary of the Interior’s Standards support upgrades that do not compromise historic character. Focus on reversible, invisible, or compatible treatments.
– Prioritize “invisible” improvements:
– Attic insulation (added above existing without disturbing historic fabric)
– Basement/crawlspace air sealing and insulation
– Storm windows (interior or exterior)—preserves original windows while adding performance. Often approved by preservation offices.
– Insulate attic hatch with rigid foam board
– Window strategy:
– Repair first: Reglaze putty, add discreet weatherstripping, install interior storm panels (magnetic acrylic).
– Performance note: Properly maintained historic wood windows with interior storms can achieve performance close to many replacements.
– Consult your State Historic Preservation Office (SHPO) early. Many offer free technical advice and approve specific methods.
– HVAC solutions:
– Ductless mini-splits avoid cutting historic walls for ductwork. Units can be mounted on less prominent walls.
– High-velocity small-duct systems use minimal intrusion.
– Resources:
– National Park Service Preservation Brief 3: “Improving Energy Efficiency in Historic Buildings”
– Association for Preservation Technology (APT) guidelines
– Local preservation societies often host workshops
“Budget is Tight—Where Do I Start?”
Reality: The most powerful steps cost little or nothing. Momentum builds capability.
– Begin with Tier 1 today: Behavioral changes cost $0 and yield immediate awareness. Track any savings in a dedicated “Efficiency Fund” jar.
– Phase Tier 2 strategically:
– Month 1: $15 for outlet gaskets + weatherstripping for one drafty door
– Month 2: $25 for a low-flow showerhead
– Month 3: $40 for a smart power strip
– Reinvest a portion of observed savings into the next step
– Access no-cost resources:
– Utility freebie programs: Many provide free LEDs, aerators, or smart thermostats.
– Community workshops: Habitat ReStores, libraries, or sustainability groups often host free DIY clinics.
– Tool libraries: Borrow caulk guns, insulation tools, or IR thermometers.
– Apply for assistance:
– Weatherization Assistance Program (WAP): Free upgrades for eligible households.
– Local nonprofit programs: Many communities have initiatives for seniors, veterans, or low-income residents.
– Mindset shift: View efficiency as a series of small, cumulative investments. Each $20 spent on materials that yields $100 in annual savings represents strong return. Compound progress over time.
“I’m Concerned About Contractor Reliability”
Reality: Diligent vetting prevents most issues. Become an informed client.
– Vet thoroughly:
– Certifications: Look for BPI, RESNET, or NATE certifications. Verify online.
– References: Request 2–3 recent clients with similar projects. Call them. Ask about timeliness, cleanliness, communication, and satisfaction.
– Licenses/Insurance: Confirm active state license. Request certificate of insurance (liability and workers’ comp).
– Red flags to avoid:
– Unsolicited door-to-door offers after storms
– Demands for full payment upfront
– High-pressure “today only” tactics
– Vague contracts lacking scope, timeline, or warranty details
– Contract essentials:
– Detailed scope of work (materials, methods, locations)
– Clear start/completion dates
– Payment schedule tied to milestones (e.g., deposit, progress payment, final payment after inspection)
– Warranty terms (labor and materials)
– Cleanup and debris removal responsibilities
– Get multiple bids: Minimum of three. Compare line items, not just totals. A significantly lower bid may omit critical steps.
– Trust your judgment: If communication feels dismissive or unclear during quoting, seek another contractor. A qualified professional educates, listens, and respects your questions.
– Resource: ENERGY STAR’s “Partner Locator” lists contractors adhering to quality standards.
“I Live in an Apartment or Condo”
Reality: Focus on unit-level actions and strategic advocacy for building-wide improvements.
– Unit-level actions:
– Apply removable window film to south/west windows in summer
– Use draft stoppers at balcony/patio doors
– Install smart power strips for entertainment centers
– Request permission to replace bulbs in closets or personal spaces with LEDs
– Building advocacy:
– Join the HOA or sustainability committee.
– Propose pilot projects: “Let’s install smart thermostats in three units to measure impact before a full rollout.”
– Share credible data: “Studies indicate multi-family efficiency upgrades can enhance property value and resident satisfaction.”
– Partner with neighbors: Collective requests carry more weight.
– Utility programs: Many offer incentives for multi-family building upgrades. Encourage property management to explore these.
– Key insight: In multi-family buildings, common area efficiency (lighting, HVAC) often offers higher collective ROI than individual unit actions. Focus advocacy where you can create shared value.
Your Questions, Answered
Q: How much can I realistically expect to save on utility bills?
A: Savings vary significantly based on your home’s current condition, climate, energy sources, local rates, and which actions you implement. Households completing Tier 1 and Tier 2 actions often observe 10–20% reductions within several months. Adding Tier 3 actions may increase savings further. Comprehensive Tier 4 retrofits can yield deeper reductions. Crucially, use weather-normalized usage data (available via most utility portals) to distinguish savings from weather fluctuations. Track your own data to understand your unique results. Even modest, consistent reductions compound meaningfully over time.
Q: Are professional energy audits worth the cost?
A: For homeowners planning significant investments (Tier 3 or 4), a professional audit is often highly valuable. Tools like blower door tests quantify air leakage, and thermal imaging identifies hidden issues—data difficult to gather independently. The audit report provides a prioritized roadmap with estimated impacts for each recommendation. Many utilities offer rebates covering part or all of the audit cost. Consider it an investment to avoid misdirected spending. For renters or those focusing only on Tier 1–2 actions, the DIY assessment in this guide provides a strong foundation.
Q: Do smart thermostats deliver real energy savings?
A: Independent studies and utility data indicate potential savings of 10–15% on heating and cooling when used appropriately. However, actual savings depend heavily on prior habits. If you already adjusted temperatures diligently, gains may be smaller. Additional value often includes:
– Remote control preventing accidental operation (e.g., leaving AC on while away)
– Usage reports highlighting patterns
– Integration with utility demand-response programs for small credits
– Multi-room sensors addressing comfort issues that lead to thermostat adjustments
Choose based on your needs: models with remote sensors help balance temperatures; learning models adapt to schedules; others prioritize utility program compatibility.
Q: Is upgrading to LED lighting worthwhile if I don’t use lights much?
A: Prioritize strategically. Replacing a bulb in a closet used minutes daily offers minimal return. Focus first on fixtures used several hours daily: kitchen main light, porch light, garage, home office. Also consider non-energy benefits:
– LEDs run cooler (reducing fire risk in enclosed fixtures)
– Longer lifespan (reducing replacement frequency, especially in hard-to-reach fixtures)
– Improved color rendering (high CRI models enhance visibility)
– Dimmability and smart features (scheduling, motion activation)
For very low-use areas, replace bulbs as they burn out. Efficiency is about smart allocation of effort and resources, not universal replacement.
Q: How do I assess if my attic insulation is sufficient?
A: Measure depth and compare to recommended R-values for your climate zone (ENERGY STAR provides maps and calculators). For fiberglass batts:
– If insulation sits below the top of floor joists (typically 2×10 or 2×12), additional insulation is likely beneficial.
– Target depth varies: R-38 often requires ~12–14 inches of fiberglass; R-49 requires more.
For blown-in insulation: Depth should be consistent. Use a ruler on a stick.
Critical check: Ensure insulation does not block soffit vents. Install baffles if needed to maintain airflow. If you see light through roof sheathing in the attic, significant gaps likely exist. When uncertain, consult a qualified professional for assessment.
Q: Can I install insulation myself, or should I hire a professional?
A: Adding unfaced fiberglass batts over existing insulation in an accessible attic is a feasible DIY project for confident homeowners:
– DIY considerations: Wear proper PPE (respirator, goggles, gloves). Work from boards laid across joists. Follow manufacturer instructions.
– Hire a professional for:
– Blown-in insulation (requires specialized equipment)
– Wall insulation (dense-packing existing walls)
– Spray foam applications (requires training, safety protocols, equipment)
– Areas with limited access, moisture concerns, or potential hazards (asbestos, knob-and-tube wiring)
– Safety first: Never cover recessed lights not rated for insulation contact. Verify electrical safety. If uncomfortable at any stage, stop and consult a professional. Proper installation is critical for performance and safety.
Q: Are heat pumps effective in very cold climates?
A: Yes—modern cold-climate air source heat pumps are rigorously tested and deployed successfully across northern U.S. states, Canada, and Scandinavia. Field data from building science organizations confirms:
– Units maintain useful efficiency well below freezing (e.g., COP > 2.0 at 5°F / -15°C)
– Backup heat (electric resistance or existing fossil fuel system) activates only during extreme cold snaps, which represent a small fraction of annual heating hours in most regions
Look for models certified for cold-climate performance. For added peace of mind in very cold zones, a dual-fuel system (heat pump paired with an existing gas/propane furnace) offers balanced efficiency and reliability. Always ensure sizing is based on a professional load calculation.
Q: What is the most common oversight in home energy projects?
A: Skipping foundational assessment and jumping straight to equipment replacement. Installing a high-efficiency furnace or AC unit in a leaky, under-insulated home often yields suboptimal results. The new equipment works harder to compensate for uncontrolled losses, potentially reducing comfort, shortening equipment life, and diminishing return on investment. Addressing the building envelope first (air sealing, insulation) reduces the load, allowing smaller, less expensive equipment to perform optimally. As building science principles emphasize: “Seal tight, ventilate right.” This sequence maximizes impact and value.
Q: How do time-of-use (TOU) electricity rates affect my strategy?
A: TOU rates charge more during peak demand periods (often weekday evenings). This shifts focus from “using less” to “using smarter”:
– Shift flexible loads: Run dishwasher, laundry, or EV charging during off-peak hours (nights, weekends). Use timers or smart plugs.
– Pre-cool/pre-heat: Adjust thermostat slightly before peak rates begin, then allow temperature to drift moderately during peak hours.
– Solar + storage synergy: If you have solar, batteries become more valuable—they store midday production for use during expensive peak hours.
– Monitor usage: Use utility portal data or an energy monitor to understand your hourly patterns. Identify which appliances drive peak demand.
– Verify suitability: Some TOU plans have higher baseline rates. Use your utility’s bill comparison tool to confirm if switching benefits your specific usage pattern.
Q: Do energy-efficient upgrades enhance home resale value?
A: Evidence suggests yes. Studies, including research from Lawrence Berkeley National Laboratory, indicate homes with documented efficiency features (like solar panels or ENERGY STAR certification) may sell for a premium and attract buyers seeking lower operating costs. To maximize value:
– Document all upgrades: Keep receipts, warranty information, and pre/post utility usage records.
– Highlight efficiency in listings: “Recent insulation upgrades contributed to reduced heating costs.”
– Provide audit reports or Home Energy Score to serious buyers.
– Critical: Ensure all work is professionally installed, permitted where required, and well-maintained. Quality documentation presents efficiency as a tangible asset. Buyer priorities vary; transparency is key.
Q: Which “energy vampire” devices should I prioritize unplugging?
A: Focus on devices drawing significant power continuously. An energy monitor can identify specifics, but common higher-draw culprits include:
– Older cable/satellite boxes (can draw 30–40 watts 24/7)
– Game consoles in standby mode
– Desktop computers with peripherals left powered
– Older refrigerators/freezers in unconditioned spaces (garages)
– Dehumidifiers without auto-shutoff
– Phone/laptop chargers left plugged in (minimal draw, but symbolic)
Strategy: Group entertainment devices on a smart power strip. Use smart plugs for garage appliances to schedule operation. Unplug chargers when not in use—it reinforces mindful energy habits. Eliminating continuous standby draw from several devices contributes incrementally to annual savings. Small, consistent actions matter.
Conclusion and Your Next Step
You now have a comprehensive, adaptable framework—not a list of isolated tips—to guide your home energy journey. This path emphasizes progress over perfection, intentionality over intensity. Each tier builds logically on the last, compounding benefits while respecting your unique circumstances, constraints, and pace. You’ve learned to observe before acting, prioritize based on impact and feasibility, navigate resources strategically, and adapt solutions to your reality. The direction is clear, flexible, and entirely within your control.
Three Guiding Principles to Carry Forward
1. Sequence supports success: Foundational awareness (Tier 1) informs smart upgrades (Tier 2), which enable efficient system optimization (Tier 3), making major investments (Tier 4) maximally effective. Proceeding thoughtfully yields stronger results than rushing.
2. Your data guides your path: Track usage, document observations, measure changes. Let evidence—not assumptions or anecdotes—inform your next decision.
3. Progress compounds: A modest, well-chosen action that yields observable results builds confidence and resources for the next step. Momentum is cultivated through consistent, manageable progress.
Your 24-Hour Action: One Small, Meaningful Step
Within the next day, complete this 10-minute action:
1. Take your phone or a small notebook.
2. Walk through one frequently used room in your home.
3. Note just two observations:
– One location where you feel a draft (window, door, outlet)
– One electronic device plugged in but not actively in use
4. Before the day ends, choose one tiny action:
– Place a rolled towel at the base of a drafty door
– Unplug a single unused charger or device
– Adjust the thermostat by one degree
This step is not about the scale of the action. It is about initiating momentum. Breaking inertia is often the hardest part. One household began by sealing a draft under a back door with a simple door sweep. Observing a modest reduction in their next bill provided the confidence to explore attic insulation months later. Two years of thoughtful, phased steps later, their cumulative efforts yielded significant, sustained reductions in energy use and enhanced home comfort. Your journey is uniquely yours. Start where you are. Use what you have. Do what you can. The path unfolds with each intentional step.
Explore Complementary Guidance:
Understanding Home Energy Bills | DIY Weatherization for Renters | Navigating Utility Incentive Programs | Seasonal Home Maintenance Checklist | Introduction to Home Energy Monitoring