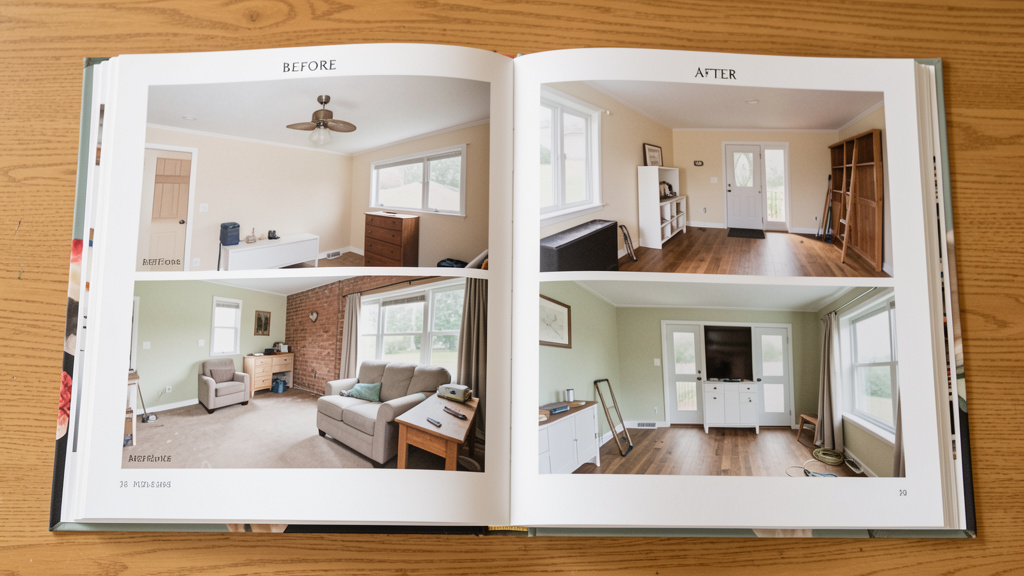
Go beyond snapshots: Build a strategic visual record that protects your investment, showcases your skills, and tells a compelling story of transformation.
Every hammer strike, every brushstroke, every carefully chosen tile represents a chapter in your home’s evolving story. Yet without intentional documentation, these transformations risk becoming fleeting memories or unverifiable claims buried in a chaotic digital graveyard. A strategically built before-and-after portfolio does far more than showcase aesthetic appeal—it serves as a legal safeguard for insurance discussions, a powerful marketing asset for tradespeople, a critical tool for supporting property value conversations, and a deeply personal archive of your journey. This comprehensive guide dismantles the myth that documentation is merely about taking pretty pictures. Instead, we present a purpose-driven system informed by observable patterns across real estate transactions, insurance workflows, contractor portfolio reviews, and preservation practices. You will learn precisely how to capture, organize, and leverage visual evidence that remains useful long after the project dust has settled, with adaptable techniques for any skill level, budget, or project scope.
Introduction: Why Your Camera Is Your Most Underrated Home Improvement Tool
In the flurry of sawdust and paint swatches, documentation is often an afterthought—a few quick phone snaps tossed into a digital void labeled “House Stuff.” However, consistent patterns observed across real estate transactions, insurance claim workflows, contractor client acquisition cycles, and preservation case studies reveal a meaningful insight: the intentionality behind your visual documentation often correlates with practical outcomes. Homes with well-organized renovation histories frequently present more transparently to potential buyers. Insurance claims accompanied by clear visual records may experience smoother communication with adjusters. For skilled tradespeople, a thoughtfully structured portfolio reduces the need for lengthy verbal explanations when demonstrating capability. This isn’t about vanity; it’s about transforming routine photography into versatile, multi-purpose assets derived directly from work you’re already completing. The following framework systematically converts fragmented snapshots into a coherent, high-value resource—whether you’re a first-time DIYer painting a bedroom, a licensed contractor building a business, or a steward of a century-old property.
The Transformation Documentation Framework (TDF): Purpose, Process, Preservation
Forget random photo dumps. The Transformation Documentation Framework (TDF) is a three-pillar system designed to ensure every image you capture carries intention, longevity, and utility. Synthesized from documentation principles used across insurance, preservation, and design fields, this model shifts your mindset from passive recorder to active architect of your home’s visual narrative. The pillars function as an interdependent ecosystem: Purpose defines why you’re documenting and shapes every technical and compositional decision; Process governs how you capture images with precision, consistency, and narrative clarity; Preservation guarantees your archive remains accessible, searchable, and usable for years. Mastering these elements converts fragmented snapshots into a strategic asset that serves multiple future scenarios—often in ways you cannot anticipate today. This framework scales seamlessly: the same core principles apply whether documenting a shelf installation or a full kitchen renovation.
Pillar 1: Define Your Documentation Purpose (The “Why” That Drives Every Shot)
Before your finger touches the shutter button, clarity of purpose is essential. A photo taken for an insurance discussion requires radically different details than one intended for a contractor’s portfolio. Ambiguity at this stage often leads to missed critical shots or effort spent on irrelevant angles. Below, we explore eight distinct documentation purposes, their unique requirements, strategic shot priorities, and illustrative examples. Treat this section as your strategic filter—every subsequent decision in the TDF flows directly from this foundational choice.
Purpose A: Supporting Real Estate Value & Buyer Confidence
Primary Audience: Future buyers, real estate agents, home inspectors
Strategic Goal: Demonstrate proactive stewardship, provide transparency about improvements, and build confidence
Critical Shot Requirements:
– Context Shots: Wide-angle views showing the improved space integrated within the whole room. Example: A new backsplash isn’t just a close-up of tile; it’s a shot from the kitchen doorway showing how it harmonizes with cabinets, countertops, lighting, and adjacent areas.
– Problem-Solution Pairs: Explicitly document pre-existing conditions and their resolution. Photograph water stains on a ceiling before repair, then the properly sealed and repainted area after. Include a caption noting “Drywall repair and moisture mitigation completed [Month Year].” This transparency builds trust.
– Hidden Value Documentation: Capture elements buyers cannot easily verify: insulation visible during renovation (photograph cavity before drywall), upgraded plumbing materials, new electrical components with permit documentation visible, energy-efficient window labels, or structural reinforcements. These “proof points” substantiate value claims.
– Material & Specification Close-Ups: Photograph manufacturer labels on appliances (showing model/year), flooring product codes, tile lot numbers (for future repairs), or cabinet hardware specifications.
Common Pitfall to Avoid: Only photographing pristine “after” shots while omitting evidence of prior conditions. Transparent documentation of repairs signals competence and honesty, which often outweighs the minor visual imperfection of a “before” shot.
Illustrative Example: A homeowner documented the replacement of outdated wiring throughout their older home. They included: 1) Close-up of original wiring configuration in the attic, 2) Photo of updated circuits labeled at the panel, 3) Copy of electrical permit documentation pinned beside the panel. This thorough record helped address potential buyer questions during the sale process.
Purpose B: Insurance Claims & Disaster Preparedness
Primary Audience: Insurance adjusters, claims processors, restoration contractors
Strategic Goal: Create clear, objective evidence of pre-loss condition and post-loss damage to support efficient claim resolution
Critical Shot Requirements:
– Baseline Home Inventory (Pre-Loss): Photograph every room, closet, storage area, garage bay, and exterior feature before any incident occurs. For high-value items (artwork, electronics, collectibles), capture serial numbers, model numbers, purchase documentation (digitally stored with photos), and contextual shots showing items in use. Store this archive offsite (cloud) and review annually.
– Damage Documentation Protocol (Post-Loss):
– Overall: Wide shot of entire affected room/area.
– Mid-Range: Shot showing relationship between damage and surrounding structure (e.g., water-damaged drywall adjacent to window frame).
– Extreme Close-Up: Damage detail with scale reference (ruler, coin, or common object like a smartphone). Example: “Close-up of foundation detail at basement corner; coin placed for scale showing fracture.”
– Progress Shots: If making emergency repairs (tarping roof, extracting water), photograph damage before temporary fixes. Then document each repair stage with timestamps.
– Metadata Imperative: Enable date/time/location stamp on camera if possible. Captions must be strictly objective: “Water saturation observed on floorboards in dining room, extending from south wall baseboard” NOT “Terrible flood ruined our beautiful floors.” Let visuals convey context; captions provide neutral, factual description.
Critical Nuance: Clear, organized documentation reduces cognitive load for professionals reviewing claims. Disorganized or emotionally charged photos may trigger additional verification steps.
Illustrative Example: After severe weather, a homeowner submitted: 1) Baseline photos of roof condition from prior year (showing no prior damage), 2) Timestamped photos of impact marks on shingles with ruler for scale, 3) Photos of related damage to gutters and siding. The clear documentation supported efficient claim processing. Neighbors without baseline records reported longer review periods.
Purpose C: Contractor, Designer & Tradesperson Portfolio Building
Primary Audience: Potential clients, referral partners, award committees
Strategic Goal: Demonstrate expertise, process mastery, problem-solving ability, and aesthetic consistency
Critical Shot Requirements:
– The Hero Shot: One technically strong “after” photo per project (wide angle, balanced exposure, clutter-free). For significant projects, investing in professional photography may be considered a business development expense.
– The Process Narrative: Include 3–5 key before/during/after sequences telling a story. Example for a bathroom remodel:
1. Before: Demolition revealing existing conditions behind tile
2. During: Framing with waterproofing membrane installed (highlighting craftsmanship)
3. During: Tile layout in progress showing precise cuts and alignment
4. After: Final reveal with minimal styling (towels, plants) but no personal items
5. Detail: Extreme close-up of custom tile niche or seamless caulk line
– Detail Shots That Highlight Skill: Close-ups of crown molding joints, cabinet hardware installation, custom millwork, neatly organized electrical connections, or landscape irrigation zones. These highlight precision often invisible in wide shots.
– Client Context (With Explicit Permission): A tasteful shot of the client using the space (e.g., family cooking in new kitchen) adds emotional resonance. Non-negotiable: Secure a signed media release form before capture. Template releases are available from trade associations.
Common Pitfall to Avoid: Over-editing photos with heavy filters, excessive HDR, or unrealistic color grading. This can erode credibility. Aim for accurate color representation—clients expect the space to look like the photos. Use editing solely for exposure correction, straightening horizons, and minor distraction removal.
Illustrative Example: A woodworker includes “process detail” shots in every portfolio entry: a close-up of joinery during assembly, a shot of custom finish mixed to client specifications, and a final shot with contextual notes about material choices. This authenticity has become a distinctive element of their professional presentation.
Purpose D: DIY Enthusiast Personal Journaling & Legacy Building
Primary Audience: Yourself, family members, future homeowners, online community
Strategic Goal: Create a meaningful chronicle of your journey, capturing lessons learned, emotional milestones, and personal pride
Critical Shot Requirements:
– Narrative Captions: Write detailed notes about challenges overcome (“Spent time troubleshooting this electrical connection—solution: verified wiring sequence per code guidelines”), material choices (with observed pros/cons), costs (actual vs. budgeted), time invested, and emotional milestones (“First meal cooked in renovated kitchen”).
– Progress Timelines: Take weekly “same spot, same angle” photos during long projects (e.g., garden transformation, basement finish). Compile into a time-lapse video later using free apps like Microsoft Photos or Canva.
– Mistake Documentation: Photograph errors and their fixes. Example: “Tile installed with incorrect spacer—removed and reset next day. Lesson: Always do a dry layout first!” This vulnerability resonates deeply in online communities and becomes invaluable for your future projects.
– Personal Touches: Include occasional “you in the shot” elements—a hand holding a tool, your shadow on the wall, a coffee mug on the workbench. These humanize the archive.
Pro Tip: Pair photos with voice memos recorded on your phone immediately after a work session. Describe frustrations, breakthroughs, or questions. Transcribe these later for rich caption content. The immediacy of voice captures nuance text often misses.
Illustrative Example: A homeowner documenting a multi-year restoration of an older house journals each project phase. Their digital archive now serves as both a personal memory book and a practical reference for ongoing maintenance. Printed “project books” for major renovations have become meaningful family keepsakes.
Purpose E: Historic Home Preservation & Stewardship
Primary Audience: Historical societies, future owners, preservation boards, family historians
Strategic Goal: Create an accurate, respectful record of changes while honoring original fabric; support future restoration efforts
Critical Shot Requirements:
– Pre-Intervention Baseline: Photograph every surface, fixture, and architectural detail before any alteration. Include moldings, hardware, flooring patterns, window configurations, and even paint layers (scrape a tiny test spot in an inconspicuous area and photograph the stratigraphy).
– Reversible Modification Documentation: If updating systems (electrical, plumbing) within historic walls, photograph the original configuration before covering. Note locations of original features preserved in place (e.g., “Original subfloor retained beneath new finish flooring”).
– Material Sourcing Records: Photograph samples of replacement materials alongside originals (e.g., new brick next to original brick with mortar sample). Document supplier information and reasoning for choices (“Chose reclaimed material to match existing elements; sourced from salvage provider”).
– Contextual Shots: Include exterior shots showing the house within its streetscape, and interior shots showing room relationships. Historic value often lies in spatial flow.
Ethical Imperative: Avoid staging “before” shots to exaggerate deterioration. Preservation ethics demand accuracy. Caption honestly: “Original plaster showing minor hairline cracks consistent with age; stabilized during repair.”
Illustrative Example: Owners documenting the careful restoration of original stained-glass elements photographed: 1) Elements covered by later modifications, 2) Removal process showing intact glass, 3) Restoration work by a specialist, 4) Final installation. This archive was later referenced by the local historical society for educational purposes.
Purpose F: Rental Property Management & Tenant Transitions
Primary Audience: Property managers, tenants, maintenance staff, legal counsel
Strategic Goal: Establish clear condition baselines, streamline turnover, prevent deposit discussions, document maintenance history
Critical Shot Requirements:
– Move-In/Move-Out Protocol: Photograph every room, closet, appliance, window, door, and floor surface with timestamped, sequential numbering. Use a consistent path (e.g., start at front door, move clockwise through property). Include close-ups of existing wear.
– Condition Detail Shots: Focus on areas commonly discussed: carpet stains (with ruler for scale), wall marks near light switches, appliance interiors, faucet aerators, window screen condition.
– Maintenance & Repair Records: Document issues reported by tenants before repair (e.g., “Leaky faucet in master bath—photo taken per work order”), then the completed repair. Store with work order and invoice.
– Safety & Compliance Shots: Photograph functioning smoke/carbon monoxide detectors (with date visible on unit), fire extinguishers, handrails, and egress windows. Critical for liability awareness.
Legal Safeguard: In many jurisdictions, detailed move-in documentation supports security deposit processes per local regulations. Incomplete records may limit the ability to document pre-existing conditions.
Illustrative Example: A property manager implemented a standardized digital checklist with mandatory photo uploads for every unit turnover. This systematic approach contributed to fewer condition-related discussions and more efficient transitions between tenants.
Purpose G: Home Warranty & Service Claim Support
Primary Audience: Warranty providers, service technicians, manufacturers
Strategic Goal: Support claim resolution by providing clear evidence of condition per warranty terms
Critical Shot Requirements:
– Failure Documentation: Photograph the component clearly showing the issue (e.g., cracked component, leaking connection). Include model/serial numbers visible in shot.
– Context Shots: Show the component within the system (e.g., leaking pipe under sink with shutoff valves visible).
– Installation Evidence (If Applicable): If claiming installation-related concerns, photograph relevant details (e.g., “Component installed per manufacturer specifications—photo shows required clearance”).
– Timeline Evidence: Include photos showing the issue persisting after initial troubleshooting (e.g., “Water observation noted multiple days post-installation despite resealing”).
Critical Tip: Review warranty terms before documenting. Some require specific evidence (e.g., pressure readings for plumbing claims). Capture exactly what the provider mandates.
Illustrative Example: A homeowner documented an appliance concern with: 1) Photo of display indicator, 2) Close-up of serial plate, 3) Brief video of operational sound. The clear documentation supported efficient communication with the service provider.
Purpose H: Design Inspiration & Material Reference Library
Primary Audience: Yourself, designers, future renovation planners
Strategic Goal: Build a searchable visual database of colors, textures, layouts, and solutions encountered in real homes
Critical Shot Requirements:
– Contextual Detail Shots: Photograph elements you admire in situ: a clever closet organization system, a unique tile pattern transition, a lighting layout that minimizes shadows, a paint color in natural light at different times of day.
– Material Close-Ups: Capture flooring textures, countertop veining, fabric weaves, or hardware finishes with a color reference card (available affordably online) in frame for future matching.
– Spatial Relationships: Note room dimensions in captions (“Living room: approximately 14’x18′, 9′ ceilings”). Photograph sightlines between rooms.
– Lighting Documentation: Take shots at dawn, noon, and dusk to see how natural light interacts with finishes. Note artificial light sources (bulb type, fixture style).
Organization Strategy: Create dedicated folders: “Kitchen Layouts,” “Bathroom Tile Ideas,” “Exterior Color Schemes.” Tag photos with keywords (e.g., “herringbone,” “matte black,” “open shelf”). This transforms random inspiration into an actionable resource.
Illustrative Example: A designer maintains a private digital library of “problem-solving details” photographed over many years: discreet pet access solutions, accessible shower details, hidden storage integrations. This reference library speeds up concept development during client consultations.
The Fundamental Principle: Documentation without intention is decoration; documentation with strategy is an asset. Every photograph should answer the silent question: “Who will use this image years from now, and what specific understanding will it enable?”
Pillar 2: Master the Capture Process (The “How” of Technical and Narrative Excellence)
With purpose firmly defined, execution determines value. This pillar transforms your device—whether a smartphone or dedicated camera—into a precision documentation instrument. We break execution into three phases: Pre-Capture Planning, During Capture Execution, and Post-Capture Metadata. Each phase contains actionable techniques, common pitfalls, and tiered solutions for varying resources. Mastery here ensures your images are technically sound, compositionally clear, and contextually rich.
Phase 1: Pre-Capture Planning – The Blueprint That Prevents Regret
Skipping planning often leads to missed critical shots. This phase takes 5–15 minutes but saves significant frustration later. For any project, complete this checklist:
- Create a Purpose-Driven Shot List: Based on your selected Purpose (Pillar 1), list every required photo. Be specific.
Example for Kitchen Project (Purpose A: Real Estate Value): - [ ] Wide shot from kitchen doorway (before)
- [ ] Close-up of existing backsplash condition (before)
- [ ] Photo of cabinets showing current state (before)
- [ ] Shot of plumbing under sink (before)
- [ ] Wide shot from same doorway position (after)
- [ ] Close-up of new countertop detail (after)
- [ ] Detail of under-cabinet lighting installation (after)
-
[ ] Photo of new faucet with certification label visible (after)
Pro Tip: Keep this list open on your phone. Check off shots as completed. This prevents “I thought I got that” moments later. -
Schedule Capture Times for Consistent Lighting: Lighting inconsistency is a common reason before/after comparisons feel disjointed.
- Interiors: Shoot on overcast days or during softer light periods to avoid harsh shadows. Note the exact time of day for “before” shots (e.g., “10:15 AM, north-facing window light”). Replicate this timing precisely for “after” shots.
- Exteriors: Photograph at the same time of day and season if possible. A “before” shot of a porch taken at sunset in summer will not match an “after” shot taken at noon in winter. Use apps like Sun Surveyor to predict sun position.
-
Critical Exception: For urgent documentation (e.g., weather damage), capture immediately regardless of lighting. Timeliness outweighs perfect conditions.
-
Gather Essential Tools (Beyond Your Camera):
- Tripod (Highly Recommended for Consistency): Enables identical framing for before/after shots. Even an affordable smartphone tripod improves results. Mark its position on the floor with painter’s tape for perfect replication.
- Measuring Tape or Scale Object: For detail close-ups. A standard ruler, coin, or even your hand provides crucial scale.
- Cleaning Supplies: Microfiber cloth for lenses and surfaces, small broom for debris. A clean lens and tidy scene prevent distractions.
- Neutral-Colored Step Stool: For elevated angles (e.g., photographing countertops, upper cabinets) without distortion from extreme low angles.
- Clipboard or Voice Memo App: For immediate caption notes before memory fades.
Phase 2: During Capture Execution – Technique Deep Dive for Clear Results
This is where technical execution meets narrative clarity. These principles work with any device.
Camera Settings Demystified (No Jargon):
– Smartphone Users:
– Enable “Grid Lines” in camera settings (rule of thirds overlay).
– Tap to focus on your subject, then slide the sun icon up/down to adjust exposure (brightness). Lock exposure by holding tap until “AE/AF Lock” appears.
– Use volume buttons or headphone remote as shutter release to minimize shake.
– Never use digital zoom. Move closer physically. Digital zoom reduces image quality.
– Dedicated Camera Users:
– Shoot in Aperture Priority mode (A or Av). Set aperture to f/8 for good sharpness throughout the scene.
– Keep ISO as low as possible (100–400) to minimize grain/noise.
– Use a 2-second timer or remote shutter to eliminate camera shake.
– Universal Rule: Take 2–3 shots of every critical scene. Slight variations in focus or exposure give you options later. Delete weaker ones during review.
Composition Rules for Documentation (Not Art):
– The Consistent Angle Rule: This is the single most important technique. Place tripod on marked spot. Frame shot using grid lines. Take photo. For “after” shot later, return tripod to exact mark. Result: Aligned before/after comparison. Without this, comparisons feel disjointed.
– The Context-Detail-Context Sequence: Tell a visual story:
1. Wide shot establishing location (e.g., entire bathroom)
2. Medium shot focusing on area of change (e.g., shower surround)
3. Close-up of critical detail (e.g., tile grout lines, plumbing fixture)
4. Return to wide shot for closure
This structure guides the viewer logically through the transformation.
– Eliminate Distractions: Remove personal items (toothbrushes, mail piles), close doors to other rooms, turn off TV screens (creates reflections), straighten rugs. For “before” shots of damaged areas, include only neutral context (e.g., photograph water stain on wall with a ruler beside it—not with family photos on the mantel).
– Straight Horizons: Tilted photos distort spatial perception. Use grid lines or a small bubble level app. If shooting handheld, brace elbows against your body or a wall.
Lighting Strategies for Truthful Representation:
– Natural Light Mastery: Position yourself with the main light source (window, door) behind you. This illuminates the subject evenly. For window-lit rooms, use a white poster board or foam core as a reflector to bounce light into shadowed areas (e.g., under cabinets).
– Artificial Light Protocol: Turn on all room lights. For dark spaces (basements, closets), use a continuous LED work light instead of flash. Flash creates harsh shadows and reflections. If using flash, diffuse it with a tissue or dedicated diffuser.
– Avoid Mixed Color Temperatures: Don’t mix daylight (cool blue) and incandescent (warm yellow) lighting in one shot. It creates unnatural color casts. Choose one source and stick with it.
– Critical Test: Review photo on screen. Can you clearly see texture in fabrics? Are shadows revealing detail or hiding it? Adjust lighting and reshoot if needed.
Room-by-Room Critical Angles Checklist:
Use this as a quick reference during capture. Adapt based on your Shot List.
– Kitchens:
– Wide shot from primary entry point
– Sink area (faucet, backsplash, counter)
– Stove/cooktop area
– Refrigerator interior (for inventory)
– Under-sink plumbing (before repair)
– Cabinet interiors (if upgraded)
– Electrical panel with new circuits visible (if applicable)
– Bathrooms:
– Wide shot from doorway
– Shower/tub area (including floor/wall junctions)
– Vanity and mirror
– Toilet area
– Vent fan location
– Floor condition near baseboards
– Living Areas:
– Primary wide shot showing flow to adjacent rooms
– Feature wall (fireplace, built-ins)
– Window treatments and hardware
– Floor condition in high-traffic paths
– Exteriors:
– Front elevation (from sidewalk)
– Rear elevation (from yard)
– Each side elevation
– Roof condition (from ground or safe ladder position)
– Foundation perimeter (look for cracks, moisture)
– Landscaping features (patios, decks, irrigation)
– Utility areas (HVAC unit, electrical meter)
– Structural/Systems (During Renovation):
– Framing with insulation visible
– Plumbing rough-in (note pipe types)
– Electrical rough-in (note box placements)
– HVAC ductwork
– Always include a dated note or calendar in frame for timestamp verification.
Phase 3: Post-Capture Metadata – The Invisible Backbone of Long-Term Utility
A photo without context becomes meaningless within months. Metadata is your insurance against future confusion. Complete this within 24 hours while details are fresh.
Immediate Captioning Protocol:
– Open each photo in your preferred viewer (Google Photos, Apple Photos, Adobe Bridge).
– Add a descriptive caption including:
[Date] | [Project Name] | [Location in House] | [Purpose Context] | [Technical Notes]
Example: “2024-05-15 | Master Bath Project | Shower Niche | After installation showing waterproofing system | Lighting: 10 AM natural light from east window”
– For condition shots: “2024-06-02 | Basement Observation | Northeast corner | Water line visible on foundation wall | Ruler for scale; photo taken prior to mitigation”
– Pro Tip: Use voice-to-text on your phone for speed. Accuracy matters more than perfect grammar.
File Naming Convention (Non-Negotiable for Searchability):
Adopt this universal structure:
YYYYMMDD_ProjectName_Location_ShotType_Number.jpg
Examples:
– 20240515_KitchenProject_BreakfastNook_Before_01.jpg
– 20240515_KitchenProject_BreakfastNook_After_01.jpg
– 20240602_BasementObservation_NEcorner_Condition_01.jpg
Why this works: Files sort chronologically and logically in any folder. “ShotType” (Before/During/After/Condition/Detail) enables instant filtering. Avoid vague names like “IMG_1234.jpg”.
Backup Protocol: The 3-2-1 Rule for Digital Preservation
– 3 Copies: Original + 2 backups
– 2 Different Media Types: Computer hard drive + External SSD/HDD
– 1 Offsite Copy: Cloud storage (Google Drive, Dropbox, Backblaze)
Implementation:
1. Import photos to your computer’s “Home Documentation” folder.
2. Immediately copy to an external drive stored in a fireproof safe or separate location.
3. Sync the folder to a cloud service with version history (enables recovery if files are accidentally deleted/edited).
Schedule: Set calendar reminders for quarterly backup verification. Test restoring one file annually to ensure integrity. Digital preservation requires proactive management.
Pillar 3: Preservation & Long-Term Archive Management
Capturing perfectly is futile if your archive becomes inaccessible. This pillar establishes systems for organization, retrieval, and legacy planning that withstand technological shifts and life changes.
Folder Structure for Scalability:
Create a master “Home Documentation” folder on your computer/cloud. Structure subfolders hierarchically:
Home Documentation/
├── 00_MASTER_INVENTORY (Baseline home condition)
├── 01_KITCHEN/
│   ├── 2024_KitchenProject/
│   │   ├── Before/
│   │   ├── During/
│   │   ├── After/
│   │   └── Receipts_PermitScans/
│   └── 2020_CabinetRefinish/
├── 02_BATHS/
│   ├── 2023_MasterBath/
│   └── 2021_GuestBath/
├── 03_EXTERIOR/
│   ├── 2025_RoofProject/
│   └── 2022_DeckBuild/
├── 04_SYSTEMS/
│   ├── Electrical/
│   ├── Plumbing/
│   └── HVAC/
├── 05_INSURANCE_CLAIMS/
│   └── 2024_BasementObservation/
└── 06_INSPIRATION_LIBRARY/
    ├── TilePatterns/
    ├── ColorSchemes/
    └── LayoutIdeas/
Why this works: Numeric prefixes force chronological order. Clear naming avoids ambiguity. Dedicated folders for receipts/scans keep supporting documents linked to visual evidence.
Digital Asset Management (DAM) Lite for Non-Professionals:
You don’t need expensive software. Leverage free tools:
– Google Photos: Use “Albums” for projects. Enable “Archive” for non-essential personal photos to keep documentation visible. Use search: type “kitchen tile” to find relevant shots.
– Apple Photos: Create “Projects” albums. Use Keywords (View > Show Keywords) to tag photos: “before,” “after,” “condition,” “receipt,” “permit.”
– Free Desktop Tools: digiKam (Windows/Mac/Linux) or Darktable offer robust tagging, rating, and metadata editing. Tag photos with: Project, Room, Year, Purpose (e.g., “Insurance,” “Portfolio”).
Searchability Tip: Consistently tag all photos from a project with the same keyword (e.g., “Kitchen2024”). Later, searching “Kitchen2024 after” retrieves all relevant shots instantly.
Physical Archive Integration (For Hybrid Keepers):
– Print Select “Hero” Shots: For major milestones (completed kitchen, restored historic detail), print one key before/after pair on archival paper. Include a small caption label on the back with date, project, and purpose. Store in acid-free photo boxes.
– Project Dossiers: For complex projects, create a physical binder:
– Clear page protectors for printed photos
– Copies of permits, contracts, receipts
– Handwritten notes or journal entries
– Material samples (paint chip, tile fragment in small envelope)
Store binders on a dedicated shelf. Label spines clearly.
– Legacy Planning: Include archive location instructions in your personal documents: “Digital home documentation stored in Google Drive folder ‘Home Documentation’; master password in secure location. Physical project binders located on shelf in home office.” This ensures continuity for future stewards.
Future-Proofing Against Technological Obsolescence:
– Format Migration: Every 5 years, review file formats. Convert older formats to widely supported standards (JPEG for photos, PDF for documents).
– Cloud Strategy: Avoid vendor lock-in. Maintain copies across two cloud services or use a dedicated backup service.
– Physical Media Caution: Do not rely solely on DVDs, Blu-rays, or external drives stored long-term. Media degrades. Cloud + multiple external drives is safer.
– The “Future User Test”: Could someone with minimal tech skills access this archive in 20 years? If your system requires specific software no longer supported, simplify it now. Plain JPEGs in clearly named folders are universally accessible.
Overcoming Documentation Friction: Practical Solutions for Real-World Constraints
Let’s address common barriers directly. You might think: “I’m not a photographer,” “I don’t have time,” or “My phone camera isn’t good enough.” These are solvable challenges. Below are tiered, actionable strategies—choose the level that fits your reality. Perfection is the enemy of progress; consistent action creates value.
The 5-Minute Daily Habit (For Time-Strapped Homeowners)
Break documentation into micro-actions that fit naturally into your workflow:
– During Active Projects: Set a daily phone reminder: “Capture one progress shot.” Focus on one area per day. Example timeline for a deck build:
– Day 1: Photo of delivered materials with receipt visible
– Day 2: Footing holes excavated (include tape measure in shot)
– Day 3: Framing complete (shot from planned seating area perspective)
– Day 4: Decking installation in progress
Consistency builds a rich timeline with minimal daily effort.
– For Baseline Home Inventory: Spend 5 minutes per room weekly. Photograph closets, storage areas, and high-value items. Use a voice memo app to dictate descriptions while walking through (“Master closet: shirts on rod, boots on shelf”). Transcribe later.
– The “Exit Shot” Rule: Before leaving a room after working, take one photo of the current state. Takes 30 seconds. Accumulates powerful progress evidence.
Equipment Solutions for Every Budget Tier
- Ideal Tier (Professional Results):
- Camera: DSLR or mirrorless
- Lens: Wide-angle zoom
- Support: Tripod with ball head
- Lighting: LED panel lights
- Accessories: Color calibration card, remote shutter
- Consideration: This investment may be appropriate for professionals for whom visual documentation is central to their business.
- Enthusiast Tier (High-Quality Smartphone Workflow):
- Device: Current-generation smartphone
- Support: Flexible tripod with phone mount ($15–$25)
- Optics: Clip-on wide-angle lens ($25–$40; avoids digital zoom distortion)
- Apps: ProCam (manual controls), Snapseed (editing), Google Photos (organization)
- Accessories: Small LED panel light ($20), microfiber cloth
- Investment: <$100. Achieves strong results with technique focus.
- Emergency/Minimalist Tier (What You Have Now):
- Device: Any smartphone or point-and-shoot camera
- Technique: Clean lens with cloth. Stand steady, brace elbows. Take 2–3 shots.
- Lighting: Shoot near windows during daytime. Turn on all room lights.
- Composition: Enable grid lines. Align horizons. Remove obvious clutter.
- Investment: $0. Better than no documentation. Start here; upgrade later.
Critical Insight: Technique trumps equipment. A well-composed, well-lit photo from an affordable phone often outperforms a poorly executed shot from expensive gear. Master the fundamentals first.
Skill-Building Without Overwhelm
- Composition in 10 Minutes: Enable grid lines. Practice the “rule of thirds”—place key elements along grid lines or intersections. Take 5 test shots of a bookshelf. Delete the 2 weakest. Repeat weekly. Muscle memory develops fast.
- Editing Essentials (Under 5 Minutes Per Photo):
- Crop to straighten horizon
- Adjust exposure (brighten if too dark)
- Increase “clarity” slightly (reveals texture)
- Never alter colors drastically (misrepresents reality)
Use free apps: Snapseed (Google), Lightroom Mobile (Adobe), or built-in Photos app tools. - When to Consider Professional Help: For contractor portfolios targeting specific clients, or real estate listings where visual quality is emphasized, budgeting for professional photography may be considered. Frame it as a business development expense. For personal projects, trade skills with a photography enthusiast friend.
Addressing Psychological Barriers
- “I’ll do it later” → Solution: Attach documentation to an existing habit. “After I sweep the renovation debris, I take one progress photo.” Habit stacking increases follow-through.
- “It’s not perfect” → Solution: Embrace “good enough.” A slightly tilted photo with accurate context is infinitely more valuable than a perfect photo that was never taken. Progress > perfection.
- “I don’t know where to start” → Solution: Begin with one room. Document your current home office today using the 5-minute habit. Momentum builds confidence.
- “What if I document a failure?” → Solution: Reframe “failure” as “learning.” Documenting a mistake and its solution creates powerful content for personal growth. Authenticity builds trust.
Advanced Scenarios: Navigating Complex Documentation Challenges
Real-world projects rarely follow textbook paths. These scenarios address nuanced situations requiring adapted strategies.
Documenting Multi-Phase or Multi-Year Projects
Challenge: Maintaining consistency across months or years of work (e.g., whole-house renovation done room-by-room).
Solutions:
– Create a master project folder with subfolders for each phase.
– Take a “project anchor” photo at the start: a wide shot of the entire house exterior with a dated note visible. Repeat this exact shot at the end of each major phase.
– Maintain a shared digital log (Google Doc) with dates, scope completed, challenges encountered, and lessons learned. Link photo folders to relevant log entries.
– For exteriors, use fixed landmarks in every shot (e.g., “Photo taken from 10 feet left of oak tree, facing front door”) to ensure angle consistency years later.
Pro Tip: Schedule quarterly “archive review” sessions. Spend 30 minutes organizing recent photos, updating captions, and backing up. Prevents overwhelming backlog.
Ethical Documentation of Sensitive Situations
Challenge: Photographing damage after a difficult event (weather impact, water intrusion) or documenting conditions in a rental discussion.
Solutions:
– Prioritize safety and well-being. Do not enter unsafe structures. Seek professional help first; documentation second.
– For sensitive scenarios: Focus on objective details. Photograph the damaged window, not scattered belongings. Captions should be factual: “Broken window pane, north bedroom, documented per report.”
– In tenant discussions: Follow local regulations meticulously. Provide tenants copies of move-in documentation. Document with a witness present if tensions are high. Avoid captions implying blame; state neutrally (“Mark on wall adjacent to light switch”).
– When in doubt, consult a professional (attorney, insurance agent, mediator) before sharing documentation externally.
Collaborative Documentation (Contractor + Homeowner)
Challenge: Ensuring both parties capture needed documentation without duplication or conflict.
Solutions:
– Define roles in the contract: “Contractor responsible for process shots and final portfolio images; homeowner responsible for personal progress journaling.”
– Share a cloud folder (Google Drive, Dropbox) with clear subfolder structure. Both parties upload relevant shots.
– Schedule brief weekly documentation check-ins: “Did we capture the plumbing rough-in before drywall?” Prevents critical misses.
– For portfolio use: Contractor obtains signed media release before project start. Template: “I grant [Contractor Name] permission to use photos/videos of this project for marketing purposes. No personal identifiers will be included without further consent.”
Win-Win Outcome: Homeowner gains comprehensive archive; contractor gains portfolio assets. Clear communication prevents misunderstandings.
Documenting Projects with Unplanned Changes or Setbacks
Challenge: The project deviates significantly from plan (unexpected condition, budget adjustment, design change).
Solutions:
– Document the deviation as it happens: “Photo of condition discovered during demo, [Date].” Include notes on cause and solution.
– Update your shot list and captions to reflect reality: “Original plan: tile floor. Revised plan: refinished original hardwood due to discovered condition and historical value.”
– For portfolios: Frame setbacks as problem-solving opportunities. “Existing configuration required creative engineering solution—here’s the safe, code-compliant upgrade we designed.” Demonstrates adaptability.
– Key Mindset: Documentation’s purpose is truth, not perfection. An honest record of challenges overcome is more valuable than a sanitized fiction.
Your Questions, Answered
Q: How many before-and-after photos do I really need per project?
A: Quality and strategic coverage matter more than sheer quantity, but practical thresholds exist. For a small project (painting a room, installing a shelf): aim for 2–3 before shots (wide context, condition close-up, detail) and matching after shots. For major renovations (kitchen, bathroom, structural): 10–20 total shots covering context, critical details, process stages, and hidden elements. The non-negotiable rule: your shot list (Pillar 2, Phase 1) must cover all elements defined by your Purpose (Pillar 1). A kitchen project for real estate value should include hidden value shots (insulation, plumbing); omitting them creates gaps. When in doubt, take the extra shot—you can delete it later, but you can’t recreate a missed moment.
Q: What if I forgot to take “before” photos? Is it too late?
A: Never too late to start building your archive. First, document the current state thoroughly as your new “before” baseline for future changes. For insurance discussions: search old photos from social media, family albums, cloud backups, or even utility bills showing your address to establish prior condition. For real estate: focus on showcasing the quality of completed work with detailed after shots, written descriptions of improvements (including dates and permits if available), and third-party verification (inspector reports, contractor invoices). Honesty is critical—state clearly: “Pre-renovation photos unavailable; documentation begins post-completion.” Transparency builds more trust than omission. For contractors: this is why including documentation scope in client agreements is essential—manages expectations upfront.
Q: Should I include photos of mistakes or failed attempts in my portfolio?
A: The answer depends on purpose and audience. For personal DIY journals: absolutely yes. These are invaluable learning records. Caption them honestly: “Tile installed with incorrect spacer—removed and reset next day. Lesson: Always do a dry layout first!” For contractor portfolios targeting clients: include only if you can frame it as a “problem solved” story that demonstrates expertise. Example: “Existing configuration required creative engineering solution—here’s the safe, code-compliant upgrade we designed.” This showcases problem-solving skills. Avoid including mistakes that reflect poorly on core competence. For insurance or real estate documentation: focus on final compliant condition. Context and audience determine inclusion—when in doubt, exclude from public-facing portfolios but retain privately for learning.
Q: How do I handle documenting a project that didn’t turn out as planned?
A: This is where strategic documentation proves its worth. Photograph the outcome objectively without judgment. For personal records: note lessons learned in captions—”Chose this paint color based on small sample; appears much darker on full wall. Will test larger swatch next time.” For contractors: if the result differs due to client-directed changes, unforeseen site conditions, or scope limitations, document the agreed-upon scope (emails, signed change orders) stored with the photos. Caption neutrally: “Installed per client’s revised specification dated MM/DD/YYYY.” This creates a factual record. For real estate: focus documentation on aspects that were successfully completed and maintained. The key principle: documentation should reflect reality accurately while positioning you professionally. Transparency about challenges, paired with evidence of responsible resolution, builds long-term credibility far more effectively than hiding imperfections.
Q: Are drone photos necessary for exterior documentation?
A: For most residential projects, drone photography is unnecessary and introduces complexity (regulations, privacy concerns, cost). Ground-level shots covering all four elevations, roof edges (from ladder or upper window), and foundation perimeter suffice for insurance, real estate, and contractor portfolios. Exceptions where drones may add value: large properties (5+ acres), complex roof documentation where safe ground access is impossible, or showcasing landscape design scale (e.g., entire backyard with pool, patio, garden zones). If using a drone:
– Verify FAA regulations and local ordinances
– Obtain explicit permission from neighbors if flying near property lines
– Prioritize safety—never fly over people or in poor weather
– Consider hiring a licensed drone operator
For most homeowners, a sturdy ladder shot of the roof edge or a second-story window shot provides safer, more detailed documentation than a distant drone image.
Q: How long should I keep my documentation archive?
A: Retention periods vary significantly by purpose and local regulations. General guidance:
– Insurance-related documentation: Keep until policy expires plus your area’s statute of limitations for claims (typically several years post-incident). Consult your agent.
– Real estate transaction support: Keep indefinitely. Future buyers may request renovation history decades later. Digital storage is inexpensive; archive everything.
– Contractor portfolios and business records: Retain active project documentation for several years for warranty support, reference, and business purposes. Consult a business advisor.
– Personal DIY journals and legacy archives: Keep as long as the memory or lesson holds value. Many families treat these as heirlooms.
– Rental property move-in/move-out records: Retain for duration of tenancy plus statute of limitations for security deposit discussions in your area (often 3–4 years).
When in doubt, digitize physical records and maintain digital copies. Implement an annual “archive review” to prune non-essential items while preserving core documentation. Label folders with retention guidance.
Q: Can I use photos from my contractor’s portfolio for my own insurance or sale records?
A: Only with explicit, written permission. Copyright law generally grants ownership of photographs to the photographer (which may be the contractor or a hired professional), not the property owner. Using images without permission risks complications. Best practices:
– Take your own photos for personal records (insurance, sale, inventory). You control these completely.
– If the contractor provides images, clarify usage rights in writing before project start. Sample clause: “Contractor grants homeowner perpetual, non-exclusive license to use project photos for personal records, insurance claims, and future property sale documentation.”
– For significant projects, budget for a separate photographer to capture images solely for your records.
Respecting intellectual property builds professional relationships. When documentation serves critical personal needs, owning the images outright is often worthwhile.
Q: What’s the single biggest mistake people make in home improvement documentation?
A: Inconsistency in camera angles and lighting between before and after shots. A before photo taken from the doorway at noon and an after photo taken from the corner at dusk makes visual comparison difficult, undermining the entire purpose. This mistake reduces credibility. The TDF’s Consistent Angle Rule (Pillar 2) solves this definitively: use a tripod and mark its position with painter’s tape on the floor. For smartphone users, place the phone against a fixed object (doorframe, shelf edge) and note the position. Replicate lighting conditions by shooting at the same time of day. This simple, disciplined practice transforms documentation from ambiguous snapshots into clear evidence. Secondary common mistakes: failing to caption photos immediately (leading to forgotten context), and neglecting backup protocols (resulting in data loss). Anchor your process in consistency, context, and redundancy.
Q: How do I organize physical photos (prints) from older projects before the digital era?
A: Digitize first, preserve second. Step-by-step:
1. Scan: Use a flatbed scanner at 300–600 DPI minimum. For fragile photos, use a smartphone scanning app (Adobe Scan, Microsoft Lens) with even lighting.
2. Organize Digitally: Create folders matching the TDF structure (e.g., “1998_KitchenProject”). Apply consistent file naming and captions noting estimated dates and context.
3. Preserve Originals: Store physical prints in acid-free, lignin-free archival boxes. Label boxes clearly with project name and date range. Store in a cool, dry, dark place (not attic or basement where temperature/humidity fluctuate).
4. Integrate: Place the digitized files into your master digital archive. The physical box becomes a legacy artifact; the digital copy becomes your working record.
This hybrid approach honors historical materials while making them accessible and searchable. For extremely valuable historical photos, consult a professional archivist.
Q: Is video documentation better than photos for home projects?
A: Video is a powerful complement to photography but does not replace it. Each medium serves distinct purposes:
– Use Photos For: Precise detail shots (tile grout lines, wiring connections), side-by-side before/after comparisons, printing, quick scanning by busy professionals, and archival stability.
– Use Video For: Walkthroughs of entire spaces showing flow and scale, demonstrating functionality (smooth cabinet door operation, faucet water pressure), capturing ambient details (natural light movement across a room), time-lapse progress sequences, and recording verbal explanations (“This custom bracket addresses the structural consideration we discussed”).
Best practice: Take photos as your primary, searchable record. Then record 30–60 second video clips of key areas. Store videos in the same project folder with clear naming (“20240515_KitchenProject_Walkthrough.mp4”). For contractors, a short video testimonial from a satisfied client (with release form) paired with portfolio photos can be persuasive. Balance is key—don’t let video creation become a barrier to capturing essential still images.
Q: How do I ensure my documentation remains private and secure?
A: Privacy and security require proactive management:
– Cloud Storage: Use services with encryption options for sensitive documentation. Avoid public sharing links with default settings.
– Folder Permissions: In Google Drive/Dropbox, set sharing permissions to “Restricted” for folders containing personal information. Never use “Anyone with link” for documentation containing identifiable details.
– Metadata Scrubbing: Before sharing photos externally (e.g., with a contractor), strip location data (geotags) using apps like Exif Purge (iOS) or built-in options in Google Photos (“Remove location info”).
– Physical Security: Store external backup drives in a fireproof safe. For highly sensitive documentation, consider encrypted drives.
– Portfolio Sharing: When publishing portfolio images online, avoid showing house numbers, street signs, or distinctive neighbor features that compromise location privacy. Blur or crop sensitive details.
Security is about respecting the personal nature of your home and protecting yourself from unintended exposure. Implement basic safeguards consistently.
Conclusion and Your Next Step
You now possess a complete, adaptable system for transforming home improvement documentation from an overlooked task into a strategic practice that supports your investment, amplifies your expertise, and preserves your story. Let’s crystallize the core journey: First, anchor every shot in Purpose—know precisely who will use the image and what understanding it will enable. Second, execute with disciplined Process—consistent angles, thoughtful composition, immediate metadata, and robust backups. Third, commit to intelligent Preservation—an organized, searchable archive designed to endure technological shifts and life transitions. This framework serves equally whether you’re caring for your family’s largest asset, building a business that wins trust, or honoring the legacy of a cherished space. The walls around you hold stories of care, creativity, and resilience; this system ensures those stories are told clearly and credibly for years to come.
The 24-Hour Rule: Your Tiny, Powerful Action
Within the next 24 hours, select one current or recently completed project in your home—no matter how small. Using only your smartphone:
1. Take one intentional photo adhering to the Consistent Angle Rule (use a doorway, piece of furniture, or floor mark as your anchor point).
2. Immediately caption it with the date, location, and purpose (e.g., “2024-05-15, Living Room North Wall, documenting patch before painting for future reference”).
3. Save it to a newly created folder named “Home Documentation” on your device and sync it to your cloud storage.
This micro-action breaks the inertia of perfectionism. It proves that strategic documentation is achievable today, with tools you already own. Momentum begins with a single, purposeful step.
The Big Picture: Cultivating Home Stewardship
Beyond immediate utility, this practice cultivates a deeper relationship with your living space. Each documented project becomes a tangible record of attention—a testament to the care you invest in your environment. For future owners, it’s a gift of transparency that honors the home’s journey. For your family, it’s a legacy of stewardship passed through generations. For professionals, it’s evidence of integrity that builds enduring reputations. Start where you are. Use what you have. Do what you can. Consistency, not perfection, builds an archive of immense value. The most powerful documentation system is the one you actually use. Begin today. Your home’s story deserves to be preserved with intention.
Explore Our Complete Home Stewardship System:
Building a Bulletproof Home Maintenance Schedule That Actually Works | The Contractor’s Guide to Client Trust Through Transparent Communication | Disaster Preparedness Decoded: Creating a Home Inventory That Supports Insurance Discussions | From Weekend Warrior to Confident DIYer: Scaling Your Home Improvement Skills | The Ethical Home Seller’s Handbook: Disclosure Strategies That Build Buyer Confidence | Preserving Place: A Guide to Documenting Historic Homes with Respect and Accuracy | Digital Legacy Planning: Ensuring Your Home Records Endure for Future Generations