From Fiber to Floor: Master 7 Techniques, Choose Perfect Materials, and Design Rugs That Transform Your Space—Safely and Sustainably
Imagine stepping barefoot onto a rug you created with your own hands—a texture born from your creativity, colors chosen to soothe your spirit, and craftsmanship that tells a story no mass-produced floor covering ever could. DIY rug making bridges ancient tradition and modern self-expression, transforming simple fibers into functional art that anchors your home’s soul. This comprehensive guide dismantles intimidation, replacing it with confidence through material science insights, design-aware frameworks, and meticulously structured techniques adaptable to any skill level, space constraint, or budget reality. Whether you have fifteen minutes or fifteen weeks, a closet full of fabric scraps or a dedicated craft room, you hold the potential to craft floor textiles that resonate deeply with your lived experience.
Introduction: Where Thread Meets Territory
Rug making is among humanity’s oldest textile arts, with archaeological evidence of hand-knotted pile rugs dating to the 5th century BCE in Siberian burial mounds. These weren’t mere decorations; they were portable insulation, cultural narratives woven in wool, and status symbols traded along Silk Road routes. Today, this timeless craft experiences a meaningful resurgence—not as nostalgia, but as intentional engagement with making. In an era of mass-produced home goods, creating your own floor textile reclaims agency over your environment. It transforms passive consumption into active creation, embedding personal meaning into the very ground you walk upon. Contemporary makers blend ancestral wisdom with accessible tools and thoughtful material choices, proving rug craftsmanship remains vibrantly relevant. This guide honors that legacy while equipping you with everything needed to begin—or deepen—your journey. We approach rug making not as a monolithic skill, but as a spectrum of accessible entry points where curiosity consistently outweighs prior experience. The floor beneath you awaits its story; let’s write it together.
The Rug Crafting Compass: Your Decision-Making Framework
Before selecting yarn or unrolling backing, successful rug creation begins with strategic alignment. The Rug Crafting Compass is a practical framework developed through analysis of documented DIY projects, maker community patterns, and material behavior principles. It prevents frustration by matching technique to your unique context across four critical dimensions:
- Skill Horizon: Honest assessment of current dexterity (e.g., comfort with needles, knots, or tools)
- Temporal Reality: Actual hours available per week—not aspirational “someday” time
- Resource Landscape: Budget constraints plus existing tools/materials in your home
- Functional Destination: Where the rug will live (high-traffic hallway? nursery? sun-drenched porch?) and required durability
Ignoring even one dimension risks project abandonment. A beginner attempting a complex hand-tufted rug for a busy entryway with only weekend availability faces near-certain discouragement. Conversely, an experienced sewer might find latch hooking tedious despite its simplicity. The Compass transforms guesswork into clarity. Below is a comparative analysis of seven core techniques mapped to these dimensions. Study this table not as rigid rules, but as a starting point for self-reflection:
| Technique | Skill Horizon (1-5) | Temporal Reality (Weeks) | Resource Landscape (Budget) | Functional Destination Strengths | Ideal For… |
|---|---|---|---|---|---|
| Latch Hook | 1 (Beginner) | 1-3 | $ (Low) | Low/Medium Traffic (Bedrooms, Nurseries) | First-time makers, children’s projects, quick gratification |
| Braided Rag | 2 (Novice) | 2-6 | $ (Very Low – Upcycled) | Medium Traffic (Hallways, Living Rooms) | Sustainability focus, textile repurposers, rustic aesthetics |
| Punch Needle | 2.5 (Novice+) | 1-4 | $$ (Medium) | Medium Traffic (Living Areas, Offices) | Instant texture lovers, embroidery enthusiasts, modern designs |
| Hand Tufting | 4 (Intermediate) | 3-10+ | $$$ (High) | Medium/High Traffic (with proper finishing) | Bold designers, textile artists, statement pieces |
| Rag Rug (Prodding) | 1.5 (Beginner) | 1-2 | $ (Low) | Low Traffic (Bathrooms, Bedrooms) | Zero-waste advocates, quick utility rugs, Scandinavian style |
| Weaving (Frame) | 3 (Intermediate) | 2-8 | $$ (Medium) | Low/Medium Traffic (Decorative, Wall-to-Floor) | Pattern precision seekers, meditative crafters, art-focused makers |
| Shirring/No-Sew | 1 (Beginner) | <1 Week | $ (Low) | Very Low Traffic (Nurseries, Dorm Rooms) | Absolute beginners, sensory projects, temporary solutions |
The Fundamental Principle: The most successful DIY rug aligns precisely with your current capacity across all four Compass dimensions—not just your aesthetic desire. Mastery emerges from completed projects, not abandoned ambitions.
This framework addresses critical micro-intentions often overlooked: the time-pressed maker seeking meaningful weekend craft, the eco-conscious creator prioritizing repurposed materials, the parent needing a non-toxic shared activity, or the renter requiring reversible, non-permanent floor art. By anchoring technique selection in tangible reality rather than idealized imagery, the Compass eliminates the primary friction point in DIY textile creation: mismatched expectations. Proceed only after identifying your quadrant. Your chosen path awaits detailed exploration.
Mastering Seven DIY Rug Techniques: Deep Dives with Precision Guidance
Latch Hook: The Gateway to Textile Creation
Latch hooking transforms pre-cut yarn strands into plush, durable rugs using a simple handheld tool. Its strength lies in immediate visual feedback—each pulled loop creates instant texture, building motivation with every row. Historically popularized through mid-century craft kits, it remains the most accessible entry point for absolute beginners.
Why This Technique Excels for Beginners:
The mechanics require minimal fine motor skill. The latch hook tool (a metal shaft with a hinged gate at the tip) handles the complex work: push yarn through canvas mesh, the gate catches the yarn tail, and pulling back secures a loop. No knotting, no tension management, no power tools. Mistakes are easily corrected by snipping and re-hooking. Projects yield satisfying results within hours—a critical psychological win for sustaining creative momentum. The structured grid of rug canvas provides built-in design guidance, reducing decision fatigue.
Materials & Tools Guidance:
– Rug Canvas: Monks cloth (loosely woven cotton) is standard. Key consideration: Canvas count (holes per inch) affects final density. 3.75–4.5 holes per inch (hpi) suits most rugs; higher counts increase detail but also time and hand strain. Pre-wash canvas to prevent future shrinkage.
– Yarn: Acrylic offers affordability and colorfastness. Wool provides superior durability, natural soil resistance, and a luxurious hand-feel. Practical insight: Blend yarn weights intentionally—bulky weight for background, worsted for details—to create subtle dimension. Avoid very slippery synthetics alone, as loops may loosen over time.
– Latch Hook Tool: Standard size (approx. 4″ long) fits most hands. Ergonomic handles reduce fatigue. Keep a seam ripper nearby for corrections.
– Essential Extras: Non-slip rug pad (cut to size before starting), sharp scissors, yarn swift or cardboard for pre-cutting strands (standard length: 2.5 inches).
Step-by-Step Execution Guidance:
1. Prepare Workspace: Cover table with flannel or non-slip mat to prevent canvas shifting. Ensure ample lighting to reduce eye strain.
2. Canvas Preparation: Hem all four edges with tight whipstitch using strong thread (e.g., polyester upholstery thread). Why this matters: Unfinished edges fray during hooking and use, compromising structural integrity. This 15-minute step prevents future repair needs.
3. Yarn Management: Pre-cut all yarn strands to uniform length. Bundle by color in labeled containers. Common pitfall: Cutting strands as you work leads to inconsistent loop height and visual unevenness.
4. Hooking Sequence: Start from the center of your design and work outward in concentric squares. Why this works: Prevents canvas distortion that occurs when starting at edges. Insert tool from back to front through a hole, catch yarn tail in the latch gate, pull firmly but smoothly back through. Maintain consistent tension—loops should stand upright without straining the canvas mesh.
5. Pattern Navigation: For kit patterns, follow the chart meticulously. For custom designs, use water-soluble fabric marker to lightly sketch major shapes onto canvas before hooking. Test marker on scrap canvas first to ensure complete washout.
6. Finishing Steps: Once complete, gently brush the pile with a wire pet slicker brush. This fluffs loops, evens texture, and removes loose fibers. Vacuum lightly. Critical final step: Apply non-slip backing (see Safety & Durability section) before first use.
Project Spotlight: “Sunrise Serenity” Entry Mat
Dimensions: 18″ x 30″ | Estimated Time: 8–10 hours | Materials: Pre-printed canvas kit (or hand-drawn gradient: deep coral → soft peach → cream), 300g acrylic yarn blend
Execution Insight: Work gradient rows horizontally. Blend colors by alternating strands every 3–4 loops within transition zones. After brushing pile, lightly steam (hold iron 2+ inches above surface) to set the gradient flow. Hem edges with contrasting whipstitch in deep coral for definition. This project teaches color blending within the technique’s constraints while yielding immediate functional reward.
Braided Rag Rugs: Heritage Craft, Modern Relevance
Braiding transforms fabric strips—often salvaged from worn clothing or linens—into dense, reversible, and remarkably durable floor coverings. Rooted in historical practices of resourcefulness, this technique embodies sustainable making. Its rhythmic process builds muscle memory quickly, and the resulting rug withstands years of foot traffic.
Why This Technique Resonates Today:
Beyond repurposing textiles, braided rugs offer unparalleled customization in color blending and shape. Unlike grid-based methods, braiding allows organic forms—ovals, kidneys, freeforms. The reversible nature extends usable life. The repetitive motion can support a focused, meditative state. Each strip of repurposed fabric carries memory, embedding personal history into the home.
Materials & Tools Guidance:
– Fabric Selection: Ideal: 100% cotton (t-shirts, sheets, quilting cotton) or wool (flannel, suiting). Avoid: Highly stretchy knits (unless stabilized), synthetics prone to melting under friction, or very slippery satins. Simple test: Tear a 1″ strip. It should fray minimally and feel substantial. Pre-wash all fabric to pre-shrink and remove finishes.
– Strip Preparation: Width depends on desired braid thickness. For traditional flat braids: 1–1.5 inches. For thicker “roped” braids: 2–3 inches. Efficient method: Use a rotary cutter, self-healing mat, and acrylic ruler for speed and uniformity. For t-shirt yarn: Cut continuous spiral from hem to neckline.
– Essential Tools: Heavy-duty scissors, upholstery needle (for starting braid), strong thread (button/carpet weight), thimble, non-slip gloves (prevents blisters during tight pulling). Optional but helpful: Braiding stand (holds braid taut) or lap board with clamp.
Step-by-Step Execution Guidance:
1. Fabric Processing: Cut fabric into continuous strips. Join strips using the “diagonal seam” method: overlap ends at 45-degree angle, sew with narrow zigzag stitch. Why this matters: Straight seams create bulky lumps that disrupt braid smoothness and wear prematurely. Trim seam allowances close to stitching.
2. Braid Initiation: Fold three strips (each 3–4 yards long) in half. Thread folded ends through upholstery needle, pull through to create loop. Secure loop to stable surface (drawer pull, clamp). Begin braiding tightly: left over middle, right over new middle, repeat. Maintain consistent tension—too loose causes gaps; too tight distorts fabric.
3. Coiling Strategy (Critical Step): After 12–18 inches of braid, begin coiling. Key technique: Use strong thread and upholstery needle to blind stitch the braid coil to itself. Insert needle through the side of the current coil loop and the underside of the previous coil—never through the top surface where stitches show. Pull thread snug but not tight enough to pucker. Space stitches every 1–1.5 inches. Common pitfall: Skipping stitches or sewing too loosely causes the rug to lose shape underfoot.
4. Shape Management: For ovals: coil tightly at ends, looser in middle sections. For circles: maintain consistent coil diameter. Periodically lay rug flat to check symmetry. Adjust stitching tension as needed.
5. Termination & Finishing: When braid ends, weave tail back through last 3–4 coils. Secure with hidden stitches. Trim excess. Durability step: Apply clear, flexible fabric glue (like Aleene’s Fabric Fusion) sparingly along the entire stitched seam on the rug’s underside. This reinforces stitching against lateral stress. Allow 72 hours to cure before use.
Project Spotlight: “Memory Lane” Oval Hearth Rug
Dimensions: 24″ x 36″ oval | Estimated Time: 15–20 hours | Materials: 12+ pre-washed cotton garments (denim scraps for border, flannel shirts for warmth, vintage tablecloth for center)
Execution Insight: Sort fabric strips by value (light/medium/dark) rather than strict color. Braid in value-gradient sections: dark denim border → medium flannel middle → light tablecloth center. This creates visual depth even with varied colors. During coiling, intentionally place recognizable fabric fragments (e.g., a child’s pajama print) on the top surface. After gluing seams, brush entire underside with diluted fabric stiffener (1 part stiffener : 2 parts water) to add body and reduce fiber shedding. This rug becomes a tactile family archive.
Punch Needle: Instant Texture, Modern Appeal
Punch needle rug hooking creates dense, looped pile surfaces with remarkable speed and intuitive motion. Unlike latch hook (which pulls loops through from back to front), punch needle pushes loops down into the foundation fabric from the top, locking them mechanically. The result resembles professional machine-tufted rugs with rich, dimensional texture achievable in hours.
Why This Technique Captivates Contemporary Makers:
The immediate visual feedback is highly motivating—each punch creates a visible loop. It bridges embroidery’s precision and rug making’s scale. Modern punch needles feature ergonomic handles and depth guides, minimizing hand fatigue. Designs range from geometric minimalism to intricate botanical illustrations. Crucially, it requires no complex backing preparation beyond securing foundation fabric in an embroidery hoop or frame—a significant barrier reduction versus tufting guns.
Materials & Tools Guidance:
– Foundation Fabric: Monk’s cloth remains standard, but key specification: Must be 100% cotton with approximately 12–14 threads per inch. Too loose? Loops may pull out. Too tight? Needle struggles to penetrate. Pre-shrink by washing/drying.
– Yarn/Floss Selection: Wool rug yarn (3-ply) is ideal for durability. For finer detail: 6-strand embroidery floss (use 3–6 strands depending on needle size). Practical insight: Blend textures—combine smooth wool with bouclé or roving for organic variation. Avoid very slippery rayon floss alone; mix with cotton for grip.
– Punch Needle Tool: Size determines loop height and yarn compatibility. #8 (medium) is versatile for rugs. Important: Match needle size to foundation fabric count.
– Essential Setup: Adjustable embroidery hoop (minimum 10″ diameter) OR dedicated rug frame (recommended for rugs >24″). Non-slip mat under hoop prevents shifting. Threader tool saves frustration.
Step-by-Step Execution Guidance:
1. Foundation Preparation: Cut monk’s cloth 4″ larger than desired rug size on all sides. Secure drum-tight in hoop or frame. Why this matters: Any slack causes uneven loop height and distorted designs. Test tension: drum should sound a high “ping” when tapped.
2. Design Transfer: Use water-soluble pen or tailor’s chalk to trace design onto foundation. For complex images: print design, tape to window, place foundation over it, trace lines. Key tip: Simplify designs! Punch needle excels at bold shapes. Avoid tiny details smaller than your loop size.
3. Threading & Technique: Thread yarn through needle eye (use threader). Hold tool vertically. Punch straight down through fabric until it stops at the depth guide. Slide tool horizontally 1/8″ along your design line. Pull straight up. Repeat. Fundamental rhythm: Down, slide, up. Never pull needle at an angle—that releases loops.
4. Directional Strategy: Work from center outward. Always punch loops in the same direction relative to your design (e.g., all loops pointing toward the top of a leaf shape). This creates consistent light reflection.
5. Color Changes & Corrections: To change colors: leave 2″ tail of old yarn, start new yarn with 2″ tail. Weave tails later on back. To fix a missed loop: use a fine crochet hook to pull the yarn tail through from back to front, then punch correctly over it.
6. Finishing Protocol: Remove from hoop. Trim pile evenly with sharp scissors (hold flat against surface). Durability step: Apply rug glue (like Liquid Fusion) to the entire back using a foam brush. This locks loops permanently. Place under weighted board for 24 hours while drying. Trim excess foundation fabric, leaving 1″ border. Fold border to back, blind stitch down. Attach non-slip pad.
Project Spotlight: “Desert Bloom” Wall-to-Floor Accent
Dimensions: 20″ diameter circle | Estimated Time: 6–8 hours | Materials: Pre-stretched monk’s cloth on frame, wool rug yarn in terracotta, sage, ochre, cream
Execution Insight: Design features simplified saguaro cactus and geometric sun. Punch background (cream) first in concentric circles from center outward. Then punch cactus shape, working dark to light (terracotta base → ochre highlights). For the sun motif, use slightly longer loops (adjust needle depth) to create subtle 3D effect. After gluing back, stitch a hidden cotton webbing strap to the back for optional wall hanging versatility. This project demonstrates directional punching for dimension and the technique’s adaptability beyond floor use.
Hand Tufting: Professional Results, Studio Control
Hand tufting utilizes a specialized gun (manual or electric) to push yarn through a primary backing fabric, creating dense, customizable pile rugs. While requiring greater investment, it offers unparalleled design freedom, speed for larger pieces, and the satisfaction of creating textile art.
Why This Technique Commands Serious Makers:
Tufting guns mechanize the punching motion, enabling rapid coverage (a 3×5 rug can be tufted in 8–12 hours). Adjusting pile height (cut pile vs. loop pile) and mixing yarn types within one piece unlocks sophisticated expression. It’s well-suited for translating illustrations directly into fiber. Community workshops and online resources have increased accessibility.
Materials & Tools Guidance:
– Tufting Gun: Manual guns build hand strength and control; electric guns reduce fatigue for large projects. Safety note: Electric guns require stable work surface and awareness of cord placement. Always unplug when adjusting.
– Primary Backing: Tufting cloth (polypropylene scrim) is essential. Its open weave allows yarn penetration while providing grip. Important: Substituting burlap or monk’s cloth risks structural failure due to insufficient integrity. Pre-stretch on frame until drum-tight.
– Yarn Guidance: Wool is a premium choice (durability, dye affinity, resilience). Acrylic is budget-friendly but less resilient. Practical specification: Use rug-weight yarn (approx. 1/8″ diameter, 3–4 ply). Test yarn in scrap backing first.
– Essential Ecosystem: Professional rug frame (essential for tension), chalk reel for large designs, tufting adhesive (latex-based), secondary backing (like felt or canvas), fabric scissors, safety glasses.
Step-by-Step Execution Guidance:
1. Frame Mastery: Stretch tufting cloth extremely taut on frame. Use canvas pliers for final tensioning. Why this matters: Slack backing causes “tunneling” (yarn pulling through without forming loops) and uneven pile. Check tension hourly during tufting; re-tighten as needed.
2. Design Scaling: Project large designs onto backing using an overhead projector, or use grid method (divide design and backing into equal squares). Trace with chalk reel for crisp lines. Key tip: Work in sections. Cover completed areas with parchment paper to prevent accidental snagging.
3. Tufting Technique: Hold gun at 90-degree angle. Trigger in short bursts. Move steadily along design lines. For cut pile: tuft normally. For loop pile: use loop attachment (if available) or carefully avoid cutting loops during finishing. Fundamental rule: Tuft against the direction of the pile you’re creating. This prevents yarn from catching on existing loops. Maintain consistent speed—too fast causes skipped stitches; too slow may overheat motor (electric guns).
4. Color Transitions: Change yarn colors at natural design breaks. Leave 3″ tails. Helpful method: When switching colors mid-line, tuft the new color over the tail of the old color for 1/2 inch to lock it in place before trimming excess later.
5. The Gluing Step (Essential): Once tufting is complete, apply tufting adhesive liberally to the entire back using a notched trowel (1/8″ notch). Work in sections. Adhesive must penetrate between every tuft to lock yarn permanently. Safety note: Work in well-ventilated area. Wear nitrile gloves. Allow adhesive to become tacky (follow product instructions, usually 15–30 mins) before applying secondary backing.
6. Secondary Backing & Finishing: Place felt or canvas backing over adhesive. Press firmly with roller. Weight heavily for 24 hours. Trim excess backing. Bind edges with heavy-duty thread or commercial rug binding tape. Final safety step: Apply non-slip coating or attach pad before use.
Project Spotlight: “Celestial Cartography” Statement Rug
Dimensions: 36″ x 48″ rectangle | Estimated Time: 15–20 hours tufting + 24h drying | Materials: Electric tufting gun, tufting cloth on professional frame, merino wool yarn in navy, silver, gold, deep purple
Execution Insight: Design features constellations over a gradient night sky. Tuft background first using stippling technique (random dot placement) with navy → purple gradient. For stars: use metallic silver yarn with loop pile setting for subtle shine. Constellation lines: cut pile in gold. Advanced consideration: Mix fine roving with standard yarn in nebula areas for ethereal texture. During gluing, use a heat gun on low setting (held 12+ inches away) to gently encourage adhesive penetration into deep pile areas before applying secondary backing—ensures maximum hold. This project exemplifies tufting’s capacity for nuanced artistry.
Rag Rug (Prodding/Threading): Scandinavian Simplicity
Often called “prodding” or “threading,” this technique weaves fabric strips through a coarse burlap or hessian backing using a large needle or bodkin. Originating in folk traditions, it produces flat, reversible rugs with a distinctive woven texture. Its charm lies in rustic authenticity and remarkable speed for utility pieces.
Why This Technique Endures:
Minimal tool requirements (needle, backing, fabric strips) make it accessible anywhere. The flat weave is inherently stable—no pile to mat down—making it suitable for moisture-prone areas like bathrooms (with proper backing treatment). The reversible nature extends its lifespan. Its aesthetic celebrates visible joins and fabric variations, aligning with wabi-sabi design philosophies. It’s exceptionally child-friendly under supervision.
Materials & Tools Guidance:
– Backing Fabric: Heavyweight burlap/hessian (minimum 10 oz weight). Important note: Cheap burlap sheds fibers excessively and tears easily. Seek “rug-grade” burlap. Pre-wash gently by hand to remove loose fibers and pre-shrink. Air dry flat.
– Fabric Strips: 1–1.5 inch wide strips of tightly woven cotton (denim, canvas, quilting cotton). Avoid stretchy or slippery fabrics. Pre-wash to prevent bleeding. Join strips with simple overhand knots—these become part of the rug’s character.
– Essential Tools: Large tapestry needle (size 18 or larger) or dedicated rug bodkin (flat, blunt-tipped tool with large eye). Scissors, thimble. Optional: Wooden dowel to roll finished sections onto, reducing bulk.
Step-by-Step Execution Guidance:
1. Backing Preparation: Cut burlap to desired size plus 2″ border. Hem all edges with tight whipstitch using heavy thread. Why this matters: Unhemmed burlap frays significantly during use. This step is essential for longevity.
2. Threading Strategy: Thread needle with 18–24″ strip. Key technique: Work in rows. Insert needle from back to front through burlap weave. Pull strip through until 2″ tail remains on back. Insert needle back down two threads over on the burlap grid. Pull snug. Continue across row. Key rhythm: Up two threads, over two threads. Consistency creates even texture.
3. Row Progression: At end of row, turn work. Begin next row offset by one burlap thread to create brick-like pattern. This interlocks rows for stability. Common pitfall: Pulling strips too tight distorts burlap; too loose creates gaps. Aim for “snug but flexible.”
4. Color Blending: Change colors at row ends. Weave tails into previous row on the back for 1 inch before trimming. For gradients, alternate strip colors every few rows (e.g., row 1: blue, row 2: blue+white mix, row 3: white).
5. Finishing Protocol: Upon completion, gently brush both sides with stiff brush to soften burlap fibers and fluff fabric strips. Durability step: Apply clear, flexible fabric stiffener (like Mod Podge Stiffy) diluted 1:1 with water to the entire back using foam brush. This seals burlap fibers, prevents shedding, and adds body. Allow 48 hours to cure completely before use. Trim any stray threads.
Project Spotlight: “Coastal Calm” Bathroom Runner
Dimensions: 20″ x 48″ | Estimated Time: 4–6 hours | Materials: Rug-grade burlap, pre-washed cotton fabric strips in seafoam, sand, driftwood gray
Execution Insight: Create subtle wave pattern by varying strip colors in gentle arcs across rows. Use slightly wider strips (1.75″) for faster coverage. After stiffener application, lightly sand the front surface with fine-grit sandpaper (220 grit) to soften any rough burlap protrusions against bare feet. For moisture resistance, apply a second, undiluted coat of fabric stiffener to the back only. This creates a subtle moisture barrier while maintaining breathability. Hem edges with contrasting whipstitch in navy thread for nautical detail. This rug demonstrates the technique’s suitability for functional, moisture-prone spaces with thoughtful finishing.
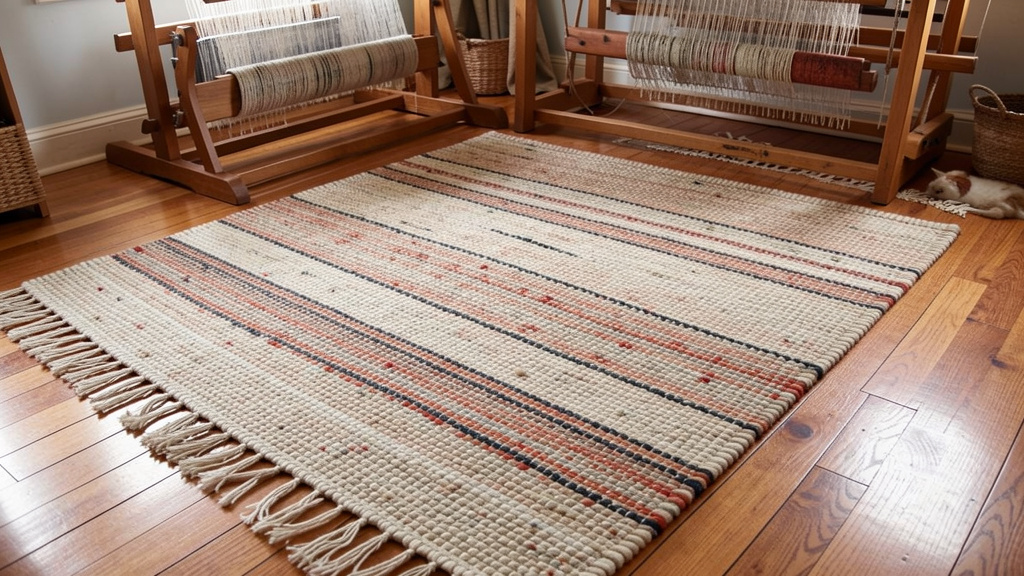
Frame Weaving: Architectural Precision in Fiber
Weaving on a simple frame loom transforms rug making into a study of structure and pattern. Unlike freeform techniques, weaving operates within a defined warp (vertical threads), creating inherently stable, flat textiles with pattern potential—from minimalist stripes to complex geometric motifs.
Why This Technique Cultivates Deep Craft:
Weaving teaches fundamental textile principles: tension, interlacement, and sett (threads per inch). The rhythmic over-under motion can be calming. Results are exceptionally durable due to the locked warp-weft structure. It’s ideal for makers who enjoy planning, precision, and seeing mathematical patterns emerge physically. Small looms fit apartment lifestyles; large looms accommodate room-sized rugs.
Materials & Tools Guidance:
– Loom Options: DIY wooden frame (1×2 pine, sanded smooth) is cost-effective. Commercial rigid heddle looms add shedding capability for complex patterns. Key spec: Loom width must exceed desired rug width by 4+ inches for weaving room.
– Warp Thread: Strong, smooth cotton rug warp (12/6 or 8/4 weight) is essential. Warp must withstand significant tension.
– Weft Materials: Rag strips (1″ wide cotton), rug wool, or thick roving. Practical insight: Mix weft textures intentionally—smooth strips for background, bouclé for accent rows.
– Essential Tools: Warping board or pegs, shuttle (or cardboard shuttle for rag strips), tapestry needle, shed stick (dowel rod), beater (comb or fork), measuring tape.
Step-by-Step Execution Guidance:
1. Warping Mastery (Foundation of Success): Secure warp thread to loom bottom. Wind vertically to top, around, down to bottom. Maintain even tension across all threads. Why this matters: Uneven warp causes “smiles” (curved edges) and weak spots. Space warp threads based on weft thickness: for rag strips, 4–6 ends per inch (epi). Use warping board for accuracy. Tie off securely at bottom.
2. Weaving Initiation: Leave 3″ warp tail at start. Begin weaving with header rows (using scrap yarn) to spread warp evenly. Beat down firmly after each pass. Fundamental rhythm: Pass weft through shed (space between warp threads), beat down, change shed, repeat.
3. Pattern Execution: For stripes: change weft color at row end, weave tail back into previous row. For geometric patterns: use tapestry technique—carry unused colors along edge, or use multiple shuttles. Key tip: Beat weft firmly but not so hard it distorts warp. Aim for weft to just cover warp threads.
4. Shape Management: To weave circles or organic shapes: use “eccentric weft” technique—vary beating pressure and weft length within rows. Requires practice but yields stunning results.
5. Finishing Protocol: Upon completion, cut warp threads from loom, leaving 6″ tails. Critical structural step: Secure ends using “hemstitch” before removing from loom: group 4–6 warp threads, loop under last weft row, pull through to create locked fringe or hem. For no-fringe finish: weave ends back into rug body for 1 inch using tapestry needle. Apply fabric glue to woven ends for security. Trim fringe evenly. Final step: Full rug requires professional binding or sewing to heavy canvas backing for floor use. Small pieces can be used as wall hangings or table runners.
Project Spotlight: “Mountain Range” Textural Wall Hanging / Floor Mat
Dimensions: 18″ wide x 24″ long | Estimated Time: 10–12 hours | Materials: DIY pine frame loom, cotton rug warp, rag strips in charcoal, slate, snow white, forest green
Execution Insight: Warp at 5 epi. Weave bottom 3″ in charcoal for base. Create mountain silhouettes using eccentric weft: vary strip lengths and beating pressure to form peaks. Use thicker roving for snow caps (insert by hand, secure with needle). Weave sky section with subtle gradient (slate → white) using blended strip bundles. After hemstitching top and bottom, attach hidden D-rings to back for wall hanging. For floor use, sew securely to non-slip rug pad backing. This project highlights weaving’s capacity for intentional shape-making and dual-purpose functionality.
Shirring/No-Sew Fabric Scrap Rug: Instant Gratification Crafting
This technique transforms fabric scraps into a soft, textured rug using only a sewing machine (or hand-sewing) and basic gathering—no specialized tools, complex knots, or backing required. Often called “shirred” or “gathered” rugs, they resemble oversized fabric flowers and are perfect for nurseries, dorm rooms, or temporary spaces.
Why This Technique Solves Specific Needs:
Unmatched speed (complete in under 4 hours). Zero barrier to entry—uses standard sewing supplies. Completely reversible. Machine-washable (with care). Ideal for sensory projects with children (soft textures, no sharp tools during assembly). Creates substantial visual impact from minimal materials. Perfect solution for renters needing non-permanent, removable floor art.
Materials & Tools Guidance:
– Fabric Selection: Lightweight to medium-weight cottons work best (quilting cotton, sheeting, lightweight flannel). Avoid heavy denim or stiff upholstery fabrics—they won’t gather smoothly. Pre-wash all fabrics.
– Scrap Preparation: Cut fabric into 2″ x 12″ strips. Efficiency tip: Stack 4–5 layers of fabric, rotary cut strips simultaneously. Sort strips by color/value.
– Essential Tools: Sewing machine with zigzag foot, heavy-duty thread (polyester), long upholstery needle (for hand-sewing option), fabric scissors, pins or clips. Optional: Fabric glue stick for temporary strip alignment.
Step-by-Step Execution Guidance:
1. Strip Assembly Chain: Place two strips right sides together at narrow ends. Sew 1/4″ seam. Press seam open. Continue adding strips until you have one continuous strip 15–20 yards long. Why this matters: Fewer seams = smoother gathering. Pressing seams prevents bulk in final gather.
2. Machine Shirring Method (Fastest): Set machine to longest straight stitch (5.0mm). Stitch down the entire center of the long strip. Key technique: Hold both thread tails firmly as you start sewing to prevent strip from feeding unevenly. Leave 6″ thread tails at start and end.
3. Gathering Magic: Gently pull the bobbin thread (bottom thread) to gather the strip. Why bobbin thread? It’s stronger and less likely to break than top thread. Work in sections, distributing gathers evenly until strip measures approximately 1/3 its original length. Pin gathers securely.
4. Coiling & Securing: Starting at one end, coil the gathered strip tightly into a spiral. Pin coil layers together every 2–3 inches. Critical securing step: Using heavy-duty thread and long needle, hand-sew through all layers of the coil at pin points with strong whipstitches. Remove pins as you sew. For machine option: Use zigzag stitch over coil edges (requires careful maneuvering).
5. Finishing Touches: Trim any uneven edges. Optional softening: Lightly steam the entire rug (avoid direct iron contact on gathers). For non-slip function: Hand-sew small dots of silicone grip tape to the underside at 6-inch intervals, OR place entirely on top of a separate non-slip rug pad.
Project Spotlight: “Rainbow Ripple” Nursery Play Mat
Dimensions: 24″ diameter circle | Estimated Time: 2.5 hours | Materials: 30+ pre-washed cotton fabric scraps in ROYGBIV gradient, polyester thread
Execution Insight: Sort strips meticulously into color gradient sequence before sewing chain. During gathering, ensure color transitions flow smoothly. When coiling, start with red at center, spiral outward through spectrum to violet at edge. Secure coil with hidden whipstitches using matching thread colors. After completion, hand-wash gently in cold water to soften fabric and set gathers. Air dry flat. Place on top of a purchased non-slip pad for safety. This project exemplifies the technique’s speed, sensory appeal, and emotional resonance for milestone spaces.
Material Mastery: Fibers, Backings, and Adhesives Decoded
Choosing materials is not merely aesthetic—it’s engineering your rug’s lifespan, safety, and sensory experience. This section moves beyond surface-level comparisons into the properties that determine real-world performance. Understanding these principles prevents common pitfalls and unlocks intentional creation.
Fiber Properties: Beyond the Label
Every fiber possesses inherent characteristics affecting suitability for floor textiles. Consider these dimensions holistically:
- Durability (Abrasion Resistance): Industry-standard abrasion tests indicate relative performance. Wool typically shows high resistance. Nylon also performs well but has different thermal properties. Polyester offers good resistance. Cotton is suitable for low-traffic areas. Practical implication: High-traffic areas benefit from fibers with higher abrasion resistance; bedrooms accommodate softer fibers.
- Resilience (Recovery from Crushing): Wool’s natural fiber structure tends to spring back; cotton may retain impressions. Simple test: Press thumb firmly into pile for 10 seconds. Release. Observe recovery.
- Soil & Stain Interaction: Wool has natural properties that can help repel soil (soil may hide within fiber, not on surface). Synthetics may attract certain stains. Helpful tip: For light-colored rugs in active homes, wool’s soil-hiding quality can be advantageous.
- Moisture Management: Wool can absorb significant moisture vapor without feeling damp—relevant for humid climates or spill-prone areas. Cotton absorbs moisture but dries more slowly. Synthetics vary in wicking properties.
- Flammability Considerations: Wool has a higher ignition temperature and tends to char rather than melt. Critical safety note: For rugs intended near fireplaces, heat sources, or in children’s rooms, fiber choice matters. Avoid fibers that melt near heat sources. Always maintain clearance between rugs and active heat sources.
- Environmental Considerations: Wool is renewable and biodegradable. Recycled cotton reduces landfill waste but often blends with other fibers for strength. Nuanced perspective: “Natural” isn’t automatically sustainable—consider dye processes, water use, and transportation. Seek certifications like GOTS (Global Organic Textile Standard) for wool or OEKO-TEX for low chemical impact when these factors matter to you.
Fiber Selection Guidance by Use Case:
| Scenario | Recommended Fiber Consideration | Why | Budget-Conscious Alternative |
|————————-|———————————|———————————————————————|——————————|
| High-Traffic Entryway | Wool | Resilience, soil management, safety profile | Wool/Nylon Blend |
| Sunroom/Patio (Covered) | Solution-Dyed Acrylic | UV resistance (reduced fading), moisture resistance | Olefin (Polypropylene) |
| Nursery/Child’s Room | Organic Cotton | Softness, hypoallergenic properties | Bamboo/Cotton Blend |
| Pet-Friendly Space | Wool | Natural stain resistance, hides pet hair, resilience to claws | Tight-Loop Nylon |
| Bathroom (Low Moisture) | Cotton Rag | Absorbent, quick-drying when properly finished | Microfiber (for mats) |
| Art Piece (Low Traffic) | Silk/Roving Blend | Visual texture and luster for impact | Mercerized Cotton |
Seasonal Note: For rugs in sun-exposed rooms (south-facing windows, sunrooms), prioritize UV-resistant fibers like solution-dyed acrylic to minimize fading over time. Rotate rugs periodically to ensure even exposure.
Backing & Foundation: The Invisible Architecture
A rug’s foundation significantly influences structural integrity. Compromising here can lead to premature wear.
- Monk’s Cloth (Cotton): Suitable for latch hook, punch needle. Key spec: Approximately 12–14 threads per inch. Pre-shrink mandatory. Longevity tip: After project completion, apply diluted fabric stiffener (1:3 with water) to unused canvas edges before hemming—may help prevent future fraying.
- Tufting Cloth (Polypropylene Scrim): Essential for tufting. Its open, grid-like structure allows yarn penetration while providing mechanical grip. Important: Substituting burlap risks structural failure—yarn may pull through under tension. Always stretch drum-tight on frame.
- Burlap/Hessian: Suitable only for prodding/threading rugs. Quality check: Rug-grade burlap feels stiff, has tight weave, minimal loose fibers. Pre-wash gently by hand; air dry flat. Seal back with fabric stiffener after completion.
- Non-Slip Backing Solutions:
- Recommended: Latex-based rug grip pads. Cut to size, place under rug. Reusable, washable.
- Permanent DIY: Apply dots of 100% silicone caulk in grid pattern on rug back. Let cure 72 hours. Flexible, washable, grippy. Test first on scrap—some silicones may discolor over time.
- Budget Option: Hot glue dots in grid pattern. Note: Less flexible, may crack over time. Best for very low-traffic decorative pieces.
- Avoid: Spray adhesives—they can stiffen rug, trap dirt, lose grip quickly, and emit strong odors during application.
Adhesives & Finishes: Supporting Durability
Proper finishing supports the transition from textile to functional floor covering. This step is frequently overlooked by beginners.
- Tufting Adhesive (Latex-Based): Should remain flexible when dry. Apply with notched trowel (1/8″ notch) for even coverage. Timing note: Apply secondary backing when adhesive is tacky (not wet, not dry)—usually 15–30 minutes. Weight heavily for 24 hours. Ventilation: Work in a well-ventilated area.
- Fabric Stiffener (For Braided/Prodded Rugs): Dilute 1:1 with water for backing sealant; use full strength for edge reinforcement. Apply with foam brush to back only to maintain front softness. Cure 48 hours before use. Helps prevent fiber shedding and adds body.
- Edge Binding: A common wear point for handmade rugs. Options:
- Recommended: Cotton webbing binding tape (sew with heavy-duty thread using whipstitch).
- DIY: Fold rug’s raw edge to back, blind stitch down with upholstery thread.
- Reinforcement: After binding, apply thin line of flexible fabric glue along stitched seam on back for extra security.
- Fire Safety Consideration (When Relevant): For rugs intended near fireplaces or in specific settings, consult local safety guidelines. Wool rugs inherently have favorable fire performance characteristics. For additional treatment where required, use EPA-registered textile fire retardants. Important: Test on scrap first—some alter color/texture. Apply evenly to back only; allow full cure per instructions. Note that treatment effectiveness may diminish with cleaning.
Design Studio: Creating Patterns That Captivate and Endure
A rug’s design functions psychologically and spatially—it can influence how a room feels and flows. This section integrates color awareness, pattern considerations, and spatial relationships to move beyond personal preference into intentional environmental design.
Color Strategy: Beyond Personal Preference
Color influences perception and mood. Leverage this intentionally:
- Cool Colors (Blues, Greens, Purples): Can make small rooms feel more spacious and calm. Ideal for bedrooms, bathrooms, restful spaces. Nuance: Deep navy adds depth without shrinking space; mint green feels fresh.
- Warm Colors (Reds, Oranges, Yellows): Create cozy intimacy. Perfect for dining rooms, libraries, entryways. Consideration: Use as accents within neutral fields in small rooms to avoid overwhelming the space.
- Neutrals (Whites, Grays, Beiges, Browns): Provide visual rest. Key distinction:
- Warm Neutrals (Beiges, Taupes, Creams): Harmonize with wood tones, create cozy foundation.
- Cool Neutrals (Grays, Charcoals, Icy Whites): Feel modern, crisp; pair with metal accents.
- Practical note: Pure white rugs show dirt readily in high-traffic areas. Oatmeal or stone tones offer more forgiveness.
- Color Harmony Approaches:
- Analogous (3 adjacent colors): Serene, cohesive (e.g., sage → olive → forest green). Ideal for restful spaces.
- Complementary (Opposite colors): Dynamic energy (e.g., terracotta + teal). Use dominant neutral with accent color.
- Monochromatic (Tints/shades of one color): Sophisticated, spacious. Vary value (light/dark) for depth.
- Practical Tip: When uncertain, pull colors directly from your room’s existing elements—a pillow fabric, artwork accent, wood tone. This supports harmony. Take physical samples when selecting yarn.
Temporal Note: Consider how natural light changes throughout the day and seasons in your space. A color that feels perfect at noon may appear differently in evening lamplight. View yarn samples in the actual room at different times if possible.
Pattern Psychology and Scale
Pattern scale should relate to room size and rug dimensions—a common design consideration.
- Large-Scale Patterns (Motifs >12″ wide): Command attention. Best for:
- Large rooms (living rooms >200 sq ft)
- Rugs covering most of floor (8×10+)
- Creating focal point in minimalist spaces
- Consideration: May overwhelm small rooms; assess room’s existing patterns.
- Medium-Scale Patterns (Motifs 4″–12″): Versatile. Works in:
- Average living rooms, dining rooms
- Rugs defining seating areas (5×8)
- Balancing rooms with moderate pattern elsewhere
- Small-Scale/All-Over Patterns (Motifs <4″): Recede visually. Ideal for:
- Small rooms (powder rooms, hallways)
- High-traffic areas (hides dirt/spots)
- Rooms with bold furniture or wall colors
- Creating subtle texture without visual weight
- Pattern Type Guidance:
- Geometric (Stripes, Checks, Moroccan): Energizing, modern. Horizontal stripes can widen narrow rooms; vertical stripes may heighten low ceilings.
- Organic (Florals, Leaves, Watercolor): Calming, traditional. Soft edges feel inviting. Best in curved rooms or to soften angular architecture.
- Abstract/Textural: Contemporary, versatile. Relies on color/value contrast rather than recognizable shapes. Forgiving for beginner makers.
- Solid Color with Texture: Timeless, sophisticated. Lets rug-making technique (tufted loops, woven texture) become the pattern. Maximizes versatility across decor changes.
Spatial Mathematics: Sizing for Function and Flow
Appropriate rug sizing supports room flow and function.
- Living Room: Rug should sit under front legs of seating furniture. Minimum size: extend 12–18″ beyond sofa on all sides. For floating furniture, rug should define the entire seating zone with 8″ border of floor visible around edges. Consideration: In open-plan spaces, rug size helps visually separate zones—avoid undersizing.
- Dining Room: Rug must extend at least 24″ beyond table edge on all sides. This ensures chairs remain on rug when pulled out. Calculate: Table length + 48″ = minimum rug length. Round tables need circular/oval rugs.
- Bedroom:
- Queen/King: Rug extends 18–24″ beyond bed sides and foot. Ideal size: 8×10 for queen, 9×12 for king.
- Alternative: Two runners (2.5×8) along bedside.
- Small Bedroom: Place rug under lower 2/3 of bed only—avoids cramped feeling.
- Hallway/Entry: Runner should leave 3–6″ of floor visible on long sides. Length should cover high-traffic path. Minimum width: 24″.
- Proportion Guideline: Rug should occupy approximately 60–75% of the “defined space” within a room. Too small = furniture floats; too large = room feels cramped. Sketch room layout with measurements before designing rug.
Translating Design to Technique
Your chosen technique influences design feasibility. Align expectations:
- Latch Hook/Punch Needle: Excel at bold shapes, limited color blending. Avoid fine details smaller than loop size. Use value contrast (light vs. dark) for clarity.
- Tufting: Handles gradients, mixed pile heights. Ideal for complex illustrations. Requires precise design transfer.
- Braiding/Prodding: Best for organic shapes, color gradients through strip sequencing. Geometric precision is difficult—embrace the handmade character.
- Weaving: Perfect for stripes, geometric repeats, controlled color blocks. Curved shapes require advanced techniques (eccentric weft).
- Universal Tip: Simplify designs by 30% before starting. What looks detailed on paper may become muddy in fiber. Increase contrast between adjacent colors. Test design at actual size by printing a section.
Safety, Durability, and Care: Ensuring Your Rug Lasts
A beautiful rug is most meaningful when it remains safe and functional over time. This section addresses essential safety considerations and maintenance practices often omitted in DIY guides. Slip-and-fall incidents are a common household hazard. A rug without proper grip significantly increases this risk, making non-slip backing a critical safety step for any floor textile.
Non-Slip Backing: Essential Safety Step
Implement one primary method:
-
Recommended Solution: Dedicated Non-Slip Rug Pad
- Material: Natural rubber (for hard floors) or felt/rubber combo (for carpets).
- Sizing: Cut pad 1–2 inches smaller than rug on all sides. Prevents pad edges from curling.
- Installation: Place pad directly on floor. Position rug on top. Do not glue pad to rug back—traps moisture, prevents washing.
- Tip: Look for pads labeled “open weave” or “breathable”—allows floor to “breathe,” preventing moisture buildup.
-
Permanent DIY Backing (For Tufted/Woven Rugs):
- Silicone Dot Method: Use 100% silicone caulk (clear or color-matched). Load into pastry bag with small round tip. Apply pea-sized dots in grid pattern (2″ apart) across entire rug back. Let cure 72 hours on non-stick surface (wax paper). Flexible, washable, grippy. Test first for colorfastness.
- Why silicone? Remains flexible across temperature ranges, doesn’t degrade like hot glue, and creates superior grip on smooth surfaces.
-
Budget Temporary Option (Use with Caution):
- Double-Sided Carpet Tape: Apply strips around rug perimeter only. Note: May leave residue, damages rug backing over time, loses grip when dirty. Only for very light-use decorative pieces. Remove carefully with citrus-based adhesive remover.
Safety Check: After applying backing, perform the “tug test.” Place rug on intended surface. Stand on edge. Attempt to slide rug with foot. If it moves >1 inch, backing is insufficient. Reassess method.
Fire Safety Considerations
While rare, rug flammability matters near heat sources.
- Fiber Considerations: Wool has a higher ignition temperature and tends to char rather than melt. Avoid fibers that melt near heat sources.
- Universal Precaution: Maintain at least 3-foot clearance between any rug and active heat sources (fireplace hearth, space heaters, radiators).
- When Treatment is Considered: For specific requirements (e.g., near fireplace), consult local safety guidelines. If using fire retardant treatment:
- Use EPA-registered product.
- Apply only to rug back to preserve front texture/color.
- Follow cure instructions precisely.
- Important: Treatment effectiveness may diminish with cleaning. Reapply only if required and per product instructions.
- Note: Wool rugs inherently meet many residential fire safety considerations; treatment is often unnecessary. When in doubt, prioritize fiber choice and clearance.
Cleaning and Maintenance Guidance by Technique
Improper cleaning can damage handmade rugs. Match method to construction:
| Technique | Vacuuming | Spot Cleaning | Deep Cleaning | Drying Protocol |
|---|---|---|---|---|
| Tufted | Low suction, no beater bar | Blot immediately. Mild soap + cold water. Test hidden area first. | Professional cleaning recommended | Lay flat, weighted edges. Air dry 48+ hrs. Never hang wet. |
| Woven/Flat | Both sides, gentle setting | Same as tufted. Brush gently after drying. | Hand wash cold if small; else pro | Roll in towels to absorb moisture. Lay flat to dry. |
| Braided | Low suction | Spot clean only. Avoid saturating seams. | Surface clean only. Never immerse | Air dry flat. Reshape while damp. |
| Latch/Punch | Low suction, upright position | Blot. Avoid rubbing loops. | Professional only | Never wet-clean. Vacuum thoroughly. |
| Rag/Prodded | Gentle setting | Spot clean. Seal back prevents deep penetration | Wipe back with damp cloth only | Air dry flat. Brush after dry. |
Universal Spot Cleaning Protocol:
1. Blot (don’t rub) liquid spills immediately with clean white cloth.
2. Mix 1 tsp mild dish soap (clear, dye-free) + 1 cup cold water.
3. Dip corner of cloth in solution, wring thoroughly.
4. Dab stain from edge inward. Blot with dry cloth.
5. Rinse area by dabbing with cloth dampened only with cold water.
6. Blot dry. Place fan nearby to accelerate drying.
Avoid: Vinegar (may damage wool fibers), bleach (destroys color/fiber), steam cleaners (may loosen adhesives).
Long-Term Durability Practices
- Rotation: Rotate rug 180 degrees every 6 months. Helps prevent uneven wear patterns from foot traffic and sunlight exposure.
- Sunlight Protection: UV rays can fade dyes over time. Use UV-filtering window film or rotate rug frequently. Wool generally fades slower than some synthetics.
- Furniture Pads: Place felt pads under all furniture legs resting on rug. Prevents crushing pile and indentations.
- Pet Considerations: Trim pet nails regularly. For accidents, clean immediately using enzymatic cleaner designed for textiles (test first). Place rug in lower-traffic zone if pets prone to marking.
- Storage: Clean thoroughly before storing. Roll (don’t fold) around acid-free cardboard tube. Wrap in cotton sheet (never plastic—traps moisture). Store in cool, dry, dark place. Place cedar blocks nearby to deter moths (for wool rugs).
Troubleshooting Common Rug-Making Challenges
Even experienced makers encounter obstacles. This section provides precise diagnostics and solutions for frequent pain points, transforming frustration into learning.
Technique-Specific Fixes
Latch Hook / Punch Needle:
– Problem: Loops pulling out during use.
Possible Cause: Canvas tension inconsistent during hooking; yarn too slippery; insufficient backing adhesive.
Solution: Re-hook loose areas with consistent tension. For prevention: Use rug canvas with appropriate hpi (3.75–4.5), choose wool/acrylic blends over very slippery synthetics, apply full-back adhesive after completion.
– Problem: Uneven pile height.
Possible Cause: Inconsistent punching depth or hooking tension.
Solution: Practice on scrap canvas first. Use punch needle depth guide consistently. After completion, trim pile evenly with sharp scissors held flat against surface.
Hand Tufting:
– Problem: “Tunneling” (yarn pulls through backing without forming loops).
Possible Cause: Backing not drum-tight; gun angle incorrect; yarn too thin.
Solution: Re-stretch backing until drum-tight. Hold gun perfectly vertical. Test yarn thickness on scrap backing before starting project.
– Problem: Adhesive not holding tufts.
Possible Cause: Insufficient adhesive coverage; applied too thickly; secondary backing applied too soon/too late.
Solution: Apply adhesive with notched trowel for even coverage. Wait until tacky (follow product instructions) before applying backing. Use roller to ensure full contact. Weight heavily for 24 hours.
Braided / Rag Rugs:
– Problem: Rug curls at edges.
Possible Cause: Coiling too tight; inconsistent stitch spacing.
Solution: During coiling, periodically lay rug flat. Loosen stitches in curled areas. Add extra stitches in flatter sections to balance tension. After completion, place under heavy books for 48 hours.
– Problem: Seams unraveling.
Possible Cause: Strips joined with straight seams; insufficient stitching during coiling.
Solution: Always join strips with diagonal seams. During coiling, stitch every 1–1.5 inches. Reinforce all seams with fabric glue after completion.
Weaving:
– Problem: “Smiles” (curved top/bottom edges).
Possible Cause: Uneven warp tension; beating too hard on edges.
Solution: Re-warp with consistent tension across all threads. Beat weft evenly across entire width. Use temple tool (wooden stretcher) on wide pieces.
– Problem: Weft shows through warp.
Possible Cause: Warp sett too loose; weft not beaten firmly enough.
Solution: For future projects, increase warp ends per inch (epi). During weaving, beat weft firmly until warp threads are just covered.
Universal Challenges
- Problem: Yarn/fabric bleeding color during cleaning.
Prevention: Always pre-wash materials. Test colorfastness: soak scrap in warm soapy water for 30 mins. If water discolors, use color catcher sheets during washing or choose different material. For finished rugs, use cold water only for spot cleaning. - Problem: Rug develops odor (musty, pet-related).
Solution: For surface odors: Sprinkle baking soda liberally, let sit 1 hour, vacuum thoroughly. For deeper odors: Mix 1 part white vinegar + 3 parts water in spray bottle. Lightly mist back of rug only (test first!). Air dry completely in sun if possible—UV light helps neutralize odors. For persistent issues, consult professional rug cleaner. - Problem: Pile matting down in high-traffic areas.
Solution: Regularly brush pile with wire pet slicker brush in direction of nap. For wool rugs, light steaming (hold iron 2+ inches above surface) may revive crushed fibers. Rotate rug frequently to distribute wear.
Your Questions, Answered
Q: How do I choose the right rug size for an open-concept living/dining area?
A: Treat each functional zone separately. Place an 8×10 rug under the living room seating group (front legs of furniture on rug). Position a separate 6×9 or round rug under the dining table, extending 24″ beyond table edges. Ensure at least 18″ of floor space between rug edges for visual separation. This defines zones without overwhelming the space.
Q: Can I make a rug that’s safe for a home with toddlers or pets?
A: Absolutely. Prioritize: 1) Non-slip backing (silicone dots or quality pad), 2) Durable, stain-resistant fibers (wool is ideal—naturally repels stains and hides pet hair), 3) Tight construction (tufted, woven, or tightly braided resists claw snags), 4) Avoid long pile or loose loops that small hands/paws can pull. For nurseries, the no-sew shirred rug offers soft texture with machine-washability.
Q: My latch hook rug is curling at the edges. How do I fix it?
A: This often stems from canvas tension issues during hooking. Lay rug face down on clean surface. Lightly mist the back with water from spray bottle (do not soak). Place under heavy books or boards weighted with cans. Let dry completely (24–48 hours). For prevention: Ensure canvas is drum-tight in frame before starting, and maintain consistent hooking tension. Hemming edges before hooking also stabilizes perimeter.
Q: Is it possible to repair a pulled loop or small tear in a handmade rug?
A: Yes, often invisibly. For pulled loops (tufted/punch needle): Use fine crochet hook to pull loop back through to back. Secure with tiny dot of fabric glue on back. For small tears in woven/braided rugs: Thread matching yarn through tapestry needle. Weave through surrounding fibers on back to close gap. For larger damage, consult a professional rug repair specialist—many offer mail-in services.
Q: How do I prevent colors from bleeding when washing a rag rug made from upcycled fabrics?
A: Prevention is key. Pre-wash all fabric scraps in hot water before cutting strips. Test colorfastness: soak scrap in warm soapy water 30 minutes; if water discolors, discard fabric or use only in hidden layers. During assembly, place darker fabrics between lighter ones to contain potential bleeding. For finished rugs, spot clean only with cold water. If machine washing is unavoidable (small rugs), use cold water, color catcher sheets, and air dry.
Q: What’s the most eco-friendly rug-making approach?
A: Braided rag rugs using 100% upcycled cotton/wool fabrics represent strong sustainability—diverting textiles from landfills with zero new resource consumption. Supplement with: natural dyes (avocado pits, onion skins), GOTS-certified wool for new materials, non-toxic adhesives, and natural rubber non-slip pads. Avoid synthetic backings and petroleum-based glues where possible.
Q: Can I make an outdoor rug using DIY techniques?
A: With significant limitations. Standard DIY rugs (wool, cotton) will mildew and degrade rapidly outdoors. Only consider if: 1) Using 100% solution-dyed acrylic yarn (specifically rated for outdoor use), 2) Employing tufting or weaving on marine-grade backing, 3) Applying UV-resistant, waterproof sealant to entire rug (front and back), 4) Placing under covered patio with no moisture exposure. For true durability and safety, commercial outdoor rugs are strongly recommended. DIY outdoor rugs carry high risk of failure.
Q: How long does a well-made DIY rug typically last?
A: Lifespan varies significantly based on materials, construction, placement, and care. As general guidance:
– High-Traffic Areas (Entryways): Tufted wool rug with proper backing: 5–10+ years. Braided cotton rug: 3–7+ years.
– Medium-Traffic (Living Rooms): Punch needle wool rug: 7–15+ years. Woven rug: 10–20+ years.
– Low-Traffic (Bedrooms, Walls): Any well-constructed rug: 15–30+ years.
Key longevity factors: Fiber choice (wool generally outperforms cotton in durability), secure backing/adhesive, proper non-slip foundation, and rotation/care. Many antique hooked rugs from the 1800s survive today due to wool fibers and sound construction.
Q: I have arthritis in my hands. Are there rug-making techniques suitable for limited dexterity?
A: Yes. Prioritize techniques minimizing repetitive fine motion:
– Best Options: Hand tufting with electric gun (reduces hand strain), large-scale braiding with thick strips (uses larger muscle groups).
– Adaptations: Use ergonomic tools (cushioned handles), work in short sessions with frequent breaks, use frame loom at comfortable height (sitting/standing), employ fabric glue for securing instead of fine stitching where possible. Consult occupational therapist for personalized tool modifications.
Q: How do I store a handmade rug long-term without damage?
A: Clean thoroughly first. Roll rug with the pile facing inward around an acid-free cardboard tube (prevents creases). Wrap rolled rug in breathable cotton sheet or muslin—never plastic (traps moisture, causes mildew). Store horizontally on shelf in cool, dry, dark place. Place cedar blocks nearby to deter moths (essential for wool). Check every 6 months for pests or moisture. For flat storage, place between acid-free tissue paper under light weight—avoid folding.
Q: Can I incorporate personal items like baby clothes or wedding fabric into a rug?
A: Thoughtfully, yes—this creates meaningful heirloom pieces. Critical steps: 1) Pre-wash all sentimental fabrics gently. 2) Stabilize delicate fabrics (silk, lace) by fusing lightweight interfacing to back before cutting strips. 3) Use primarily as accent elements within stronger foundation fabrics (e.g., place baby onesie strip in center of cotton braided rug). 4) Clearly communicate to future owners the rug’s significance and care requirements. For extremely fragile items, consider shadowbox framing alongside a rug made from complementary new fabrics.
Conclusion and Your Next Step
You now hold a comprehensive toolkit—not just for making a rug, but for making the right rug for your life. From the strategic clarity of the Rug Crafting Compass to the material insights, from design awareness to essential safety protocols, this guide transforms aspiration into actionable knowledge. Remember the core truth woven throughout: mastery emerges from completed projects aligned with your reality, not abandoned ambitions chasing perfection. The most meaningful rug is the one you finish, use, and love—imperfections and all.
Recap: The Three Pillars of Lasting Success
1. Compass-Aligned Creation: Honor your Skill Horizon, Temporal Reality, Resource Landscape, and Functional Destination. Start where you are, not where idealized images suggest you should be.
2. Material Integrity: Choose fibers and foundations with intention. Invest in critical components (backing, non-slip solution) while economizing elsewhere. Quality in hidden elements supports longevity.
3. Safety as Standard: Non-slip backing isn’t optional—it’s responsible craftsmanship. Fire awareness and proper maintenance protect your creation and your household.
The 24-Hour Rule: Your Tiny, Transformative Action
Within the next 24 hours, complete this single step: Sketch one rug design on paper. Not for social media. Not for perfection. Simply draw a rectangle representing your intended space. Inside, sketch three circles. Label them:
– Circle 1: “My Reality” (Write: Available hours this month? Budget limit? Primary room for rug?)
– Circle 2: “My Joy” (Write: Which technique excites me? What color brings calm?)
– Circle 3: “My Anchor” (Write: One non-negotiable safety step I will implement)
This 5-minute act bridges knowledge and action. It transforms “someday” into “starting now.” Place the sketch where you’ll see it tomorrow.
The Big Picture: Your Floor, Your Foundation
Every rug you create does more than cover floorboards. It cultivates patience in a hurried world. It honors resourcefulness in a consumptive culture. It embeds your story into the architecture of your daily life—a tactile reminder of your capability. That patch of color and texture becomes a landmark in your home’s emotional geography: where morning coffee is sipped, where children build block towers, where weary feet find comfort. In crafting it, you haven’t just made an object; you’ve woven intention into the very ground you walk upon. The threads you pull today become the foundation you stand on tomorrow. Begin.
Explore Our Complete Textile Crafting System:
The Complete Guide to Natural Dyes for Home Crafts | Sustainable Fiber Guide: Eco-Friendly Choices Decoded | Floor Textiles 101: Choosing Rugs for Hardwood, Tile & Radiant Heat | Textile Art Beyond Rugs: Wall Hangings for Beginners | Budget Crafting: 10 Upcycled Materials Transformed | The Psychology of Color in Home Spaces | Repair & Restore: Breathing New Life into Vintage Textiles