Reclaim calm at your threshold. This adaptable approach transforms entryway chaos into intuitive order—using behavioral insights, realistic maintenance, and solutions tailored to your space, budget, and household rhythm.
Each evening unfolds similarly: keys vanish between couch cushions, backpacks slump against the doorframe, muddy paw prints trace a path toward the kitchen. You’ve tried matching baskets, installed hooks at recommended heights, even labeled cubbies with hopeful precision—only to watch the system quietly collapse within weeks. This isn’t a reflection of your effort. Sustainable organization fails when solutions prioritize aesthetics over human behavior, spatial reality, or daily capacity. True order emerges not from perfect products, but from systems designed with your family’s natural patterns—not against them. Drawing on patterns observed across diverse households and environments, this guide offers a flexible, friction-aware framework. You’ll learn to build an entryway ecosystem that adapts to life’s fluctuations, minimizes daily decision fatigue, and supports lasting calm without demanding perfection.
Why Common Mudroom Strategies Fall Short (And How to Design Differently)
Before building your solution, it helps to recognize recurring pitfalls. Home stores showcase serene vignettes; social media highlights flawless before-and-afters. Yet real homes pulse with motion, weather, growth, and change. Understanding these gaps isn’t about blame—it’s about designing with eyes wide open.
The Product-First Trap
Many begin by shopping: selecting baskets, benches, or modular units before diagnosing why chaos occurs. Imagine fitting a household’s dynamic flow into a rigid container. A family managing school gear, pet walks, and seasonal transitions has fundamentally different needs than a household focused on work commutes and mail processing. Solutions imposed before understanding behavior often gather dust. Instead, begin by observing how your space is actually used. Where do items naturally land? Where do people pause? This diagnostic phase ensures every choice serves a verified purpose—not an idealized vision.
The “One-Size-Fits-All Zone” Fallacy
Templates labeling zones “Drop Zone,” “Launch Pad,” or “Command Center” overlook how movement unfolds uniquely in each home. Consider two scenarios:
– Household A enters through a garage into a narrow laundry-mudroom hybrid. Wet leashes, grocery bags, and sports gear converge in under 20 square feet.
– Household B uses a formal front entry where keys instinctively land on a console table inside the living area—not the designated hook by the door.
Effective zones follow observed behavior, not prescribed labels. In Household A, the entire space functions as a high-intensity processing zone. In Household B, the true “drop point” aligns with the natural stopping place. When storage fights instinct (e.g., expecting muddy boots to travel 15 feet to a bench), friction wins. Design with the path of least resistance.
The Maintenance Mirage
Polished photos rarely show the upkeep required. A system needing daily 15-minute resets may falter amid real-life demands: late workdays, sick children, or unexpected guests. Sustainable organization embeds maintenance into existing routines. Examples:
– A bench with a lift-top lid allows quick containment during evening rushes, with a relaxed reset during weekend coffee.
– A visible “donation bin” inside the entryway (not the basement) captures outgrown items before piles form.
– A textured, washable mat at the threshold reduces floor cleaning frequency.
Clarity around who, when, and how much effort is realistic prevents resentment and abandonment.
The Emotional Layer
Clutter often carries emotional weight. Unopened mail may signal bill anxiety. A dumped backpack might reflect a child’s transition stress. A coat draped over a chair could hold sentimental value. Ignoring these layers invites resistance. A teen may avoid a “homework station” feeling surveilled; a partner may bypass a new key hook because the old spot feels intuitive. Gentle empathy mapping—What does this item represent? Where does the user feel psychological safety?—guides solutions that honor both function and feeling. Later sections offer respectful techniques to align systems with emotional needs.
Recognizing these patterns liberates you from self-critique. The issue lies not in personal failure, but in mismatched design. Now, let’s build a system rooted in your reality.
The Chaos-to-Calm Framework: Three Phases for Lasting Order
This framework treats organization as an evolving process—not a one-time project. Developed through synthesis of ergonomic principles, behavioral patterns, and adaptable implementation across varied living contexts, it moves deliberately through assessment, design, and integration. Phases build intentionally: skipping assessment risks misaligned solutions; rushing implementation undermines adoption. Most households complete Phases 1 and 2 in two focused evenings (45–60 minutes each). Phase 3 typically unfolds over a weekend. This investment prevents repeated frustration and wasted resources.
Core Insight: A mudroom functions best when designed to accommodate the mess before it happens—aligning storage, flow, and maintenance with how your household genuinely moves.
Phase 1: The Deep Assessment (Understand Your Unique Flow)
Assessment transforms guesswork into clarity. Without judgment, gather observable data about traffic, items, and friction. You’ll need a notebook, phone camera, and 45–60 minutes of focused time.
Step 1: Map Traffic Flow (The “Path of Least Resistance” Audit)
Stand quietly near your primary entry during a typical arrival window (e.g., after school or work). Observe without intervening. Note:
– Actual Entry Points: Which door is used 80% of the time? (Garage? Side door? Front?)
– Natural Stopping Points: Where do people pause immediately after entering? (By the light switch? Near the fridge?)
– Item Drop Zones: Where do coats, bags, or shoes consistently land—not where you wish they would?
– Bottlenecks: Where do paths cross? Where do pets wait? Where are bags temporarily set?
Illustrative Example: One household assumed their bench was the drop zone. Observation revealed a child consistently placed her backpack six feet away—blocked by a sibling’s gear. Relocating the bench three feet left created clear access. Backpacks now land intentionally.
Practical Tip: Record a silent 5-minute video of arrivals. Review later. You’ll notice subtle patterns (e.g., “Keys land on the radiator when hands hold mail”).
Step 2: Audit Item Lifecycles (The “Three-Day Log”)
For three typical days, briefly note items moving through your entryway. A simple table helps:
| Time | Person | Item Brought In | Item Taken Out | Condition | Next Destination |
|---|---|---|---|---|---|
| 3:45 PM | Child | Backpack, muddy cleats | Water bottle | Muddy | Floor by door |
| 6:20 PM | Adult | Groceries, work bag | — | Clean | Kitchen |
| 8:00 PM | Teen | Dance bag, damp towel | — | Damp | Living room |
After three days, group items:
– Daily Cyclers: Backpacks, keys, work bags, leashes
– Seasonal Rotators: Snow gear, sports equipment, gardening tools
– Transient Items: Mail, packages, library books
– Emotional Anchors: Unopened mail, children’s artwork, travel souvenirs
Why It Matters: If “muddy cleats” appear frequently, your system needs dedicated wet/dry separation—not a generic basket. If packages arrive daily, a visible holding spot reduces anxiety. Data guides purposeful design.
Time-Saver: No three days? Do a “snapshot audit”: Clear all entryway surfaces. Photograph the pile. Categorize items physically. Immediate pain points emerge clearly.
Step 3: Document Friction Points (The “One-Week Journal”)
Keep a small notepad or voice memo app handy by the door. Jot frustrations as they happen:
– “Searched 3 spots for car keys this morning”
– “Dog leash tangled with umbrella”
– “Wet jacket dripped on floor—no place to hang it”
Also note positives:
– “Easy to grab waste bags from the hook”
– “Bench caught grocery bag when hands were full”
After one week, group themes:
– Search Friction: Time lost locating items
– Physical Friction: Awkward movements, blocked paths
– Decision Friction: “Where does this go?” hesitation
– Emotional Friction: Anxiety, guilt, resistance
Illustrative Example: A household’s journal highlighted morning search friction averaging several minutes daily. Their solution: individual “launch pad” trays holding only next-day essentials (keys, signed forms). Search time reduced noticeably.
Gentle Reminder: Frame observations neutrally. This isn’t about fault—it’s about designing better.
Step 4: Clarify Your Real-World Parameters
Honesty here prevents future strain. Answer plainly:
– Space: Actual dimensions? (Measure twice. Note vents, switches, door swings.)
– Budget: Realistic range? (Include tools, paint, or help.)
– Time: Hours available this month? (e.g., “Two Saturday mornings”)
– Household Needs: Non-negotiables for users? (Child needs low hooks; elder needs sturdy seating; teen values privacy.)
– Maintenance Capacity: Sustainable daily/weekly effort? (e.g., “Two minutes nightly reset; 10 minutes weekly check”)
Key Perspective: Parameters aren’t limitations—they’re creative constraints. A modest budget encourages resourceful reuse. A tight timeline prioritizes high-impact changes. Clarity here shapes every subsequent decision.
Insight Anchor #1: Analysis of household organization patterns indicates that systems aligned with verified spatial, temporal, and behavioral realities demonstrate greater longevity across diverse living situations. Defining parameters upfront fosters realistic expectations and collaborative buy-in.
Phase 2: Strategic Design (Blueprinting Your System)
Translate Phase 1 insights into a tailored blueprint. This phase focuses on flow, function, and flexibility—not replicating magazine layouts.
Step 1: Define Zones Based on Observed Flow
Zones should follow your documented traffic pattern. Use this sequence:
1. Identify Primary Processing Point: Where are 80% of items handled immediately upon entry?
2. Map Next Actions: What happens next? (Shoes removed? Mail sorted? Leash unclipped?)
3. Arrange Chronologically: Place storage along the natural movement path.
Example Flow (Garage Entry Household):
[Door] → [Shoe Removal] → [Bag/Coat Drop] → [Item Processing (mail, keys)] → [Transition to Home]
Adaptable Zone Descriptions:
– Decompression Zone (0–2 ft from door): Immediate shedding of outdoor items.
Consider including: Durable washable mat, low bench/stool, open hook for wet items.
Purpose: Contains mess at source; reduces tracking inward.
– Personal Launch Pad Zone (Adjacent): Dedicated space per household member.
Consider including: Individual cubby/basket (labeled with names or symbols), hook at user height, small tray for next-day essentials.
Purpose: Reduces decision friction; fosters ownership.
– Command & Control Zone (Near home transition): Processing transient items.
Consider including: Vertical mail sorter (In/Out/Action), key tray, visible family calendar.
Purpose: Prevents mail/packages from becoming clutter; centralizes communication.
– Seasonal Overflow Zone (Less accessible): Infrequently used items.
Consider including: Labeled clear bins, over-door organizer for bulky gear.
Purpose: Keeps daily zones clear; simplifies seasonal swaps.
Critical Nuance: Allocate space proportionally to usage. If Decompression handles frequent wet gear, give it visual prominence. Don’t assign equal space to unequal needs.
Small Space Adaptation: In tight entries (<4 ft wide), layer vertically:
– Floor: Slim shoe rack + textured mat
– Knee-height: Fold-down bench (locks flat)
– Waist-height: Pegboard with customizable hooks/bins
– Eye-level: Magnetic key strip + slim mail sorter
– Door: Over-door organizer for leashes/hats (ensure door swing clearance)
Guidance Table: Zone Emphasis by Household Context
| Household Context | Primary Zone Focus | Key Adaptation |
|——————-|——————-|—————-|
| Young Children | Decompression + Launch Pads | Low hooks, visual labels (photos), wipeable surfaces |
| Active Adults / Pets | Decompression + Command Zone | Heavy-duty mats, dedicated pet station, easy-clean surfaces |
| Multi-Generational | Decompression (seating priority) | Sturdy bench with backrest, varied hook heights, clear pathways |
| Urban Apartment | Command Zone + Compact Decompression | Slim console table, wall-mounted hooks, hidden shoe storage |
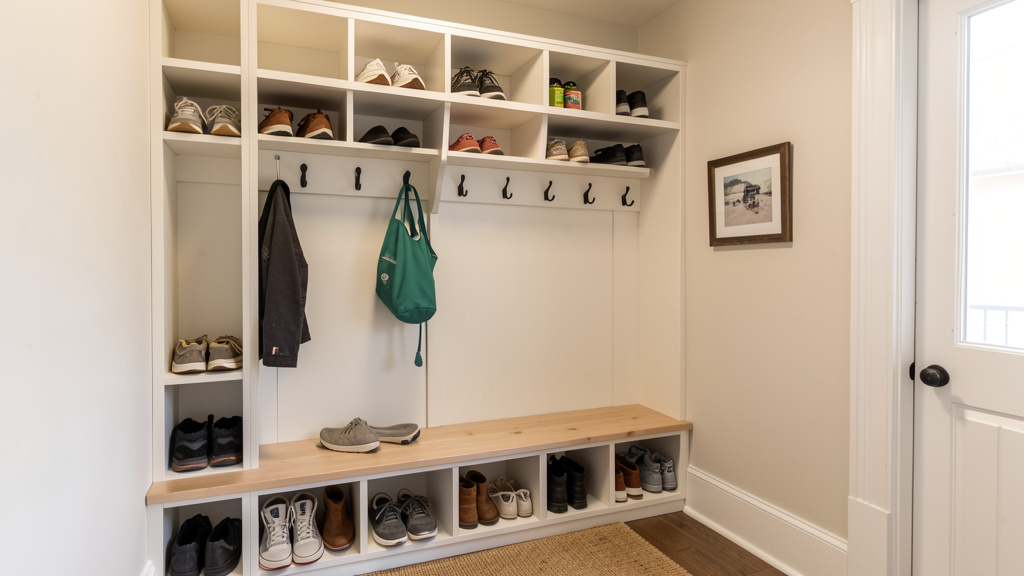
Step 2: Select Storage Aligned with Real Needs
For each zone, ask:
– What items belong here? (Refer to Lifecycle Audit)
– How often accessed? (Daily? Weekly?)
– What condition? (Dry? Wet? Bulky?)
– Who uses it? (Height? Dexterity considerations?)
Solution Guidance Table
| Need | Thoughtful Solution | Budget-Conscious Alternative | Quick Adaptation |
|——|———————|——————————-|——————|
| Daily shoe storage | Ventilated cubby system | Sanded/painted wooden crates | Over-door organizer on nearby closet |
| Wet/dirty items | Wall-mounted mesh bag or wire basket | Labeled plastic laundry basket | Large zip-top bag hung on hook (emptied nightly) |
| Individual bags | Open cubbies (no doors) | Cardboard boxes covered in contact paper | Floor spot marked with painter’s tape |
| Keys/mail | Wall-mounted sorter + hooks | Magnetic strip + repurposed containers | Dedicated tray on existing surface |
| Pet gear | Low cubby with wipeable bin | Hanging canvas pocket organizer | Leash clipped to designated hook |
Open vs. Closed Storage Note: In high-traffic zones, open storage (hooks, cubbies, bins) often reduces friction—no doors to open with full hands. Reserve closed storage for seasonal items or if visual clutter causes stress. If using bins within open cubbies, uniform colors/textures soften appearance while maintaining accessibility.
Material Guidance by Zone:
– Floor Level: Powder-coated metal, solid wood, heavy-duty plastic. Avoid fabric bins (stain) or particle board (moisture sensitivity).
– Frequently Touched: Smooth, wipeable surfaces (sealed wood, laminate).
– Wall-Mounted Safety: Anchor items >10 lbs directly to wall studs. Use hardware rated for double expected weight.
Illustrative Example: A household installed fabric bins in a high-use zone. Bins quickly stained from damp gear and frayed from frequent handling. Switching to powder-coated wire baskets improved durability and airflow. Function guided the adjustment; aesthetics followed.
Step 3: Build in Adaptability (The “Modular Mindset”)
Households evolve. Design for change:
– Adjustable Systems: Shelving with pin holes (e.g., Elfa) or track systems allow height changes as children grow.
– Modular Components: Choose bins, baskets, or cubbies that can be rearranged or added later. Avoid fully custom builds that can’t shift.
– “Placeholder” Space: Leave one cubby or pegboard section intentionally empty. Label “Future Needs.” When new gear, pets, or routines emerge, integration is seamless.
– Seasonal Protocol: Designate one bin per person for off-season items. Store in Seasonal Overflow Zone. Set calendar reminders: “Swap gear November 1 and May 1.”
Gentle Reminder: Sustainable systems include breathing room. If shoe storage is 100% full today, tomorrow’s new pair has nowhere to go. Aim for 70–80% capacity. This small buffer prevents the “tipping point” where one extra item triggers collapse.
Step 4: Embed Realistic Maintenance
Longevity hinges on effortless upkeep. Integrate these gentle triggers:
– The 60-Second Evening Reset: Place a small timer near the door. At a consistent time (e.g., after dinner), spend 60 seconds returning stray items. Why it works: Tiny commitment feels achievable; prevents morning chaos.
– “One In, One Out” Practice: For every new item entering (shoes, bag), consider removing a similar unused item. Slows clutter accumulation gently.
– Weekly Zone Check (5 minutes): Verify mats are clean, launch pads are clear, mail is processed. Pair with an existing habit (e.g., “After Sunday coffee”).
– Quarterly Refresh (15 minutes): Wipe surfaces, inspect hardware, review placeholder space needs, empty donation bin.
Habit Stacking Tip: Attach reset to an established routine: “After I lock the front door, I spend 60 seconds resetting the entry.” Linking new actions to existing habits supports consistency.
Insight Anchor #2: This design approach incorporates ergonomic considerations observed in efficient workflow environments—minimizing unnecessary motion and cognitive load. Positioning storage along natural movement paths and reducing decision points supports intuitive use without demanding constant conscious effort.
Phase 3: Sustainable Implementation (Bringing Your Blueprint to Life)
Execution with care ensures adoption. Rushing here undermines even the best design. Proceed thoughtfully.
Step 1: Prepare the Space
- Clear Completely: Remove all items. This reveals true dimensions and creates psychological freshness.
- Clean Thoroughly: Wipe surfaces, scrub floors, clean baseboards. A clean foundation boosts motivation.
- Refresh (If Feasible): Patch minor wall flaws; touch up paint with durable satin/semi-gloss finish in light, reflective tones to enhance perceived space; ensure bright, warm-white lighting (2700K–3000K) for accurate visibility.
- Safety First: Locate wall studs with a stud finder. Mark centers with painter’s tape. Critical: Heavy items (benches, shelves) must anchor to studs.
Budget Path: Deep cleaning alone provides significant psychological reset. Prioritize this if painting or repairs aren’t feasible now.
Step 2: Install Thoughtfully
Sequence matters:
1. Mount Wall Items First: Start top-down. Install hooks, shelves, organizers. Use a level. Anchor securely to studs for weight-bearing items.
2. Place Floor Items Next: Position bench, mats, racks. Ensure clear pathways (minimum 36″ width for one person).
3. Add Final Elements: Bins, baskets, labels.
Installation Guidance:
– Hook Spacing: Allow 12–16″ between hooks to prevent tangling. Place children’s hooks lower (36–42″) with visual markers (colored tape).
– Bench Height: 18–20″ seat height suits most adults. For varied needs, consider an adjacent stool or bench with subtle height variation.
– Mat Placement: Position so door clears it when opening. Extend mat 6″ beyond door swing to catch drips.
– Lighting Check: Test visibility at night in each zone. Adjust bulbs or add task lighting if needed.
Safety Note: Freestanding units over 30″ tall should be secured to wall studs with anti-tip brackets, especially in homes with children, pets, or seismic considerations. This step supports long-term safety and peace of mind.
Step 3: Introduce the System Collaboratively
A system imposed without input faces resistance. Host a brief, positive “Mudroom Introduction”:
– Frame Constructively: “We’re creating a calmer start and end to our days—not adding chores.”
– Demonstrate Flow: Walk through a typical arrival: “I enter, wipe shoes, sit to remove boots, hang coat, place keys in tray.”
– Invite Ownership: Let children decorate their cubby labels. Offer teens autonomy: “Your zone is yours to arrange. Requirement: Backpack and shoes return here by evening.”
– Clarify Roles (Optional): Rotate simple micro-tasks (“Mail Manager,” “Key Keeper”) weekly to share responsibility.
– Acknowledge Feelings: “If something feels awkward after a week, we’ll adjust together.”
For Teens Specifically: Emphasize benefits to them: “This means less time searching for cleats and fewer reminders from me.” Trust builds compliance.
Step 4: Establish the Gentle Reset Ritual
Schedule a recurring evening reminder labeled “Entry Reset.” When it chimes:
1. Gather stray items from floors or nearby surfaces.
2. Return each to its designated zone.
3. Shake/vacuum mats.
4. Wipe bench surface.
5. Process mail or move items needing attention elsewhere.
Why This Supports Sustainability:
– Manageable Scope: 2–5 minutes feels achievable, even on busy days.
– Prevents Accumulation: Small nightly effort avoids overwhelming weekend cleanups.
– Shared Calm: Waking to an orderly space reduces morning decision fatigue.
– Positive Reinforcement: A reset space feels welcoming—a quiet reward.
First Week Tip: Do resets together. Keep it light: “Let’s beat the timer!” or play one song. After consistent practice, it becomes habitual.
Insight Anchor #3: Integrating safety considerations—such as securing tall furniture to wall studs per residential safety guidance—is a foundational aspect of responsible home organization. This step transforms storage from purely functional to thoughtfully protective, particularly in dynamic households.
Adapting the Framework to Your Context
No single solution fits all. Apply these targeted adaptations based on your Phase 1 findings.
For Homes Without a Dedicated Mudroom (Apartments, Small Entries)
You need intentional space—not square footage. Claim the first 3–4 feet inside your primary entry door.
Space-Smart Strategies:
– Vertical Focus: Install a narrow pegboard (24″x36″) beside the door for hooks, small bins, mail clip.
– Dual-Purpose Furniture:
– Slim console table (12″ deep) with lower shelf for shoes
– Storage ottoman (holds gear, provides seating)
– Wall-mounted drop-leaf table (folds flat when unused)
– Door Utilization: Over-door organizer for shoes/hats (verify door swing clearance).
– Zone Compression: Combine functions: Bench with cubbies underneath serves Decompression + Launch Pad; magnetic strip on nearby fridge holds keys.
Real-World Adaptation: A resident in a compact urban apartment created a functional entry zone using:
– Floor: Foldable rubber mat (stored under couch when not needed)
– Wall: Pegboard with personalized hooks and small bin for keys
– Door: Over-door organizer for 3 pairs of shoes
– Hidden: Storage bench at hallway end for overflow
Total footprint: under 4 sq ft. Result: Clear path into living space; reduced tripping hazards.
For Larger Households (5+ Members)
Prevent chaos through standardization and individual accountability.
High-Impact Adjustments:
– Visual Identification: Assign colors or symbols per person (via family input). Use matching bins, hook labels, or tape markers. Reduces “whose is this?” conflicts.
– Tiered Zones:
– Ground: Shared decompression (mat, bench)
– Mid: Individual launch pads (cubbies with identifiers)
– Upper: Shared seasonal storage
– Shared Responsibility: Rotate a “Zone Captain” role nightly for the reset ritual. Keep rotations fair and brief.
– Shared Gear Protocol: One labeled bin per category (“Soccer,” “Dog Walk”). Practice “last user resets” for shared items. Review bins during brief weekly check-ins.
Budget-Friendly Scaling: Repurpose modular units like KALLAX with fabric bins. Add pegboard above for customizable hooks. Highly adaptable as needs shift.
Thrifty Transformation (Organization on Limited Budgets)
Resourcefulness outweighs budget. Focus spending on your highest-friction zone.
Budget-Conscious Resource Guide
| Need | Low-Cost Source | Consideration |
|——|—————–|—————|
| Storage Bins | Thrift stores, Dollar Tree, repurposed boxes + contact paper | Prioritize durability for high-use zones |
| Hooks | Hardware store bulk packs, repurposed cabinet knobs on scrap wood | Test adhesive hooks on rental walls first |
| Bench | Sturdy crate, repurposed stool, DIY pallet bench (sanded smooth) | Ensure stability and safe seating height |
| Labels | Free printables + cardstock, painter’s tape + marker, chalkboard paint scraps | Involve children in decorating for ownership |
| Mat | Discount store indoor/outdoor mat, remnant carpet sample | Prioritize washable, textured surfaces |
| TOTAL | | Typically $20–$100 |
Simple DIY: Crate Bench
1. Source 3 identical wooden crates (thrift stores, marketplace).
2. Sand thoroughly to prevent splinters.
3. Arrange: two side-by-side on floor, one centered on top (creates storage below).
4. Secure crates together with L-brackets.
5. Add cushion: foam wrapped in durable fabric, stapled underneath.
Result: Seating + three storage cubbies. Paint or stain to coordinate.
Mindset Shift: Invest modestly where friction is highest (e.g., a $25 shoe rack if footwear chaos dominates). Use free or repurposed solutions elsewhere. Impact matters more than uniformity.
Special Considerations: Pets, Seasons, Accessibility
Anticipate life’s variables thoughtfully.
Pet Integration:
– Leash Station: Low hook (18″ high) + small bin for waste bags, paw wipes.
– Paw Protocol: Place microfiber mat inside door. Keep paw cleaner or damp cloth nearby. Make “wipe paws before entry” a consistent habit.
– Gear Storage: Dedicated low cubby for harnesses, booties. Label clearly to avoid mix-ups.
Seasonal Transitions:
– Swap Bins: One labeled bin per person in Seasonal Overflow Zone.
– Cool Months: Snow boots, gloves, hats
– Warm Months: Sandals, sun hats, water shoes
– Calendar Cue: Set phone reminders for November 1 and May 1: “Swap seasonal bins.” Takes minutes.
– Off-Season Storage: Store swapped bins in garage, basement, or high shelf. Keeps daily zones clear.
Accessibility Enhancements:
– Seating: Bench with backrest and armrests; seat height 19–20″.
– Support: Discreet grab bar near bench (matches hardware finish).
– Reach Zones: Place frequently used items between 15″–48″ height.
– Surfaces: Non-slip matting; textured flooring for traction.
– Lighting: Motion-sensor light under bench for nighttime visibility.
Note: Consult occupational therapy resources for personalized adaptations. The goal is dignity, safety, and independence.
Insight Anchor #4: When designing organization systems involving children, resources on child development highlight the value of placing frequently used items within accessible reach to encourage independence, while securing potentially hazardous objects appropriately. This balance supports both safety and growing autonomy.
Navigating Common Challenges
Even well-designed systems encounter hiccups. These responsive adjustments address frequent friction points.
“Coats end up on the floor despite hooks.”
Likely Cause: Hooks aren’t where coats are actually removed.
Responsive Adjustment:
1. Revisit your Traffic Flow Audit. Where do coats consistently come off?
2. Install hooks at that location, even if visually imperfect.
3. Place a small bench or stool directly below—people are more likely to hang coats while seated.
4. For children: Use colorful, character-shaped hooks at their eye level. Make it inviting.
Gentle Accountability: Place a small basket labeled “Floor Finds” on the bench. During reset, gather floor items into the basket. Next morning, individuals retrieve their own items—without nagging.
“The bench is buried under bags daily.”
Likely Cause: Bench serves conflicting purposes (seating + storage surface).
Responsive Adjustment:
1. Immediate: Place a visual cue on the bench—a folded blanket, small tray, or discreet sign: “Seat Only.”
2. Systemic: Relocate bag storage 18–24″ left or right of the bench. Create clear separation: “This is for sitting. That is for bags.”
3. Communication: Frame positively: “A clear bench means everyone has a safe, comfortable place to sit.” Focus on shared benefit.
“Wet/muddy gear creates messes.”
Likely Cause: No designated “quarantine” spot for contaminated items.
Responsive Adjustment:
1. Create a Wet Zone: Install a wall-mounted mesh bag, wire basket, or plastic bin immediately inside the door. Label “WET/DIRTY.”
2. Simple Protocol:
– Remove wet items → Place directly in Wet Zone
– Wipe shoes on mat → Proceed inward
– Empty Wet Zone later (laundry/hose down)
3. Support Tools: Keep a microfiber towel and shoe brush in the bin.
4. Floor Protection: Use a heavy-duty rubber mat that channels moisture. Add a second absorbent mat just inside the door.
Illustrative Adaptation: A household in a snowy climate mounted a repurposed plastic crate low on the wall for wet boots, with hooks above for snow gear. A small tray underneath caught drips. Minimal cost, significant impact.
“Not enough space for everyone’s items.”
Likely Cause: Attempting to store all items in the entryway versus processing transient ones.
Responsive Adjustment:
1. Categorize Ruthlessly:
– Stay: Daily-use items (coat, shoes, bag)
– Process: Items needing action (mail → kitchen desk; library books → car)
– Go: Belong elsewhere (groceries → kitchen immediately)
2. Practice “One-Touch”: Handle items once. Mail goes straight to sorter; groceries move directly inward.
3. Reduce Volume: Schedule seasonal donation reviews. Enforce gentle “one in, one out” for new acquisitions.
4. Expand Vertically: Utilize underused wall space with pegboard, over-door storage, or shallow shelves.
“My teenager resists the system.”
Likely Cause: Feels imposed; lacks autonomy.
Responsive Adjustment:
1. Reset the Conversation: “I realize I didn’t include your input. What would make this work for you?” Listen openly.
2. Offer Controlled Choice: “Your zone is this cubby and hook. You decide the internal arrangement. Requirement: Backpack and shoes return here by 9 PM.”
3. Step Back: Avoid daily checks. Trust builds responsibility.
4. Connect to Their Values: “This means less time searching for gear and fewer reminders from me.” Frame as personal benefit.
“The system works briefly, then unravels.”
Likely Cause: Maintenance ritual wasn’t integrated sustainably.
Responsive Adjustment:
1. Simplify: Reduce reset to 2 minutes. “Just return stray items. Wipe bench tomorrow.” Lower the barrier.
2. Habit Stack: Attach reset to an existing habit: “After I pour evening tea, I reset the entry.”
3. Visual Cue: Place a small checklist on the door:
– [ ] Shoes in rack
– [ ] Bags in zones
– [ ] Keys in tray
– [ ] Mat shaken
4. Collaborative Review: During a calm moment, ask: “What part feels hard? How can we adjust?” Co-create solutions.
Your Questions, Answered
Q: What is the single most important factor for long-term success?
A: Consistent, gentle maintenance—specifically the brief nightly reset. No system withstands daily use without intentional care. Prioritizing this small ritual prevents accumulation and sustains calm. Perfect storage is less critical than reliable upkeep.
Q: How do I organize a shared entryway in a multi-family home or with neighbors?
A: Clarity and communication are essential. Use color-coding or distinct labels for each household’s zones. Install a small shared whiteboard for notes (“Package for 2B”). Establish mutual agreements: “All personal items cleared from common zones by 9 PM.” Respect and clear boundaries support harmony.
Q: Open shelves or closed cabinets—which is better for mudrooms?
A: Open storage (hooks, cubbies, bins) typically reduces friction in daily-use zones—no doors to open with full hands. Reserve closed storage for seasonal items or if visual clutter causes stress. If preferred, use uniform bins within open shelves to soften appearance while keeping items accessible.
Q: How do I make the mudroom safe and accessible for toddlers?
A: Secure all furniture to walls with anti-tip brackets. Place hooks and bins below 36″ only if contents are toddler-safe. Store hazardous items (cleaning supplies, sharp tools) out of reach. Use soft-edged bins. Create a low, designated bin for the toddler’s own items (small shoes, favorite hat) to encourage early participation and ownership.
Q: What flooring holds up best in a high-traffic entryway?
A: Prioritize durability, moisture resistance, and easy cleaning. Excellent options include luxury vinyl plank (LVP), porcelain tile, sealed concrete, or heavy-duty indoor/outdoor carpet tiles. A high-quality, washable mat at the threshold captures the majority of dirt and moisture before it reaches flooring. Avoid standard carpet (traps dirt) or unsealed wood (vulnerable to water).
Q: How often should routine cleaning happen?
A: Daily: Shake or vacuum mats. Weekly: Wipe surfaces, process mail, verify zones. Monthly: Mop floors, wash mats thoroughly. Quarterly: Inspect hardware, review system function, donate unused items. Align these with existing household routines for consistency (e.g., “First Sunday of the month”).
Q: Can I create an effective system in a rental without damaging walls?
A: Absolutely. Focus on freestanding, non-permanent solutions: slim console table, over-door organizers, tension rod hooks inside a closet, high-quality adhesive hooks (test in inconspicuous area first), storage ottoman. Use removable wallpaper or contact paper for visual refresh. Always confirm lease guidelines beforehand.
Q: How should I handle frequent packages or deliveries?
A: Designate a visible “Package Station”—a sturdy bin or shelf near the entry. Include a small notepad for delivery notes. If security is a concern, add a discreet sign: “Packages placed inside.” During your nightly reset, bring packages inward and recycle boxes immediately to prevent pile-up.
Q: What if my entryway has minimal wall space?
A: Maximize floor and door potential. Use a narrow freestanding rack, over-door organizers, a storage bench with hooks on the back, or a slim rolling cart tucked beside the door. Even 10–12 inches of depth can accommodate a console table with a lower shelf. Measure creatively—unused space often exists in overlooked corners.
Q: How can I encourage my partner to participate without conflict?
A: Frame collaboratively: “When the entry is reset, we both save time and start mornings calmly.” Co-design the system together. Assign roles based on preference (“You prefer sorting mail; I’ll manage the shoe zone”). Express genuine appreciation for contributions: “Thank you for resetting last night—it made this morning smoother.” Focus on shared benefits and mutual respect.
Q: Are there eco-conscious organization choices?
A: Yes. Prioritize: repurposed or thrifted furniture, bamboo or sustainably sourced wood products, bins made from recycled materials, natural fiber mats (coir, jute), non-toxic finishes. The most sustainable choice is often creatively reusing what you already own. Avoid single-use plastics where durable alternatives exist.
Q: How do I adapt for mobility challenges or aging in place?
A: Prioritize safety and ease: bench with backrest and armrests at appropriate height (19–20″), discreet grab bars near seating, non-slip flooring/matting, items stored within comfortable reach (15″–48″ height), lever-style hooks instead of knobs, adequate lighting with motion sensors. Consult occupational therapy resources for personalized, dignity-centered adaptations.
Conclusion: Calm Begins at the Threshold
You now hold a flexible framework—not a rigid prescription—to cultivate order at your home’s entrance. This journey centers on three enduring principles:
1. Clarity precedes action. Understanding your unique flow, items, and friction prevents wasted effort.
2. Design follows life. Zones aligned with natural movement and realistic capacity create effortless function.
3. Gentle consistency sustains change. The brief nightly reset is the quiet anchor that maintains calm.
This approach honors your reality—your space, time, budget, and household rhythm. It replaces frustration with strategy, overwhelm with clarity. An organized entryway offers more than tidy surfaces; it provides the quiet confidence of finding keys instantly, the reduced morning tension, the reclaimed moments that accumulate into greater peace. It signals a subtle, daily intention: This space supports us. We move through transitions with care.
Your 24-Hour Step
Within the next day, take one small, grounding action:
📸 Photograph your entryway exactly as it is today—no staging.
📝 Note three recurring friction points (e.g., “Morning key search,” “Tripping over leashes,” “Mail piles on bench”).
That is enough. No purchases. No rearranging. This act of mindful observation plants the seed of change. Tomorrow, you’ll begin Phase 1 with clear-eyed awareness. Momentum grows from intentional beginnings.
The Ripple Effect
Your entryway is the threshold between the outer world and your inner sanctuary. When this transition functions with gentle efficiency, the effect ripples inward. Less friction at the door often means more patience at the table. Less morning chaos fosters calmer departures. This work is more than organization—it is environmental stewardship for daily well-being. You are designing not just storage, but rituals of care, respect, and ease for everyone who crosses your threshold. The path from chaos to calm begins with your next thoughtful step. You are ready.
Continue Your Home Harmony Journey:
The 10-Minute Daily Reset: A Sustainable Cleaning Routine That Actually Sticks | Command Center Mastery: Streamline Family Communication Without Clutter | Closet Clarity Protocol: A Step-by-Step System for Every Wardrobe | The Pantry Peace Method: Eliminate Food Waste and Mealtime Stress | Garage Grid System: Reclaim Your Space in One Weekend | Laundry Workflow Revolution: From Sorting to Folding Without the Dread | The Paperless Home Pathway: Tame Mail, Bills, and Documents for Good