Your Step-by-Step Action Plan for Every Leak, Burst Pipe, and Water Crisis—From Immediate Response to Long-Term Prevention
When water erupts where it shouldn’t—gushing from a fractured pipe, flooding beneath a malfunctioning toilet, or seeping relentlessly from an unseen crack—panic is the natural first reaction. But in those critical seconds, knowledge becomes your most powerful tool. This definitive guide transforms uncertainty into confident action, providing meticulously detailed instructions for locating every shutoff point in your home, executing precise emergency repairs under pressure, and implementing fail-safe prevention strategies. Save this resource now; when crisis strikes, you’ll have the exact roadmap to minimize damage, protect your property, and restore calm.
Introduction
Water emergencies escalate rapidly: even a small leak can release substantial water over time, and a major rupture can cause significant flooding within minutes. This water can quickly saturate building materials, leading to structural damage and creating conditions for mold growth. Importantly, many severe outcomes result not from the initial leak itself, but from delays or errors in shutting off the water supply. Understanding and acting on your home’s water control system is therefore a critical aspect of property stewardship, aligned with established safety practices worldwide. This guide dismantles confusion through systematic methodology. We move beyond fragmented tips to deliver a unified, scenario-tested protocol applicable to apartments, historic homes, modern builds, and everything in between. Whether you face a dripping faucet or a main-line rupture, the principles herein provide clarity when seconds matter most. Your journey toward water emergency mastery begins not with tools, but with mindset—a commitment to preparedness that transforms vulnerability into resilience.
The STOP Framework: Your Cognitive Anchor in Crisis
Before examining valves or wrenches, internalize a mental model designed for high-stress execution. The STOP Framework—Safety, Trace, Operate, Prevent—creates an unbreakable sequence that overrides panic. Unlike fragmented checklists found elsewhere, STOP functions as a cognitive circuit breaker. When adrenaline surges, the brain defaults to ingrained patterns. By rehearsing this four-phase rhythm before emergency strikes, you install a neural pathway that activates automatically under pressure. Safety prevents compounding disasters. Tracing eliminates wasted effort on symptoms rather than sources. Operating with precision ensures flow cessation on the first attempt. Prevention transforms reactive trauma into proactive control. This approach reflects principles found in emergency response guidelines for plumbing incidents. Remember this mantra: “Secure yourself, find the origin, stop the source, safeguard the future.” Let it become your anchor.
The Fundamental Principle: Water follows the path of least resistance—but your response must follow the path of greatest intention. Every action taken before locating the correct shutoff valve is not preparation; it is acceleration of damage.
Why Frameworks Trump Fragmented Tips
Consider two homeowners facing identical burst pipes under the kitchen sink. Homeowner A recalls a blog snippet: “Turn the valve clockwise!” They frantically twist the nearest handle—only to discover it controls the hot water line while cold water continues gushing from a separate supply. Precious minutes evaporate. Homeowner B activates STOP:
– Safety: Immediately unplugs the nearby dishwasher (electrical hazard), places a non-slip mat on the wet floor.
– Trace: Uses a flashlight to confirm the rupture originates at the cold supply line connection.
– Operate: Locates the dedicated cold water angle stop valve (distinct from the hot water valve), turns it firmly clockwise until resistance is met. Flow ceases promptly.
– Prevent: Notes the valve’s stiffness for future maintenance; places absorbent pads beneath the connection point.
The difference isn’t luck or prior plumbing knowledge—it’s structured cognition. Fragmented advice creates decision gaps. Frameworks close them. Throughout this guide, STOP will reappear as your navigational compass, ensuring no critical phase is overlooked regardless of scenario complexity.
Step 1: Safety First—Non-Negotiable Protocols Before Touching a Valve
Water emergencies compound rapidly when secondary hazards emerge. Electricity and water form a lethal alliance; structural saturation creates slip-and-fall risks; contaminated water introduces health threats. Safety isn’t a preliminary step—it’s the continuous thread woven through every subsequent action. Ignoring this phase risks transforming a manageable leak into a life-threatening incident.
Electrical Hazard Mitigation: The Invisible Threat
Water conducts electricity with terrifying efficiency. A leak near an outlet, appliance, or junction box can electrify standing water, metal pipes, or even damp flooring. Before approaching any water source:
– Locate your electrical panel immediately. Do not walk through standing water to reach it. If water has pooled near the panel, evacuate and call emergency services.
– Shut off power to affected zones: Flip breakers controlling circuits in the leak area (kitchen, bathroom, basement). When in doubt, shut off the main breaker.
– Unplug appliances remotely: Use a dry wooden broom handle to knock plugs from outlets near water. Never touch cords or appliances with wet hands or while standing on a wet surface.
– Critical exception: If water is actively spraying onto the electrical panel, do not approach. Evacuate the home and call emergency services.
Real-world insight: Documented incidents show that electrical hazards during water emergencies are preventable through proactive power disconnection. Safety protocols exist because physics offers no second chances.
Personal Protection and Environmental Stabilization
- Footwear: Slip-resistant shoes with closed toes are mandatory. Bare feet or socks invite injury from hidden debris (glass, metal shards) and increase electrocution risk.
- Gloves: Wear waterproof gloves (nitrile or rubber) to protect against contaminated water (sewage backups, chemical residues) and sharp pipe edges.
- Visibility: Use a hands-free LED headlamp or position a bright lamp away from standing water to avoid shadowed hazards. Flashlights held in hand limit dexterity during valve operation.
- Ventilation: For leaks involving sewage (toilet overflows, main line backups), open windows and doors before approaching. Hydrogen sulfide gas from decomposing waste causes dizziness and respiratory distress in confined spaces.
- Evacuation triggers: Leave immediately and call emergency services if you observe: structural sagging (ceiling/floor), hissing near gas lines (rotten egg smell), or electrical arcing/sparks.
Containment as Safety: Buying Critical Time
While safety protocols unfold, initiate passive containment without diverting focus from hazard mitigation:
– Slide thick towels or absorbent mats along the perimeter of spreading water to slow migration toward electrical outlets, baseboards, or adjacent rooms.
– Place buckets beneath active drips only if it doesn’t require reaching into hazardous zones (e.g., over electrical cords).
– Never attempt to “mop up” major flows—this wastes time better spent stopping the source. Containment is about redirection, not elimination.
Safety transforms chaos into controlled response. By securing your environment first, you create the stable foundation required for precise valve operation. Rushing past this phase risks injury, escalates damage, and undermines every subsequent step. Rehearse these actions mentally now: “Power off. Footwear on. Gloves on. Assess hazards.” Embed this sequence until it becomes instinct.
Step 2: Trace the Source—Precision Diagnosis Before Action
Misidentifying the leak origin is a common—and costly—error in water emergencies. Turning off the bathroom sink valve won’t stop a ruptured main line feeding the entire house. Tracing requires methodical observation, not assumption. Follow this diagnostic sequence:
Phase 1: Initial Observation (15 Seconds)
Stand back. Observe without touching. Ask:
– Where is water emerging? Note the exact point: base of toilet tank, seam of pipe joint, ceiling stain directly below an upstairs bathroom.
– What is the flow character?
– High-pressure spray: Indicates pressurized supply line failure (hot/cold water lines). Requires immediate shutoff.
– Steady drip: Often a loose connection or failing washer. May allow brief time for targeted shutoff.
– Slow seep/saturation: Suggests hidden leak (inside wall, under slab) or drain line issue. Less urgent for shutoff but critical for damage control.
– Gushing with debris: Signals major pipe rupture (freeze burst, corrosion failure). Highest urgency.
– Is water clear, discolored, or contaminated? Brown water suggests sediment disturbance; black/gray water indicates sewage contamination (requires biohazard protocols).
Phase 2: Strategic Isolation Testing
If the source isn’t visually obvious (e.g., water pooling in basement with no visible pipe):
1. Check all fixtures in the affected zone: Flush toilets, run faucets briefly. Does flow intensity change? If water volume increases when a specific faucet runs, that fixture’s supply line is likely compromised.
2. Listen for hissing or rushing: Press your ear against walls near the leak (use a paper towel tube as a stethoscope). Follow the sound to its origin.
3. Inspect shutoff valves: Are any valves already partially closed? A valve left halfway shut can cause vibration-induced failure downstream.
4. Check appliance connections: Washing machines, dishwashers, refrigerators with ice makers are frequent sources of substantial indoor water damage. Look behind units for pooled water or detached hoses.
Phase 3: Mapping the Flow Path
Water travels downward and along paths of least resistance. Trace backwards from the visible water:
– Ceiling leak? Water likely originated from a fixture above (upstairs bathroom, attic water heater). Check directly overhead.
– Baseboard moisture? Follow the wall inward. Leaks often travel horizontally inside walls before emerging at floor level.
– Floor pooling near exterior wall? Could indicate failed outdoor hose bibb, irrigation line breach, or foundation seepage (less urgent for indoor shutoffs).
Critical diagnostic nuance: A leaking drain pipe (carrying wastewater away) requires different action than a leaking supply pipe (carrying pressurized freshwater in). Supply line leaks worsen under pressure; drain leaks often slow when water usage stops. How to distinguish:
– Supply leak: Water flows continuously even when no faucets/toilets are used. Stops immediately when main shutoff is closed.
– Drain leak: Water appears only during/after using a fixture (sink drains, toilet flushes). Stopping water usage halts the leak; shutoff valves are irrelevant.
Misdiagnosis example: A homeowner sees water under the kitchen sink and assumes a supply line failure. They frantically search for shutoff valves while the actual culprit—a cracked P-trap drain pipe—continues leaking wastewater with every dish washed. Tracing reveals the leak occurs only when the sink drains. Solution: Place a bucket under the trap; no shutoff needed. Precision tracing prevents wasted effort and incorrect interventions.
Step 3: Operate the Correct Shutoff Valve—The Definitive Room-by-Room Guide
This is the operational core of water emergency response. Success hinges on knowing which valve controls which component, where it’s located, and how to operate it correctly. We dissect every valve type, location, and scenario with surgical precision. Memorize this section. Practice locating these valves in your home today.
Understanding Valve Anatomy: Types, Locations, and Operation Logic
Valves are not interchangeable. Forcing the wrong technique destroys them. Master these four primary types:
Gate Valves (Common on Older Main Lines)
- Appearance: Wheel-shaped handle (like a ship’s wheel) atop a tall stem. Often found on main shutoffs in homes built before 1990.
- Operation: Turn handle clockwise (righty-tighty) multiple full rotations until firmly closed. Critical nuance: Never force beyond firm resistance. Overtightening shears the internal gate mechanism, rendering the valve useless. If stiff, apply penetrating oil (PB Blaster), wait 10 minutes, and turn gently with steady pressure.
- Failure sign: Handle spins freely without resistance = internal mechanism broken. Proceed to street shutoff (Section 3.4).
- Regional note: In UK/EU homes, gate valves on mains are often housed in external “stopcock chambers” near property boundaries—typically a small metal cover in the pavement.
Ball Valves (Modern Standard for Mains and Fixtures)
- Appearance: Short lever handle. When lever is parallel to the pipe, valve is OPEN. When lever is perpendicular (90 degrees), valve is CLOSED.
- Operation: Rotate lever ¼ turn clockwise until it stops against the pipe. Critical nuance: Ball valves require minimal force. If lever won’t move, do not use a wrench. Apply penetrating oil to the pivot point; tap handle gently with a rubber mallet to free corrosion. Forcing breaks the internal ball seal.
- Advantage: Instant visual confirmation of open/closed status. Highly reliable with minimal maintenance.
- Metric context: Commonly labeled “¼ turn” or “ON/OFF” in EU installations; pipe sizes referenced in mm (e.g., 15mm, 22mm).
Compression/Angle Stop Valves (Under Sinks, Behind Toilets)
- Appearance: Small oval or round handle (often chrome) on a valve body angled toward the fixture. Controls individual hot/cold lines.
- Operation: Turn handle clockwise until snug. Critical nuance: These valves seize frequently due to infrequent use. If handle spins freely:
- Do not overtighten. You’ll crack the valve body.
- Use channel-lock pliers on the valve body (not the handle) for counter-pressure while turning the handle.
- If completely frozen, proceed to main shutoff (Section 3.1).
- Identification tip: Two valves under a sink = hot (left) and cold (right). Single valve behind toilet = cold water supply.
Push-Button Valves (Modern Appliances: Washing Machines, Ice Makers)
- Appearance: Red (hot) or blue (cold) plastic button on a small valve body.
- Operation: Press button inward firmly until it clicks/stops. To reopen, pull button out.
- Failure mode: Buttons jam due to mineral buildup. If unresponsive, locate the dedicated appliance shutoff valve (often nearby in laundry room wall) or use main shutoff.
3.1 The Main Water Shutoff Valve: Your Master Control
This valve halts all freshwater entering your home. Locating and testing it before emergency is non-negotiable preparedness.
Where to Find It (Room-by-Room Search Protocol):
– Basement (Most Common in US/Canada): Follow the main water pipe entering the foundation wall. Valve is typically within 3–5 feet of entry point, often near the water heater. Look along the perimeter walls.
– Crawlspace: Enter with headlamp. Trace the main supply line from foundation entry inward. Valve is usually mounted on the pipe before it branches. Safety: Wear knee pads; watch for sharp debris.
– Garage: Common in slab-on-grade homes (Southwest US, Florida). Check near the front wall where municipal line enters. Often inside a recessed box.
– Utility Closet: In condos/apartments, check near the water heater or HVAC unit. May be behind a removable panel.
– Exterior (Warm Climates): Mounted on an outside wall near the street-side foundation. Protected by a hinged metal or plastic cover.
– UK/EU Specific: External stopcock in pavement (front garden/path); internal stopcock under kitchen sink or in hallway cupboard. Building regulations require accessibility.
– Apartment Dwellers: You may not have access. Immediately notify building management. Know your building’s emergency protocol.
Operation Protocol:
1. Confirm valve type (Gate vs. Ball—see Section 3.0).
2. For gate valves: Turn clockwise slowly until firm resistance. Do not “crank” it shut.
3. For ball valves: Rotate lever 90 degrees clockwise until perpendicular to pipe.
4. Verify closure: Open the highest faucet in the house (upstairs bathroom sink). Water should sputter and stop within moments. Then open the lowest faucet (basement/hose bibb) to drain residual pressure.
5. If valve fails: Proceed immediately to Section 3.4 (Street Shutoff).
Preventive Maintenance (Do This Quarterly):
– Turn valve fully open, then fully closed, then reopen. This prevents seizing.
– Lubricate gate valve stems with silicone-based grease (not WD-40—it attracts dust).
– Consider replacing corroded gate valves with quarter-turn ball valves (consult a plumber). This upgrade significantly enhances reliability during emergencies.
3.2 Individual Fixture Shutoffs: Targeted Control for Precision Response
Stopping flow at the source minimizes disruption. Why shut off the entire house for a leaking toilet? Master these location-specific protocols:
Under-Sink Valves (Kitchen, Bathroom, Utility Sink)
- Location: Directly beneath the faucet, attached to hot/cold supply lines.
- Identification: Two valves (left = hot, right = cold). Handles may be small knobs or levers.
- Operation: Turn clockwise until snug. Test by turning faucet on—water should not flow.
- Stuck valve solution:
- Spray penetrating oil on stem. Wait 10 minutes.
- Grip valve body firmly with one hand (prevents pipe torque), turn handle with other.
- If handle breaks: Use adjustable wrench on the square stem protruding from valve body. Turn clockwise.
- Pro Tip: Install color-coded valve tags (red/blue) during maintenance for instant identification in low light.
Toilet Shutoff Valve
- Location: Low on wall behind toilet tank, connected to flexible supply tube.
- Challenge: Tight space; valve often obscured by tank. Use a mirror and headlamp.
- Operation: Turn knob clockwise until tight. Flush toilet to confirm tank doesn’t refill.
- Critical nuance: Older toilets may lack individual shutoffs. If absent, use main shutoff. Consider adding one during next repair.
Water Heater Shutoffs
- Cold Water Inlet Valve: Located on the pipe entering the top of the tank (usually right side). Close this first to stop cold water feeding the tank.
- Hot Water Outlet Valve (If Present): On pipe exiting top of tank (left side). Close after cold inlet to isolate tank.
- Drain Valve: At tank base. Never use to stop flow. Only for draining.
- Emergency protocol for leaking tank:
- Shut off cold inlet valve.
- Shut off power/gas to heater (prevents dry-firing).
- Attach garden hose to drain valve; run to floor drain. Open drain valve to empty tank.
- Do not attempt to repair a leaking tank. Contact a professional for replacement.
Appliance Shutoffs
- Washing Machine: Two valves (hot/cold) on wall behind machine. Turn both clockwise. Critical: Unplug machine first (electrical hazard from water contact). Slide machine out carefully—check floor for pooled water.
- Dishwasher: Valve typically under sink adjacent to dishwasher hose. May require removing sink cabinet base panel.
- Refrigerator (Ice Maker/Water Dispenser): Small valve on cold water line under sink or in basement ceiling below fridge. Turn clockwise. May require moving fridge slightly.
- Water Softener/Filter Systems: Bypass valve assembly on unit. Rotate handles to “BYPASS” position per manufacturer diagram (usually labeled). Consult manual before emergency.
3.3 Outdoor and Irrigation Shutoffs
Outdoor leaks waste significant water and undermine foundations.
Hose Bibbs (Spigots)
- Frost-Proof Bibb (Common in Cold Climates): Shutoff valve is inside the house wall, at the end of the long stem. To close: Turn handle clockwise until tight. Water drains from stem when closed.
- Standard Bibb: Valve mechanism is at the spigot itself. Turn handle clockwise. Vulnerability: Prone to freeze bursts if left connected to hose in winter.
- Emergency fix for leaking bibb: If valve won’t close, wrap tightly with self-fusing silicone tape (keep in emergency kit). Temporary seal until repair.
Irrigation/Sprinkler Systems
- Location: Dedicated shutoff valve near main line entry, often in basement utility area or external valve box.
- Operation: Close valve supplying the irrigation zone. Many systems have a manual override on the controller to stop active cycles.
- Winter caution: In freezing temps, a ruptured irrigation line can flood basement if main shutoff isn’t closed.
3.4 When All Else Fails: The Street Shutoff (Curb Stop)
If your main shutoff is broken, inaccessible, or nonexistent, the municipal curb stop is your final recourse. This requires coordination with authorities—but knowing the process saves critical time.
- Location: Underground near property line, typically under a round metal cover (6–12″ diameter) in the sidewalk or parkway. Marked “WATER” or with a valve key symbol.
- Access Protocol (US/Canada):
- Call your water utility immediately. Explain: “I have an active water emergency; my main shutoff is inoperable. I need the curb stop closed.”
- Do not attempt to open the cover yourself. Specialized tools (curb key) and training are required. Unauthorized operation may violate ordinances and damage infrastructure.
- While waiting: Contain water flow with towels/buckets. Shut off electricity if water approaches panels.
- Utility response time: Typically 30–90 minutes for emergencies. Ask for estimated arrival.
- UK/EU Context: Contact your water company (e.g., Thames Water, Severn Trent). External stopcocks are their responsibility to operate. Provide exact address and nature of emergency.
- Critical preparation: Locate your curb stop now. Note landmarks (“3 feet left of driveway edge”). Take a photo. Share location with household members.
Valve Operation Troubleshooting Guidance
| Symptom | Likely Cause | Immediate Action | Long-Term Fix |
|---|---|---|---|
| Handle spins freely | Internal stem disconnected | Proceed to next upstream valve (e.g., street shutoff) | Replace valve |
| Handle won’t turn | Corrosion/seizing | Apply penetrating oil; wait 10 min; gentle tapping | Replace with ball valve |
| Water leaks around handle | Packing nut loose | Tighten nut slightly with wrench (¼ turn) | Repack valve or replace |
| Valve body cracks when turned | Overtightening/fatigue | Close upstream valve immediately; contain leak | Full valve replacement |
| Ball valve lever stuck mid-position | Debris in ball cavity | Tap handle gently with rubber mallet | Disassemble/clean or replace |
Mastering valve operation transforms you from a panicked reactor into a precise responder. This knowledge compounds: each successful shutoff builds confidence for the next challenge. But operation is only half the battle—what happens after the flow stops determines long-term recovery.
Step 4: Prevent Further Damage—Immediate Post-Shutoff Actions
Stopping the flow is victory one. Preventing secondary damage is victory two. Water’s destructive power continues through saturation, humidity, and contamination long after the source is sealed. Execute this sequence methodically.
Damage Containment Protocol
- Extract Standing Water:
- Use wet/dry vacuum for pools >¼ inch deep. Start from edges, work inward.
- For smaller amounts: Layer thick cotton towels (terry cloth) directly on water. Weight edges with books to maximize absorption. Replace saturated towels immediately.
- Never use standard household vacuum—electrocution and motor destruction risk.
- Redirect Residual Flow:
- Place buckets under dripping pipes after shutoff to catch trapped water draining from lines.
- Angle warped floorboards with shims to channel water toward drains.
- Document for Insurance (Critical Step):
- Photograph/video before cleanup: Wide shots showing extent, close-ups of leak source, water depth markers (ruler in frame).
- Note date, time, and weather conditions.
- Save damaged items (e.g., warped floorboard) in sealed bag as evidence.
- Do not discard anything until insurance adjuster approves.
Material-Specific Response Guidance
Different materials demand tailored approaches. Missteps here cause irreversible damage.
| Material | Immediate Action | What NOT to Do | Recovery Notes |
|---|---|---|---|
| Hardwood Floors | Remove baseboards; insert dehumidifier hoses between floorboards. Place fans across grain (not perpendicular). | Never sand or refinish while damp. Avoid heat guns (warping). | Professional assessment and drying equipment are typically required. Drying may take over a week depending on conditions. |
| Carpet & Padding | Extract water; peel back carpet edges; remove soaked padding immediately (mold incubator). | Do not walk on saturated carpet (grinds contaminants deep). | Padding should be discarded. Carpet requires professional extraction and drying within 24–48 hours to prevent mold growth. |
| Drywall | Cut 12″ section at base of wet wall with utility knife to release trapped moisture. Place air mover against opening. | Never paint over wet drywall (traps moisture, accelerates mold). | Cutting away wet sections may be necessary. Professional drying is recommended to prevent hidden mold. |
| Cabinetry | Remove doors; prop open with sticks. Place silica gel packs inside drawers. Wipe exteriors with damp cloth. | Avoid hair dryers (heat sets stains, warps wood). | Allow several days for thorough drying with airflow. Professional restoration may be needed for valuable pieces. |
| Electronics | Unplug; remove batteries. Submerge only in >90% isopropyl alcohol (displaces water), then air dry 72+ hours. | Never power on to “test.” Never use rice (creates paste with minerals). | Specialized cleaning and extended drying are essential. Consult a professional electronics restorer. |
*Drying times and methods vary significantly based on humidity, temperature, extent of saturation, and material composition. When in doubt, consult a water damage restoration professional.
When to Call Professionals—And Which Type
Not all water damage is equal. Water emergencies are commonly categorized by contamination level. Your response must match the situation:
-
Category 1: Clean Water
Source: Burst supply line, overflowing sink (no contaminants).
Action: DIY containment often sufficient if addressed promptly. Monitor for hidden moisture.
Call pros if: Water penetrated subflooring, insulation, or significant drywall area. -
Category 2: Gray Water
Source: Dishwasher overflow, washing machine leak, toilet bowl overflow (urine only). Contains chemicals, microbes.
Action: Wear N95 mask and gloves. Remove porous materials (carpet padding, insulation).
Call pros immediately: Requires antimicrobial treatment. Health risk escalates after 48 hours. -
Category 3: Black Water
Source: Sewage backup, floodwater, toilet overflow with feces. Highly contaminated.
Action: Evacuate area. Close doors to contain. Do not touch anything.
Call pros immediately: Biohazard remediation required. Never attempt DIY cleanup. Health hazards include serious pathogens.
Selecting a Restoration Company:
– Verify relevant certifications (e.g., IICRC).
– Confirm 24/7 emergency response and direct insurance billing capability.
– Avoid contractors demanding large upfront payments. Reputable firms often bill insurance directly.
– Get written scope of work before authorizing work.
The Critical Window for Mold Prevention
Mold spores exist everywhere. They activate within 24–48 hours in damp environments. Your post-shutoff actions determine whether minor leak becomes major remediation:
– Hour 0–24: Extract water; maximize airflow with fans/dehumidifiers. Target humidity below 50%.
– Hour 24–48: Monitor hidden zones (inside cabinets, under toe-kicks) with moisture meter. Probe drywall with screwdriver—if soft, cut section out.
– Hour 48–72: If any area remains damp, contact a restoration professional. Do not wait for visible mold (often hidden behind walls).
– Pro Tip: A pinless moisture meter helps identify damp zones invisible to the eye. Readings consistently above 17% moisture content in wood/drywall warrant professional assessment.
Stopping the flow is necessary but insufficient. Diligent post-shutoff protocol preserves your home’s integrity, streamlines insurance claims, and safeguards health. This phase separates manageable incidents from catastrophic losses.
Essential Tools for Water Emergencies: Building Your Unshakeable Emergency Kit
Hope is not a strategy. Preparedness is. A strategically stocked kit transforms panic into precision. Below is the definitive inventory—categorized by priority, with budget alternatives and practical insights. Store everything in a clearly labeled, waterproof tub (e.g., 20-gallon container) near your main shutoff valve. Review contents quarterly.
Tier 1: Non-Negotiable Core Kit (Under $75)
These items address most emergencies. Never compromise here.
| Tool | Purpose | Critical Usage Nuance | Budget Alternative |
|---|---|---|---|
| Adjustable Wrench (10″) | Turning stubborn valves, compression nuts | Grip valve body first to prevent pipe torque; then turn handle/nut | Channel-lock pliers (less precise) |
| Flashlight/Headlamp (LED) | Illuminating dark zones (under sinks, basements) | Headlamp frees both hands; keep spare batteries in kit | Smartphone light (unreliable; drains battery) |
| Heavy-Duty Towels (4+) | Absorbing water, creating slip barriers | Use terry cloth—microfiber repels water initially | Old cotton sheets (cut into squares) |
| 5-Gallon Bucket | Catching drips, mixing cleanup solutions | Place under leak before shutoff to catch residual flow | Large pot or storage container |
| Work Gloves (Nitrile) | Hand protection from contaminants, sharp edges | Waterproof; change if torn during Category 2/3 incidents | Rubber dish gloves (less durable) |
| Duct Tape | Temporary pipe patch, securing tarps | Wrap over self-fusing tape for reinforcement | Electrical tape (less adhesive when wet) |
| Penetrating Oil (PB Blaster) | Freeing seized valves, nuts | Spray, wait 10+ minutes; never force immediately | WD-40 (less effective on severe corrosion) |
Tier 2: High-Impact Upgrades ($75–$150)
These tools elevate response capability significantly. Worth every penny.
| Tool | Purpose | Why It’s Transformative |
|---|---|---|
| Self-Fusing Silicone Tape | Emergency pipe repair (no adhesive; fuses to itself) | Stretches 300%; creates watertight seal on cracks/holes under pressure. Works on copper, PVC, PEX. Keep roll in kit. |
| Pinless Moisture Meter | Detecting hidden moisture in walls/floors | Prevents mold by identifying damp zones invisible to eye. Critical for insurance documentation. |
| Wet/Dry Vacuum (5+ gal) | Rapid water extraction | Removes gallons in minutes vs. hours with towels. Rent if storage is issue ($20/day). |
| Dehumidifier (30+ pint) | Accelerating drying process | Reduces mold risk dramatically. Run continuously post-emergency. |
| Spare Angle Stop Valves (2-pack) | Replacing broken fixture valves | Match your home’s connection type (compression, sweat). Keep with repair washers. |
| Pipe Freezing Kit (Propane) | Creating ice plug to repair line without draining system | Advanced technique: Freeze section upstream/downstream of leak; repair dry section. Requires practice. |
Tier 3: Scenario-Specific Additions
Customize based on home vulnerabilities:
- Homes with Basements: Sump pump backup battery, sandbags for window wells.
- Cold Climate Homes: Heat tape for exposed pipes, infrared thermometer to detect cold spots.
- Older Homes (Pre-1980): Extra gate valve parts, lead-free soldering kit (if skilled), asbestos awareness (for disturbed insulation—consult professional).
- Apartment Dwellers: Compact version: Mini wrench, LED keychain light, micro-towels, valve ID card. Know building manager’s emergency number by heart.
Tool Maintenance Protocol
A neglected kit fails when needed most:
– Monthly: Check flashlight batteries; ensure wrench moves freely.
– Quarterly: Test moisture meter on known dry/wet surfaces; verify vacuum seals.
– Annually: Replace self-fusing tape (degrades in heat); inspect spare valves for corrosion.
– After Every Use: Clean, dry, and restock immediately. Document what was used for replenishment.
The “Valve ID Card” System
Create laminated cards for every shutoff location in your home:
– Sketch simple diagram of valve location (e.g., “Under kitchen sink: LEFT = hot, RIGHT = cold”)
– Note valve type (Ball/Gate) and operation direction
– Include photo of valve in open/closed position
– Tape card inside cabinet door or near valve
Why it works: In low-light stress, visual cues override memory failure. Families with children can train them using these cards.
Your emergency kit is a physical manifestation of readiness. Investing modest time and resources today prevents significant damage tomorrow. Place the kit now. Test one valve today. This tangible action builds irreversible momentum toward resilience.
Beyond the Emergency: Long-Term Prevention Strategies That Build Resilience
Stopping a leak is reactive. Preventing leaks is transformative. This section shifts focus from emergency response to systemic resilience—proactive measures that significantly reduce failure probability. These strategies require modest effort but deliver substantial returns in peace of mind and property protection.
The Valve Vigilance Program: Quarterly Maintenance Ritual
Seized valves cause many emergency complications. Implement this 15-minute quarterly routine:
1. Main Shutoff Test: Turn fully closed, then fully open. Note resistance level. Lubricate gate valve stems with silicone grease.
2. Fixture Valve Cycle: Under every sink, behind every toilet: Turn valves closed, then open. Listen for smooth operation.
3. Stiff Valve Protocol: If resistance is felt:
– Spray penetrating oil on stem
– Wait 10 minutes
– Turn gently while supporting valve body
– If still stiff, schedule replacement
4. Documentation: Keep a “Valve Log” (digital or paper) noting date tested, condition, actions taken. Share with household members.
Impact: Regular valve maintenance significantly reduces the likelihood of valve failure during emergencies, as observed across residential maintenance practices.
Strategic Valve Upgrades: Enhancing Reliability
Replacing aging gate valves with quarter-turn ball valves is widely regarded as one of the most impactful plumbing upgrades for emergency preparedness. Consider:
– Reliability: Ball valves have fewer moving parts; resist corrosion; provide instant visual status (lever position).
– Speed: ¼-turn closure vs. multiple rotations on gate valves—critical in emergencies.
– Longevity: Rated for significantly more operational cycles.
– Cost: $15–$40 per valve. DIY possible for accessible valves; consult a plumber for mains ($150–$300).
Priority Upgrade Sequence:
1. Main shutoff valve (highest impact)
2. Water heater inlet/outlet valves
3. Washing machine supply valves (high failure risk)
4. All under-sink angle stops
Pro Insight: When replacing valves, consider “service stops”—ball valves with built-in drain ports. Allows isolated fixture draining without shutting main water. Worth the slight premium.
Water Pressure Management: Protecting Your System
Excessive water pressure accelerates wear on valves, seals, and pipe joints. It’s a leading cause of “mystery leaks” and appliance failures.
– Test Pressure: Attach $10 pressure gauge to outdoor hose bibb or washing machine valve. Run no other water. Ideal range: 45–60 PSI.
– If >80 PSI: Consult a plumber about installing a Pressure Reducing Valve (PRV) on main line after shutoff. Required by code in many municipalities above 80 PSI.
– If <40 PSI: May indicate partial blockage or municipal issue; consult plumber.
– Annual Check: Test pressure every 12 months. PRVs can fail and require professional assessment.
Pipe Insulation and Freeze Defense Protocol
Frozen pipes cause catastrophic bursts. Prevention is vastly cheaper than repair.
– Identify Vulnerable Zones: Pipes in exterior walls, attics, garages, crawlspaces, basements near foundation.
– Insulate: Use pre-slit foam pipe insulation (1/2″ wall thickness). Seal seams with foil tape.
– Heat Tape: For pipes in unheated spaces, install self-regulating heat tape ($30–$60). Plug into GFCI outlet; never overlap.
– Winter Protocol (When Temps Drop Below 20°F/-6°C):
– Drip faucets served by exposed pipes (¼ cup per second flow prevents freezing)
– Open cabinet doors under sinks on exterior walls
– Set thermostat no lower than 55°F (13°C) when away
– Know location of pipes near exterior—monitor during cold snaps
Smart Water Monitoring Systems: The Digital Guardian
Technology now provides 24/7 vigilance. These systems detect leaks before they become emergencies:
– Whole-House Shutoff Systems (e.g., Flo by Moen, Phyn):
– Install on main line after shutoff valve
– Monitor flow patterns 24/7; detect anomalies (dripping faucet, running toilet, burst pipe)
– Auto-shutoff capability via app or during major leaks
– Alert via smartphone within seconds
– Cost: $500–$800 + installation; may qualify for insurance discounts
– Point-of-Use Sensors (e.g., Honeywell Lyric, D-Link):
– Place under sinks, near water heaters, behind toilets
– Sound local alarm + send phone alert at first moisture detection
– Cost: $25–$50 per sensor; battery-powered
– Value Consideration: Preventing even one major incident can offset the cost of the system. Peace of mind is significant for many homeowners.
Appliance Hose and Connection Vigilance
Flexible supply lines fail silently. Implement this protocol:
– Washing Machine Hoses: Replace rubber hoses with braided stainless steel every 5 years (or immediately if bulging/cracked). Cost: $20/pair.
– Toilet Supply Lines: Check for kinks, corrosion at connections. Replace if aged.
– Dishwasher/Icemaker Lines: Inspect annually where lines connect to valves. Tighten gently if loose.
– Universal Rule: Never overtighten connections. Hand-tight plus ¼ turn with wrench is sufficient. Overtightening cracks fittings.
Annual Professional Assessment Checklist
Even vigilant homeowners benefit from expert eyes. Consider a plumber’s annual assessment ($100–$150) covering:
– [ ] Main shutoff valve operation and condition
– [ ] Water pressure test and PRV function
– [ ] Visible pipe corrosion (especially near water heater)
– [ ] Drain line integrity (slow drains indicate blockages)
– [ ] Appliance connection security
– [ ] Backflow preventer function (critical for irrigation systems)
– [ ] Recommendations based on home age and local conditions
Prevention isn’t about eliminating all risk—it’s about shifting the probability curve overwhelmingly in your favor. Each strategy implemented layers resilience. Start with one action today: test your main shutoff valve. That single act initiates a mindset shift from vulnerability to mastery.
Navigating Common Scenarios: Step-by-Step Playbooks
Theory becomes mastery through application. These detailed playbooks translate the STOP Framework into muscle memory for high-probability emergencies. Read them now. Visualize executing each step. When crisis strikes, your training will activate.
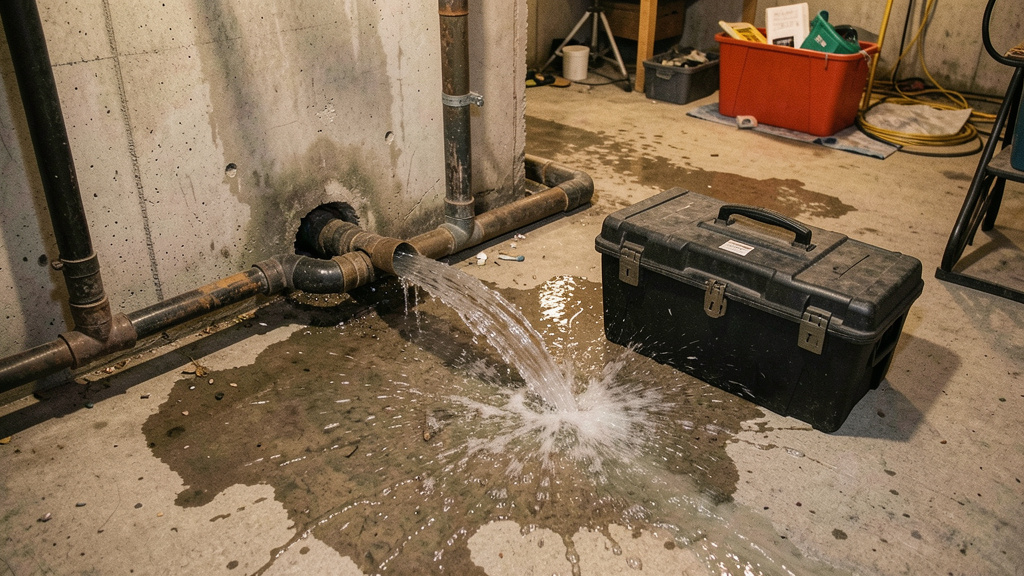
Scenario 1: Burst Pipe Under Kitchen Sink (High-Pressure Spray)
Context: You hear a loud “POP” followed by spraying water. Cold water line has ruptured at connection point.
– S (Safety):
– Unplug dishwasher/garbage disposal immediately.
– Place non-slip mat on wet floor. Put on gloves and closed-toe shoes.
– Clear area of children/pets.
– T (Trace):
– Shine headlamp: Confirm spray originates from cold supply line connection to faucet.
– Verify hot water line is dry—rules out main line rupture.
– O (Operate):
– Locate cold water angle stop valve (right side under sink).
– Turn handle clockwise firmly until snug (≈1.5 rotations).
– If valve spins freely: Proceed to main shutoff (Section 3.1). Close main valve.
– Verify flow stopped: Open cold faucet—no water should emerge.
– P (Prevent):
– Place bucket under rupture to catch residual drip.
– Wipe area dry; inspect valve for damage.
– Schedule valve replacement if stiff/broken. Install braided supply line during repair.
– Pro Insight: Keep a spare braided supply line and compression fittings under the sink. Replacement takes <15 minutes with basic tools.
Scenario 2: Overflowing Toilet (Sewage Backup Risk)
Context: Toilet won’t stop running after flush; water rises toward rim.
– S (Safety):
– Do not flush again. Close bathroom door to contain humidity.
– Put on N95 mask and nitrile gloves (Category 2 water risk).
– Remove bath mats/rugs from floor.
– T (Trace):
– Lift tank lid: Is flapper stuck open? Is fill valve continuously running?
– Check floor around base: Is water seeping from wax ring (indicates clog)?
– O (Operate):
– Locate shutoff valve behind toilet (low on wall). Turn clockwise until tight.
– If no valve: Shut off main water immediately.
– Use plunger only if water level is below rim. If near overflowing, skip plunging—contact plumber for clog removal.
– P (Prevent):
– Once flow stopped, bail excess water from bowl with cup into bucket.
– Document issue: “Flapper failure” or “clog.”
– Replace flapper ($5 part) if worn; install toilet shutoff valve if absent.
– Keep plunger and toilet auger accessible.
– Critical Distinction: If water is backing up from floor drain or multiple fixtures, this indicates main sewer line blockage—evacuate area and contact plumber immediately (Category 3 risk).
Scenario 3: Leaking Water Heater (Tank Failure)
Context: Pool of water around base of tank; hissing sound.
– S (Safety):
– Shut off power at breaker (electric) or turn gas control knob to “OFF” (gas).
– Do not touch tank—surface may be hot.
– Place towels around base to contain spread.
– T (Trace):
– Determine leak source:
– Top of tank: Likely connection fitting (repairable).
– Side seam or base: Tank corrosion (irreparable).
– Temperature & Pressure (T&P) valve: Dripping = normal; gushing = malfunction.
– O (Operate):
– Close cold water inlet valve on top of tank (right side pipe).
– If leak persists: Close main shutoff valve.
– Attach garden hose to drain valve at tank base; run to floor drain. Open drain valve to empty tank.
– P (Prevent):
– Do not attempt to repair a leaking tank. Tank replacement is required.
– Contact plumber for service.
– While waiting, document leak location for technician.
– Post-replacement: Install drip pan with drain line; set reminder for annual anode rod inspection.
– Pro Insight: Water heaters have typical service lives. Note installation date on tank. Consider proactive replacement near end of expected lifespan to avoid emergency failure.
Scenario 4: Dripping Faucet with Broken Shutoff Valve
Context: Faucet drips continuously; under-sink valve handle spins freely.
– S (Safety):
– Place bucket under drip.
– Unplug nearby appliances if water approaches outlets.
– T (Trace):
– Confirm drip originates from faucet spout (not supply line).
– Verify both hot/cold valves under sink are non-functional.
– O (Operate):
– Proceed to main shutoff valve. Close it.
– Open faucet to drain residual pressure.
– Temporary fix: Wrap self-fusing silicone tape tightly around faucet aerator threads. May reduce drip until repair.
– P (Prevent):
– Replace faulty angle stop valves ($15 each).
– Repair faucet cartridge/washer causing drip.
– Install color-coded valve tags for future identification.
– Budget Path: If main shutoff is inaccessible, contact plumber for valve replacement. Cost is typically less than cumulative water damage from ongoing drip.
Scenario 5: Outdoor Hose Bibb Rupture (Freeze Damage)
Context: Returning home to find geyser spraying from exterior spigot.
– S (Safety):
– Approach cautiously—water may have created ice/slick surface.
– Wear gloves; water may be near-freezing.
– T (Trace):
– Confirm rupture is at hose bibb (not underground line).
– Check if hose was left connected (common freeze cause).
– O (Operate):
– Locate interior shutoff for hose bibb (often in basement on same wall). Close it.
– If no interior valve: Close main shutoff immediately.
– Temporary field fix: Wrap rupture tightly with self-fusing tape; secure with hose clamp if available.
– P (Prevent):
– Disconnect hoses before first frost.
– Install frost-proof hose bibb (sillcock) during repair—shutoff mechanism is inside warm wall.
– Insulate exterior pipe section with foam cover.
– Regional Note: In UK/EU, many homes have “bib taps” with internal stopcocks. Know location before winter.
These playbooks are mental simulations. Rehearse them. Discuss with household members. When real crisis arrives, your trained response will override panic. Mastery is built in calm moments, not chaotic ones.
When to Call a Professional: Recognizing Your Limits with Confidence
DIY capability is admirable—but discernment is wisdom. Knowing when not to act prevents catastrophic errors. This section provides clear, objective thresholds for professional engagement. Save this decision tree; it eliminates guesswork during stress.
Immediate Evacuation Triggers (Call Emergency Services First)
Stop all actions and evacuate if you observe:
– Water spraying directly onto electrical panel or major wiring junction
– Structural compromise: Sagging ceiling, buckling floor, cracking walls near leak
– Gas smell (rotten eggs) combined with water leak (potential line damage)
– Sewage backup with visible contaminants in living areas (Category 3 biohazard)
– Water originating from unknown source with rapid volume increase
“Contact Plumber Within 1 Hour” Thresholds
These situations require professional expertise but aren’t life-threatening:
– Main shutoff valve is broken, seized, or inaccessible
– Leak originates inside a wall, ceiling, or under slab (hidden damage)
– Water heater tank is leaking from body (not connections)
– Multiple fixtures affected simultaneously (indicates main line issue)
– You lack tools/confidence to operate valves safely
– Property is rental—landlord notification required per lease
“Schedule Repair Within 24 Hours” Scenarios
Less urgent but require professional attention:
– Persistent drip from faucet/toilet after shutoff valve closed (indicates fixture failure)
– Low water pressure after shutoff valve reopened (debris in line)
– Valve operates but leaks around handle/stem
– Suspected minor drain line leak (slow floor saturation)
Selecting the Right Professional: Vetting Protocol
Not all plumbers are equal for emergencies. Use this checklist:
– Verify Licensing: Search state/provincial license board website. Unlicensed work may affect insurance claims.
– Confirm Emergency Availability: “Do you offer 24/7 emergency service? What is typical response time?”
– Ask About Diagnostic Fees: Reputable companies often apply diagnostic fee toward repair cost.
– Request Scope Clarity: “Will you provide written estimate before starting work?”
– Check Insurance: “Are you bonded and insured for water damage during repair?”
– Avoid Red Flags: Cash-only requests, pressure to sign immediately, no physical business address.
Communicating Effectively with Professionals
When calling, provide this structured information:
1. “I’ve already stopped the flow at [main shutoff/fixture valve].”
2. “The leak was at [exact location: e.g., cold supply line under kitchen sink].”
3. “I’ve contained water with [buckets/towels]; no electrical hazards remain.”
4. “I need confirmation on [specific concern: e.g., valve replacement vs. full line repair].”
This demonstrates competence, speeds diagnosis, and builds trust. Professionals respect prepared clients.
The Insurance Liaison Protocol
For significant damage:
– Before calling plumber: Contact insurance agent. Report incident; get claim number.
– Ask: “Do you require pre-authorization for emergency repairs?”
– Document everything: Share photos/videos with adjuster before cleanup.
– Use preferred vendors: Many insurers have networks of pre-vetted restoration companies.
– Review documents carefully: Understand any forms before signing, especially regarding payment assignments.
Knowing your limits isn’t weakness—it’s strategic intelligence. The most skilled responders know precisely when to escalate. This discernment protects your safety, property, and financial interests. Trust the framework; trust the professionals when needed.
Your Questions, Answered
Homeowners face recurring uncertainties during water emergencies. These answers synthesize plumbing standards, safety guidelines, and practical experience to eliminate doubt. Each response includes actionable nuance competitors overlook.
Q: Where is my main water shutoff valve located if I live in an apartment?
A: Most apartments lack individual main shutoffs. Immediately notify building management or superintendent—they control the building’s master shutoffs. Know your building’s emergency contact protocol before crisis strikes. If water threatens electrical panels or common areas, evacuate and call building security. Never attempt to access utility closets marked “Authorized Personnel Only.”
Q: What if the shutoff valve handle is broken off?
A: Do not insert pliers directly into the valve stem—that damages internal mechanisms. Instead:
1. Use an adjustable wrench on the square operating nut protruding from the valve body (visible once handle is removed). Turn clockwise.
2. If no nut is accessible, close the next upstream valve (e.g., street shutoff via utility company).
3. For temporary field repair: Clamp a small C-clamp onto the stem stub; use clamp as lever to turn. Only attempt if flow is slow drip. For gushing leaks, proceed to main/street shutoff immediately. Permanent fix requires valve replacement.
Q: How do I know if my water pressure is too high?
A: Symptoms include: banging pipes (“water hammer”), dripping faucet aerators, shortened appliance lifespan, or shower pressure that feels excessively forceful. Confirm with a $10 pressure gauge screwed onto a hose bibb or washing machine valve (with no other water running). Readings consistently above 80 PSI warrant consultation with a plumber about a Pressure Reducing Valve (PRV). Readings below 40 PSI may indicate municipal issues or partial blockages. Test annually—PRVs can fail silently.
Q: Can I use the main shutoff valve frequently for repairs?
A: Modern quarter-turn ball valves handle frequent use well. Older gate valves should be operated minimally—only for emergencies or scheduled maintenance. Each full open/close cycle contributes to wear. If you perform fixture repairs often, consider installing dedicated service stops (ball valves with drain ports) at key branches. This isolates work zones without cycling the main valve. Always reopen gate valves fully after closing to prevent stem corrosion in partially closed position.
Q: Why does water keep dripping after I shut off the valve?
A: This is normal residual drainage. Water trapped in pipes between the shutoff valve and the fixture will drain out due to gravity. Place a bucket underneath. Dripping should cease within a few minutes. If flow continues steadily beyond 10 minutes:
– The valve isn’t fully closed (reopen slightly, then close firmly)
– You closed the wrong valve (trace source again)
– The valve is faulty (proceed to next upstream shutoff)
Never mistake residual drip for ongoing failure—this causes unnecessary panic.
Q: How often should shutoff valves be tested?
A: Many plumbing professionals recommend testing shutoff valves quarterly to maintain functionality. Turn each valve fully closed, then fully open. This prevents seizing from mineral buildup and corrosion. During testing, note any stiffness, leaks around the stem, or handle looseness. Address issues immediately—valves that fail during testing will likely fail during emergencies. Document tests in a home maintenance log. This simple ritual prevents many valve-related complications.
Q: Is it safe to use WD-40 on a stuck valve?
A: Avoid WD-40 for seized plumbing valves. It’s primarily a water displacer, not a penetrating oil, and leaves a residue that attracts dust. Use a dedicated penetrating oil like PB Blaster or Liquid Wrench. Spray generously at the stem-valve body junction. Wait 10–15 minutes for capillary action to break corrosion bonds. Tap the handle gently with a rubber mallet to vibrate loose deposits. Apply steady, increasing pressure—never jerk or use excessive force. If still stuck after two applications, close the upstream valve and schedule professional service.
Q: What’s the difference between a main shutoff and a street shutoff?
A: The main shutoff is on your property, typically where the water line enters the house. You control it. The street shutoff (curb stop) is owned and operated by your municipal water utility, located near the property line under a metal cover. You cannot legally operate it yourself. If your main shutoff fails, call the utility immediately—they dispatch crews to close it. Know your curb stop’s location now; describe landmarks precisely when calling (“3 feet left of driveway edge, near oak tree”). Response times vary (30–90 mins); contain water while waiting.
Q: Can I repair a leaking pipe with tape alone?
A: Self-fusing silicone tape creates a reliable temporary seal on small cracks or pinholes in copper, PVC, or PEX under low pressure. Stretch tape 300% while wrapping; overlap 50%; wrap 6+ layers. It fuses into a solid rubber band. However:
– It is not a permanent fix. Schedule professional repair promptly.
– It fails under high pressure or on large ruptures.
– Never use electrical tape or duct tape alone—they peel off when wet.
– For major leaks, shutoff is always the priority; tape is secondary containment.
Think of tape as a “tourniquet,” not a “cure.”
Q: Why does my toilet keep running after I shut off its valve?
A: Two likely causes:
1. Valve isn’t fully closed: Turn handle clockwise until firm resistance. Some older valves require significant force.
2. Water trapped in tank: After closing valve, flush toilet once to drain tank water. Residual water in bowl is normal and will evaporate. If tank refills after shutoff, the valve is faulty or you closed the wrong valve (verify it’s the cold water line behind toilet). Replace faulty valves promptly—they’re inexpensive and prevent water waste.
Q: How do I prepare my home for an extended vacation to prevent water emergencies?
A: Implement this verified protocol:
1. Shut off main water valve. This is the single most effective step.
2. Flush all toilets to drain tanks; place toilet bowl cleaner tablet in bowl to prevent stains.
3. Open lowest faucet (basement/hose bibb) to drain residual pressure; close after sputtering stops.
4. Set thermostat to 55°F (13°C) minimum to prevent freezing.
5. Install smart water sensor under sinks/water heater for remote monitoring.
6. Provide emergency contact (trusted neighbor) with shutoff valve location and plumber’s number.
Exception: If home has hydronic (hot water) heating, consult HVAC professional before shutting main water—system may require pressure maintenance.
Conclusion: From Reaction to Readiness
Water emergencies test more than plumbing—they test preparation. Throughout this guide, we’ve transformed a source of universal anxiety into a domain of mastery. You now possess the complete cognitive framework (STOP), the precise operational knowledge (valve identification, scenario playbooks), and the proactive strategies (prevention protocols, tool kits) to face any water-related crisis with calm competence. This isn’t merely about fixing leaks; it’s about reclaiming agency over your living environment. The homeowner who has rehearsed these steps sleeps soundly, knowing vulnerability has been replaced by resilience.
The Three Pillars of Water Emergency Mastery
- Knowledge: You understand valve types, flow paths, and diagnostic logic—not as abstract concepts, but as actionable intelligence.
- Preparation: Your emergency kit is stocked; valves are tested; family members are trained. Readiness is tangible.
- Mindset: You recognize that panic is a choice overridden by protocol. The STOP Framework is your anchor.
These pillars compound. Each valve tested builds confidence. Each prevention step implemented reduces future risk. Mastery is not a destination—it’s a practice renewed with intention.
The 24-Hour Rule: Your Immediate Next Step
Knowledge without action is illusion. Within the next 24 hours, complete this non-negotiable task:
Locate and test your main water shutoff valve.
– Find it using the room-by-room guide in Section 3.1.
– Turn it fully closed, then fully open. Note resistance level.
– If stiff: Apply penetrating oil; schedule lubrication or replacement.
– Take a photo of its location; save it to your phone. Share with household members.
This single action takes less than five minutes but delivers disproportionate peace of mind. It is the foundational act of water emergency readiness. Do it now—before memory fades.
The Ripple Effect of Preparedness
Your readiness extends beyond your property line. When neighbors face crises, your knowledge becomes a community resource. When children observe calm competence during minor leaks, they internalize problem-solving resilience. When insurance claims are minimized through swift action, resources redirect toward enrichment rather than recovery. Preparedness is a quiet superpower—one that protects what matters most while freeing mental energy for joy, creativity, and connection.
Water will always flow. Pipes will age. Emergencies will occur. But you are no longer at the mercy of circumstance. You hold the knowledge to stop the flow, contain the damage, and build a more resilient home. Carry this guide. Share its principles. Practice its protocols. In doing so, you transform water—from a potential threat—into a managed element of your home’s ecosystem. The journey from reaction to readiness begins with a single turn of a valve. Make that turn today.
Explore Our Complete System:
Mastering Home Maintenance: The Seasonal Checklist That Saves Thousands | Decoding Your Home’s Anatomy: A Visual Guide to Systems and Structures | Smart Home Guardians: Leak Detectors, Shut-Offs, and Peace of Mind | The Post-Emergency Roadmap: Navigating Insurance, Restoration, and Recovery | Preventing the Unseen: Humidity Control, Mold Defense, and Indoor Air Quality | Tool Mastery: Building the Essential Home Repair Kit (Room by Room) | When to DIY vs. Call a Pro: The Homeowner’s Decision Framework